
I remember the frustration of watching potential sales slip away.
Shoppers would add items to their carts on my clients’ online stores, only to vanish without completing their purchases.
It was like seeing money disappear right before my eyes, and I had no idea why it was happening. Tracking cart abandonment statistics felt like a puzzle I couldn’t solve—until I found a better way.
You’ve probably felt this pain if you’re running an online store. Cart abandonment rate is one of the biggest challenges eCommerce businesses face, and figuring out why it happens can seem impossible.
Google Analytics 4 provides a powerful way to track these behaviors. But let’s be honest, setting up and navigating GA4 on your own can be overwhelming.
I’ve been there, toggling between WordPress and GA4, digging through menus, and trying to make sense of all the data. It’s a lot, and it’s easy to feel lost or give up altogether.
That’s where MonsterInsights saves the day.
It simplifies the entire process of tracking cart abandonment rate, giving you clear, actionable insights without the headache. No more guessing or toggling between tools.
Just the data you need, right in your WordPress dashboard.
But as simple as it is to use MonsterInsights to track cart abandonment, I am a firm believer in understanding both the quick and complex WordPress processes.
That is why, in this guide, I’ll walk you through how to track cart abandonment reports, both with and without a plugin.
I want to make sure that you understand how the connection between Google Analytics 4 and MonsterInsights allows you to track your eCommerce metrics.
How to Track Cart Abandonment Reports
As mentioned, I will walk you through how to track cart abandonment with a plugin and without. So, if you want to skip to a method you want to read about, select one of the links below.
With that said, let’s get started!
How to Track Cart Abandonment Statistics with MonsterInsights (With a Plugin)
Let us start with cart abandonment tracking using a plugin. In our case, we will use MonsterInsights, since it is the easiest yet most advanced tracking plugin I have used.
Before I show you how it works, let us first understand what this analytics plugin is.
What is MonsterInsights?


MonsterInsights is a powerful tracking plugin that connects your WordPress site to GA4 and helps simplify all that complex data.
Instead of jumping between screens and scratching your head, MonsterInsights gives you easy-to-read reports right inside your WordPress dashboard.
You’ll still need to set up GA4 (Google Analytics 4) to track abandoned carts, but with MonsterInsights, it’s way easier.
It breaks down data like:
- Page views
- Dwell time
- Returning vs. new visitors
Apart from that, it also tracks more advanced metrics like form submissions, user journey tracking, and cart abandonment rate funnels.
Check out my full MonsterInsights review here.
With that out of the way, let me show you, step by step, how to use MonsterInsights to track your cart abandonment.
Step 1: Install and Activate MonsterInsights Pro
Before you set up MonsterInsights, you need to have a Google Analytics account. Having it ready, you install this analytics plugin, ensuring the setup is quick and easy.
To make it easier, make sure you log in to Google Analytics formerly Universal Analytics, on a different tab, but on the same window as you have your WordPress dashboard.
If you do not have an account, don’t worry, it is super easy. All you need is a free Gmail account.
If you need help, follow this guide on how to set up Google Analytics.
Next, you’ll need the Pro version of MonsterInsights or higher to track cart abandonment or view detailed abandoned cart Google Analytics eCommerce reports.
The free version is great at offering basic analytics for your blog and general site insights. But features like eCommerce tracking, which includes cart abandonment insights, are only available with the Pro plan.
To get MonsterInsights Pro, go to their official website and choose a plan.
Once you’ve completed the purchase, go to your monsterInsights account and select the Download Tab. Here, download the ZIP file to your PC. While here, copy the license key; you will need it later.
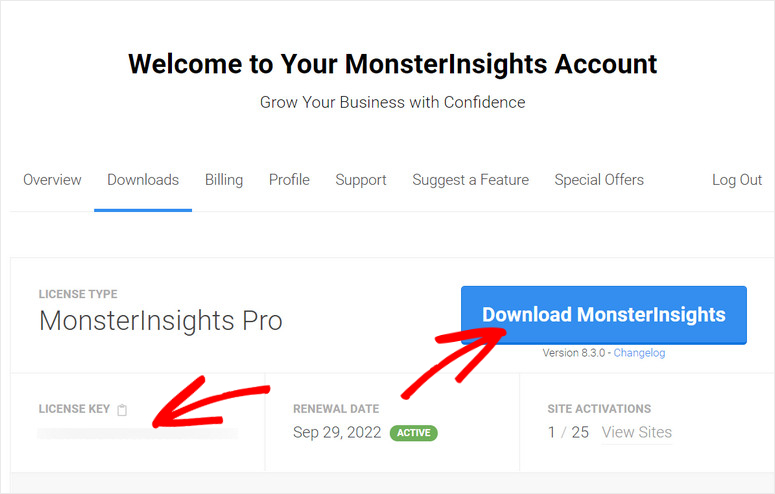

Once done, head over to your WordPress dashboard and go to Plugins » Add New. On this screen, select the Upload Plugin button.
Upload the MonsterInsights Pro plugin file you downloaded earlier, install it, and select Activate.
If you face any issues, follow this guide on how to install a plugin for more information.
After activation, You should see a new menu option in your WordPress dashboard labeled Insights, indicating the installation was a success.
Next, go to Insights Settings and navigate to the General tab. Here, paste the code you copied earlier in the text box provided and hit “Verify.”
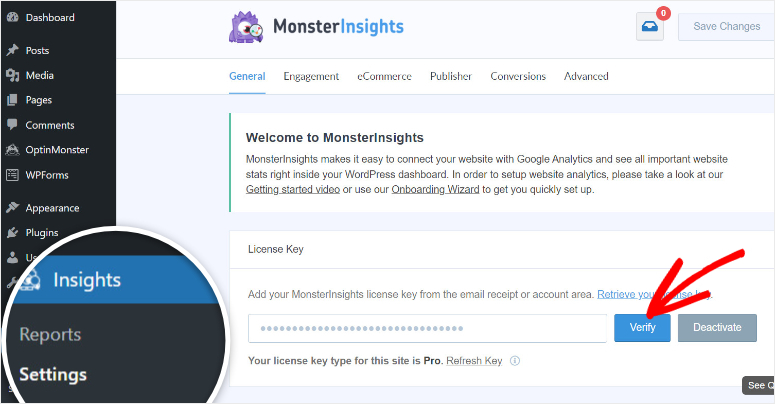

That is it! You are now ready to connect MonsterInsights to your Google Analytics 4 account.
Step 2: Connect Your Website to Google Analytics
To connect GA 4 we will use the MonsterInsights set up wizard which is found on the same page as the verification text bar. That is, Insights » Settings » General.
Once you verify MonsterInsights, scroll down the page and select Launch Setup Wizard to open the first screen of the setup process.


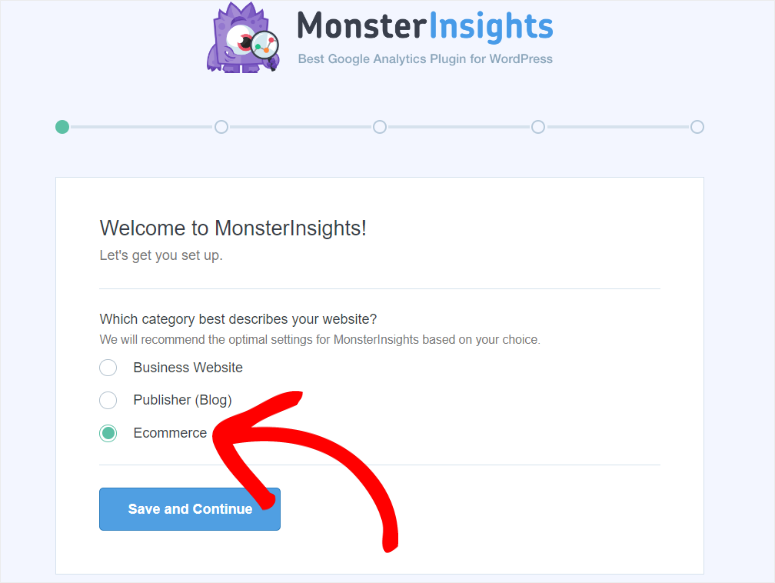
The first screen will ask you to select the type of website you’re running. Use the checkboxes to select between Business Website, Blog, or eCommerce.
Since we are setting up cart abandonment tracking, choose eCommerce to ensure the right settings are applied.
After this, hit Save and Continue to move to the next page of the installation wizard.

Then, on the next screen, you’ll be prompted to sign in with your Google account.
Remember when I mentioned having both your Google Analytics account and WordPress dashboard opened in the same Window? This is where it comes in handy.
So, with that done, hit “Connect MonsterInsights.”
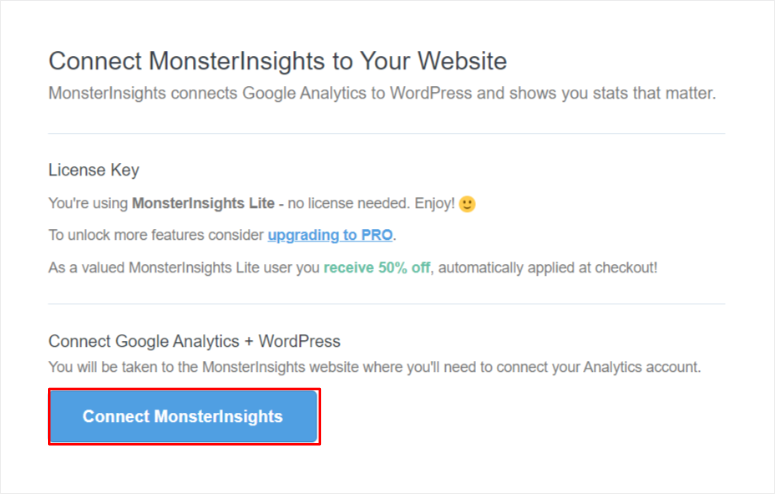

After logging into Google, you’ll see a list of all your Google accounts logged in. Select the Google Account you used to create GA 4.
Then, on the next page, select Allow to grant MonsterInsights access to your Google Analytics account.
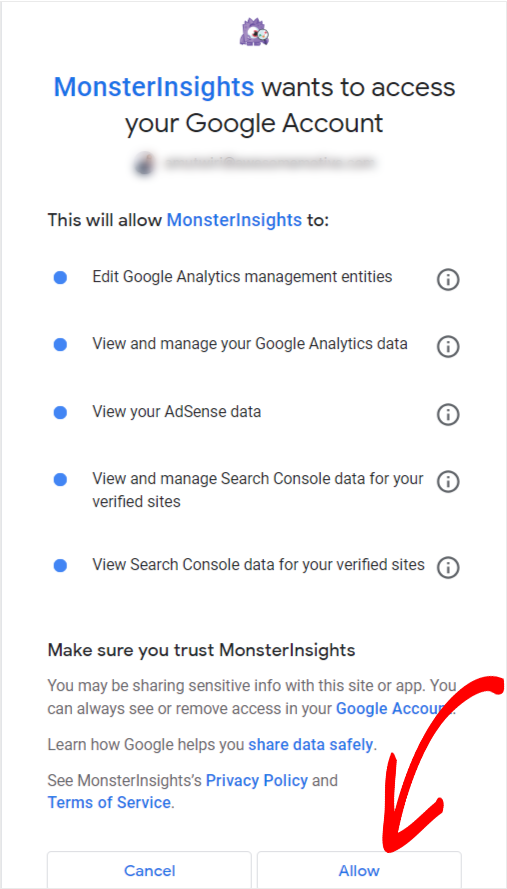

After the connection is successful, you will be redirected back to your WordPress dashboard to continue the setup process with the wizard.
On this page, you will see the recommended settings, like event tracking, file download tracking, and enhanced link attribution. It’s best to leave these on unless you have special requirements.
While on this page, also make sure that eCommerce tracking is on to ensure all the metrics are sent to your WordPress dashboard.
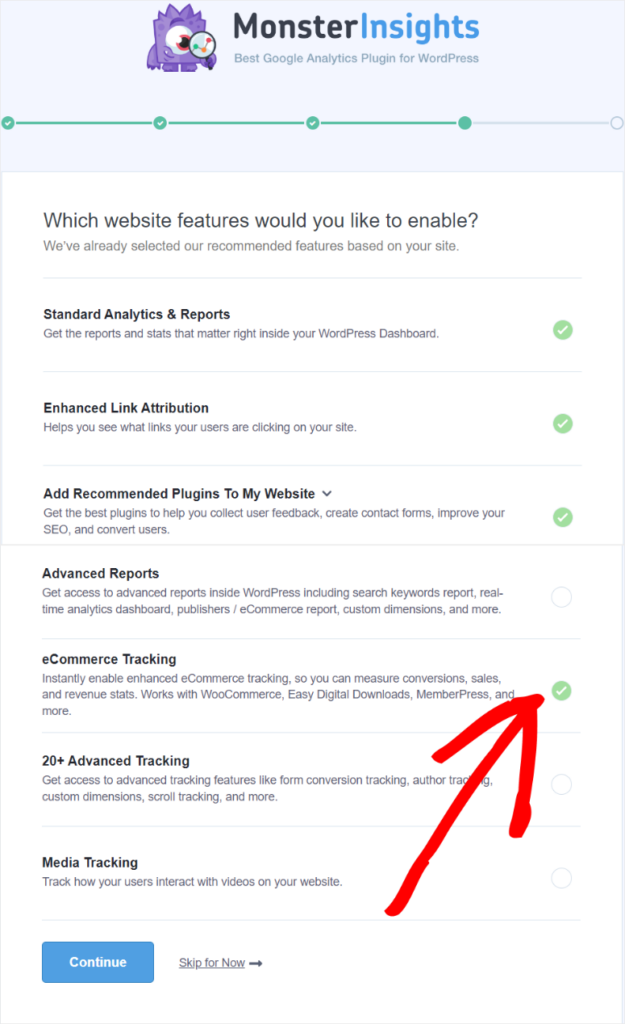

Finally, hit Continue to complete the GA4 connection. It is that simple, no need to touch any code or dig into complex Google Analytics settings!
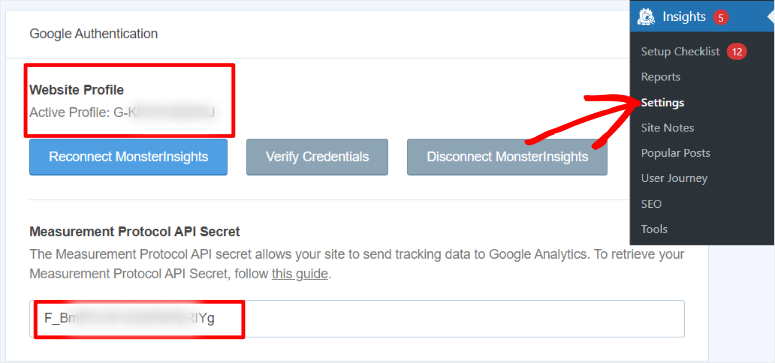
To confirm if you have actually connected Google Analytics to WordPress, head to Insights » Settings and proceed to the General tab.
Find the “Google Authentication” section, where you will see your Google ID and Measurement Protocol API from your Google Analytics account already placed by MonsterInsights.

Now, let us set up eCommerce tracking in MonsterInsights.
Step 3: Install the eCommerce Addon
After connecting your site to GA4, the next important step is to install the eCommerce Addon inside MonsterInsights to help you gather cart abandonment statistics.
This addon unlocks the ability to track specific WooCommerce activities, such as product views, add-to-cart events, checkout steps, and completed purchases.
To set this up, head to your WordPress dashboard and choose Insights » Addons. Then, browse through the available addons until you find the one called “eCommerce.”
Once you locate it, select Install, and once the installation is done, choose “Activate.”


That’s it! Once the addon is activated, MonsterInsights will automatically start tracking your eCommerce data, without any extra setup or code.
Step 4: Monitor Cart Abandonment Rate with MonsterInsights
Now that you have set up to track users who leave their cart without making a purchase, let me show you how to get this data.
First, head to Insights » Reports, where you will see all the metrics from Google Analytics populated in easy-to-read charts and columns.
Once here, select the eCommerce tab to see a chart of how your products are performing.
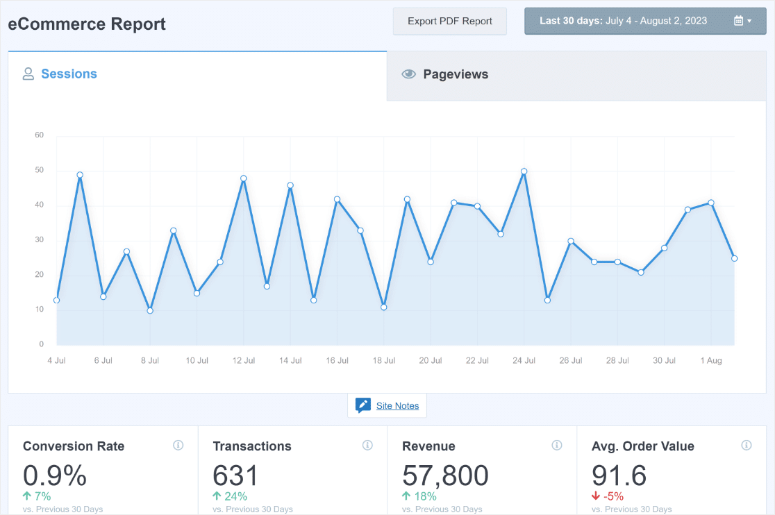

But to view cart abandonment statistics, select the dropdown menu under the eCommerce tab, and hit the “Cart Abandonment” tab.
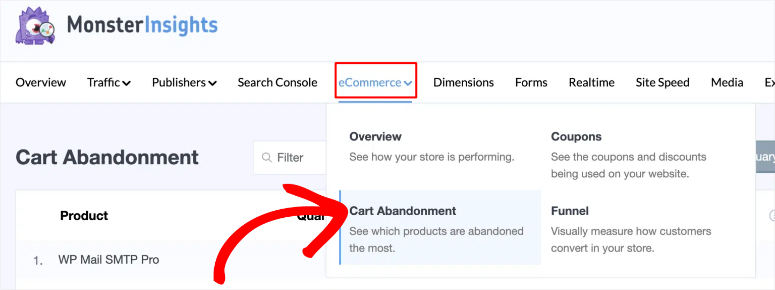

Once done, you should see metrics related to like:
- Product
- Quantity
- Revenue
- Cart Abandonment Rate
- Checkout Abandonment Rate
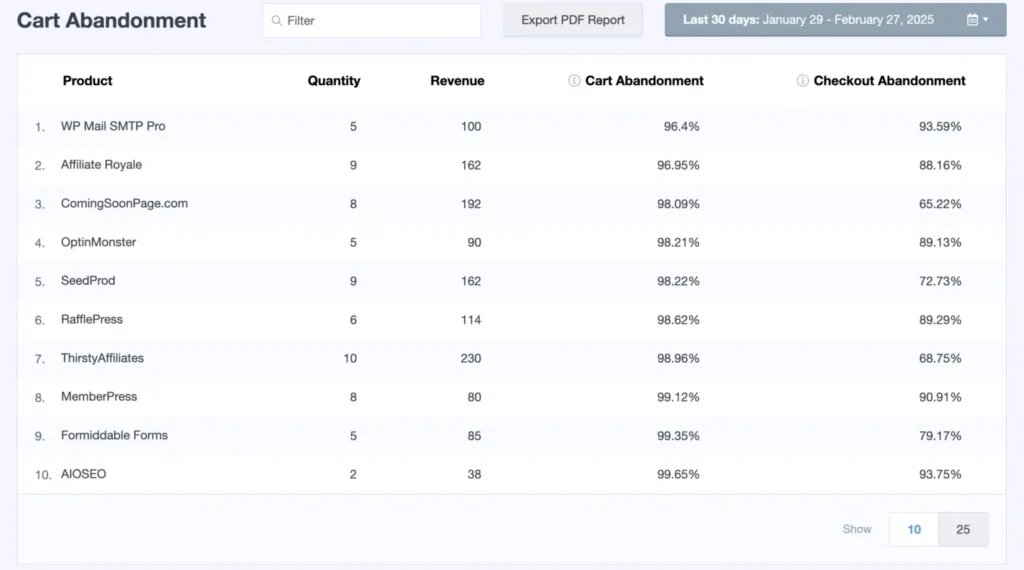

While this detailed report can tell you a lot about how your online store is performing, I like to go a step further and view the eCommerce sales funnels.
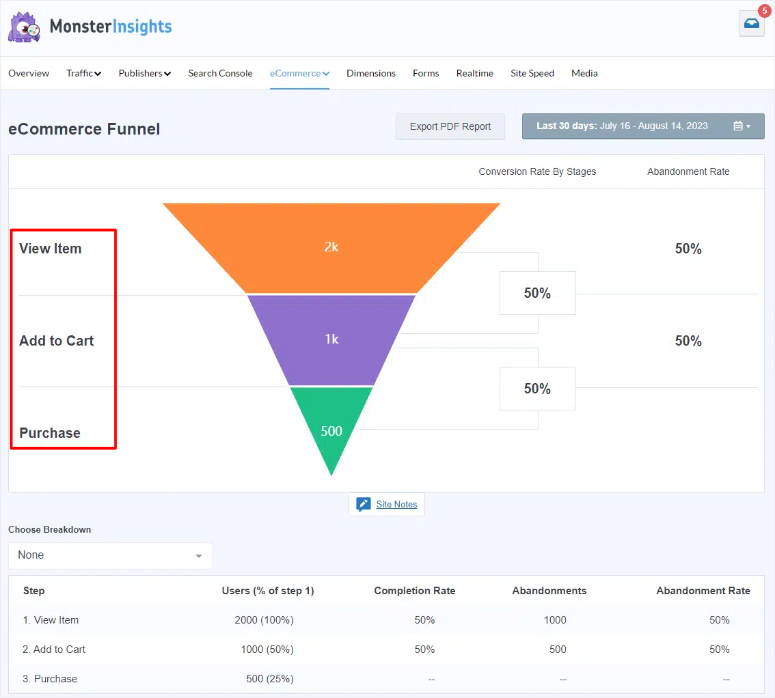
To do this, all you have to do is select the Funnels tab under the “eCommerce” tab.
With these eCommerce funnels, you can visualize how your user viewed an item, added it to cart, and purchased. You also get the rate of abandonment for an even better analysis.

Congratulations! You can now track cart abandonment with MonsterInsights.
As you can see, you can see exactly how customers are interacting with your products, where they are in the sales funnel, and where they might be dropping off.
How to Track Cart Abandonment Without a Plugin
Now that you understand how to track cart abandonment statistics, let us look at setting this up without a plugin.
Enable Enhanced Measurement (Optional)
Even though MonsterInsights handles a lot of the heavy lifting, you can also automatically track common user interactions on your website without needing extra code or Google Tag Manager setup.
This will help you quickly track events like page views, scroll metrics, outbound links, video engagement, and more.
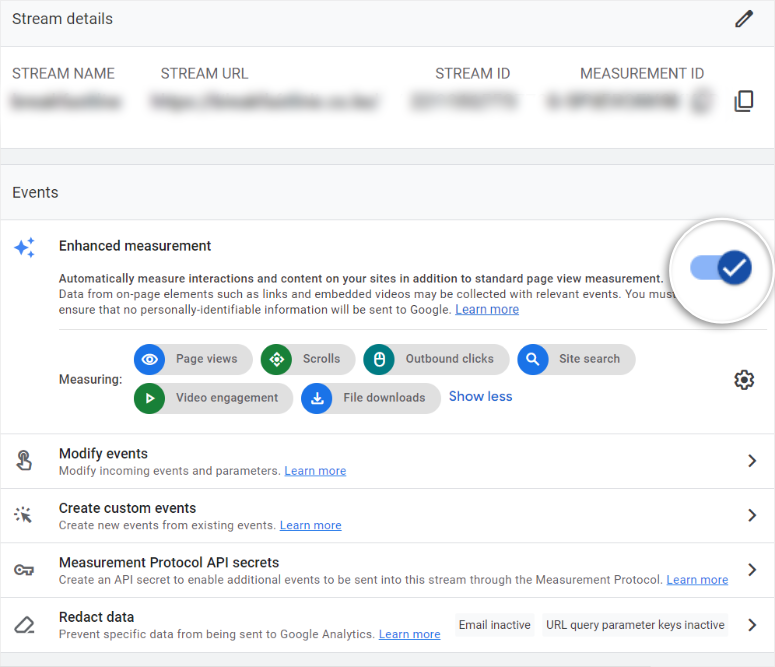

This feature also allows you to automatically track your cart abandon rate from your Google Analytics dashboard.
Check out this full guide on how to set up Enhanced Measurement in Google Analytics 4.
If you are using MonsterInsights, you do not need to have this setting on, as this statistics plugin does everything for you.
Track Cart Abandonment Manually
If you want to track cart abandonment manually inside GA4, here’s a super simple way to do it using the Funnel Exploration feature.
It might sound technical, but don’t worry, I will walk you through it step by step.
First, log in to your GA4 account. Then on the left-hand menu, hit on Explore. On the next screen, you will see funnel templates like Free Form, Funnel Exploration, and Path Exploration.
But in our case, we want to make a custom funnel to track cart abandonment. To do this, we will select the “Blank” template.


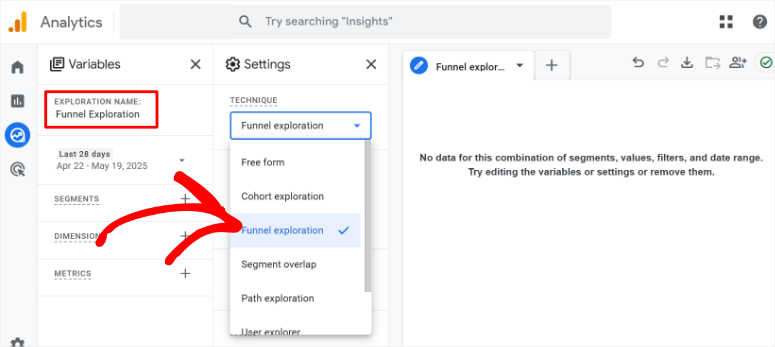
After this, under Exploration Name, give your funnel a name that makes sense to you, something like “Abandoned Cart” works great.
Next, go to the “Settings” tab and go to Technique. Here, pick Funnel Exploration from the dropdown menu.

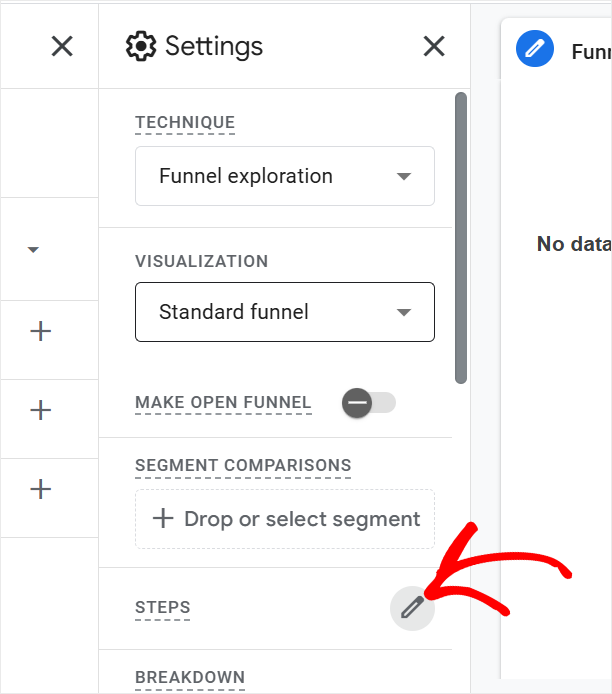
Then, select the pencil icon next to Steps to open the funnel settings. This is the place where you will add the steps for your funnel.

Remember, they need to be logical, mimicking the user journey from when a user lands on your site until they make a purchase.
This allows you to see the drop-off at this stage, and most importantly, understand cart abandonment.
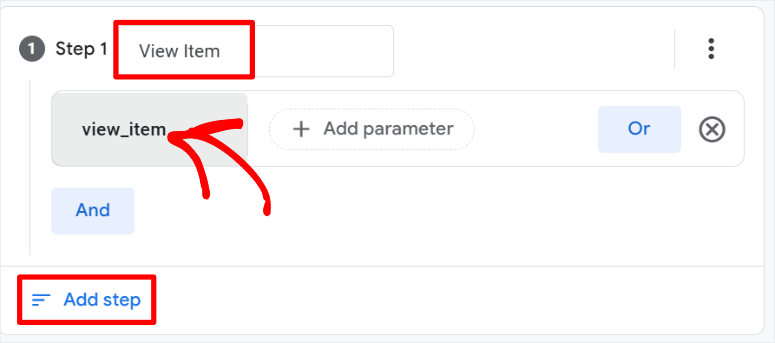
So, with that in mind, name ” Step 1″ something like “View Item.” Then, under the Add new condition dropdown, select “view_item.”
Can’t see it? No worries, you can create a custom event with the name “view_item.” After this, select the Add Step button to move to the next step.

After this, you will repeat Step 1 to add all the steps for your funnel. So in our case, we created:
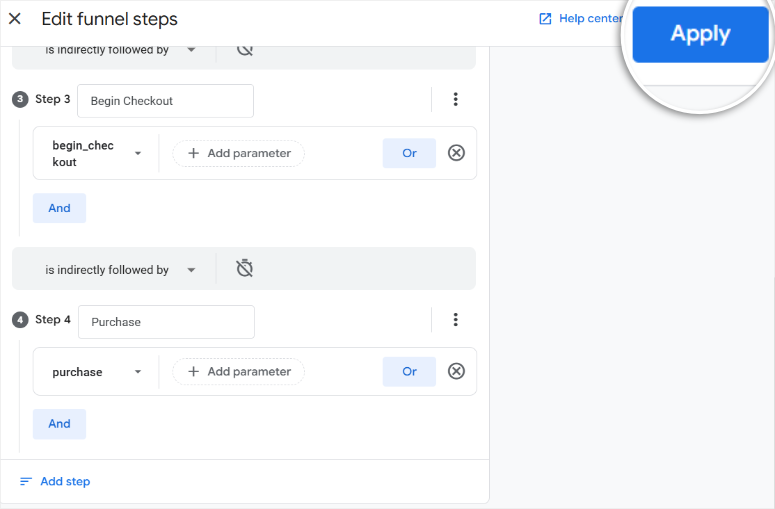
- Step 2: Name it “Add to Cart.” Then, in the Add New Condition dropdown, select or create “add_to_cart.”
- Step 3: Go with “Begin Checkout.”Then, in the Add New Condition dropdown, select or create “begin_checkout.”
- Step 4 should be named “Purchase.”Then, in the Add New Condition dropdown, select or create “purchase.”
In the end, your funnel steps should look like my sample below. All that you have to do now is select Apply.

That’s it! You’ve now created a custom funnel to help you manually track cart abandonment inside GA4.
Analyze Cart Abandonment Data in Google Analytics 4
This funnel will show you exactly where people are dropping off, whether they view a product, add it to their cart, but never make it to checkout or purchase.
It’s a fantastic way to get a clear picture of your abandoned cart stats and spot where you might need to improve your checkout experience.
The funnel visualization in GA4 will clearly show how many users progress through each step, from adding products to the cart, starting the checkout process, and ultimately completing a purchase.
With the funnels, you can track:
- Each funnel step and the number of users in percentage who reached this step.
- The actual number of users who reached each step
- Completion rate
- Abandonment rate
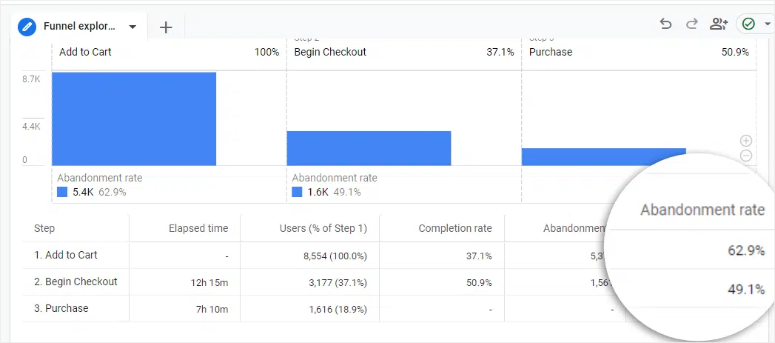

There you have it! You can now set up cart abandonment funnels both manually and using a plugin. The next question is how you use this data.
What to do With the Cart Abandonment Data
Whether you use the manual way to collect information about cart abandonment or a plugin like MonsterInsights, the end goal is actually to understand and use the data.
Here is how:
By regularly analyzing your cart abandonment data, you can spot trends, test improvements, and optimize your sales pages for better conversions.
That comes to an end of my step-by-step tutorial on tracking cart abandonment. If anything is unclear, check out the commonly asked questions below.
FAQs: Track Cart Abandonment Reports
Do I need MonsterInsights Pro to track cart abandonment in WordPress?
Yes, you need MonsterInsights Pro or higher to track cart abandonment. The free version lacks eCommerce tracking features, crucial for monitoring cart abandonment and sales metrics. So, upgrading to Pro or a higher plan provides these insights, helping you effectively enhance your online store’s performance.
Does MonsterInsights work with eCommerce platforms besides WooCommerce?
Absolutely! MonsterInsights supports various WordPress-based eCommerce platforms. It’s optimized for WooCommerce but also works with Easy Digital Downloads, MemberPress, and other compatible plugins. This allows you to track your eCommerce data in a more dynamic way.
What is online shopping cart abandonment?
Online shopping cart abandonment happens when customers add items to their cart but exit the website before purchasing. It’s a frequent eCommerce issue, often due to high shipping costs, a lengthy checkout, or distractions. But you can reduce it by simplifying the purchase process and addressing customer concerns to boost conversions.
How can I track shopping cart abandonment in Google Analytics?
You can automatically track shopping cart abandonment in Google Analytics by enabling Enhanced eCommerce tracking. Use the Checkout Behavior report to see where customers abandon their carts. You can also track shopping cart abandonment manually by setting up funnels. This allows you to monitor drop-off points, then optimize those stages to improve completion rates and revenue.
What is the average cart abandonment rate for eCommerce sites?
According to Baymard Institute, the average cart abandonment rate for eCommerce sites is approximately 70%, though it varies by industry. The general price of an industry’s products primarily determines the cart abandonment rate. For example, most fashion items are priced lower, so the abandonment rate is lower, while electronics, which are often priced higher, have a higher abandonment rate. But regardless of your industry, reducing this rate involves offering clear pricing, fast load times, and better checkout options.
Final Verdict: Should You Track Cart Abandonment Rate?
Tracking shopping cart abandonment with Google Analytics or the MonsterInsights eCommerce addon is a smart strategy to better understand your customers and recover lost sales.
With just a few simple setup steps, you’ll unlock powerful data that reveals exactly where shoppers abandon their carts.
This can help you improve your cart abandonment rate and create strategies to encourage returning customers.
Just remember, data only works if you use it correctly! Make it a habit to regularly check your funnel reports and experiment with small changes that could steadily improve your conversion rates.
Now, check out this article if you want to learn how to make a sales funnel in Google Analytics.
Apart from that, here are other articles you might be interested in reading.
These posts will arm you with a proper understanding of Google Analytics 4 and how to use the data you collect to improve your sales and conversions.
منبع: https://www.isitwp.com/track-cart-abandonment-rates/
