

Are you looking to accept recurring payments to your WordPress Website?
Online recurring payments are a great way to ensure consistent revenue. The reality is that once someone signs up for a subscription, they are more likely to keep it even if they do not use the service that often.
It also makes it less likely that a user will forget to renew the subscription, reducing the churn rate.
In this article, we will show you how to accept online recurring payments in WordPress. We will walk you through the 2 best methods step by step so that you can choose the one most convenient for you.
Reasons to Accept WordPress Recurring Payments
Unlike most business models where predicting revenue can be difficult, with recurring payments, this is not the case. This is because you already know the number of subscribers you have and the subscription plans you offer.
This allows you to quickly calculate how much you can potentially earn, helping you plan better.
As a result, you can not only predict your earnings but also expect consistent revenue over a longer period of time.
That is why many subscription-based companies use their user database to look for investors and evaluate their business value. They leverage these numbers to help get them funding and grow their stock value.
But, one of the biggest advantages of monthly billing is that it automates the payment process. You do not need to send invoices or reminders to your users about upcoming online payments.
This reduces the chances of conflict or disputes between you and your users, ensuring a longer relationship. It also saves you time so that you can focus on your business.
Here are other reasons you should consider recurring payment processing.
- Increased Customer Lifetime Value: A customer provides revenue over a longer period compared to a one-time purchase. This results in a higher overall value from each customer.
- Convenience: Recurring payments save customers the hassle of re-entering payment information for each purchase. This creates a smoother and more enjoyable checkout experience.
- Customer Budgeting: Customers can easily factor the recurring cost into their budget, knowing exactly what to expect each billing cycle.
- Improved Customer Experience: There’s no risk of service interruption due to missed billing. It can also help improve customer satisfaction and reduce friction in the payment process.
- Cash Flow: With a steady stream of revenue, you can manage your cash flow better. This makes it easier to cover operational expenses and invest in growth opportunities.
- Customer Insights: Recurring payments provide valuable data about customer behavior, preferences, and lifetime value. This can be used to tailor marketing strategies and improve product offerings.
Because of these reasons, recurring payments can help you easily create a loyalty program that can help you get more consistent users and manage them more effectively.
Check out this article on how to set up a loyalty program with Woocomerce to learn more.
Best Subscription Management Tools
While there are many ways to add subscriptions to your website, the aim is to make the process simple and convenient for both you and your users. It should be secure and accept different payment gateways.
For these reasons, we will focus on these 2 ways of adding recurring payments to WordPress.
You can select the links above to jump to the section of the method you want to read.
Method 1: Accept Recurring Payments with WPForms
WordPress forms are a must-have for any website. They help with customer communication and lead generation in a simple and straightforward way. You can create different types of forms, such as contact forms, registration forms, testimonial forms, and more.
Since users are so familiar with using online WordPress forms, it only makes sense to also offer recurring payments through them.
Now, there are plenty of form plugins out there that you can start with. Each of these forms software is designed with unique features ideal for their user base. To get started, check out this article on the best form builders for WordPress.
You need a form plugin that is easy to use, has plenty of customization options, and allows you to create different types of forms.
Most importantly, you need a secure form builder that integrates with payment gateways.
That is why we went with WPForms.
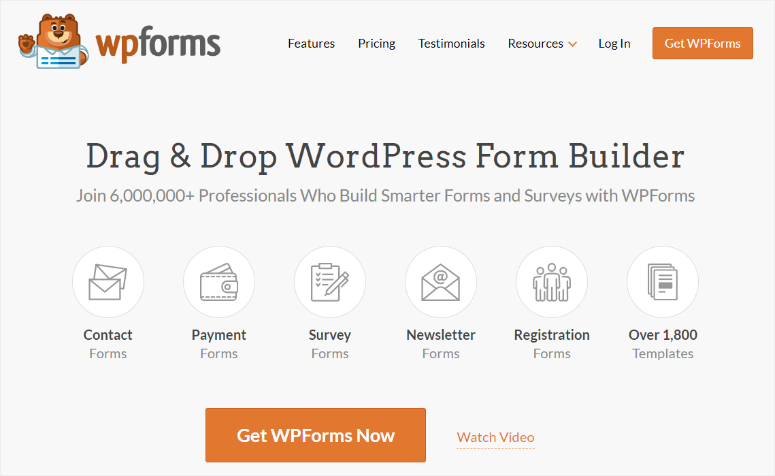

WPForms is the best forms plugin because it offers a drag and drop builder to help you customize your forms to make them truly unique. It also comes with over 1800 templates which can help you with your form-building process, making it great for beginners.
It also comes with security features such as invisible CAPTCHA, spam protection, and more. For example, you can also define roles helping you control who accesses and edits payment forms.
You can also lock the billing form with a password when you send it to a user, ensuring that they are the only once able to access it.
Now, WPForms does not do the recurring payment processing itself.
Instead, it integrates with trusted companies with a track record in security and user satisfaction, such as PayPal, Stripe, and Square.
But you can also connect with many popular email and content marketing systems. This makes WPForms great for eCommerce online stores and small businesses looking for simple payment solutions.
But for recurring payments, WPForms partners with Stripe.
This ensures you can easily set up Stripe subscriptions, and your users can enjoy a great experience. You can also receive payment from credit and debit cards, Apple Pay, Google Pay, and even direct bank transfers. This makes WPForms one of the best recurring payment systems.
If you want to learn more about this form builder, check out the latest WPForms review here.
Now, let us walk you through how to add recurring payments in Stripe and WPForms.
Step 1: Install and Set Up WPForms
It is important to remember that WPForms offers both a free and premium version of the WordPress plugin. WPForms lite allows you to create and manage simple forms in WordPress. But if you want to integrate payments with Stripe, you will need a WPForms Pro plan.
To get started with WPForms Pro, head to the plugin’s official website and purchase a plan.
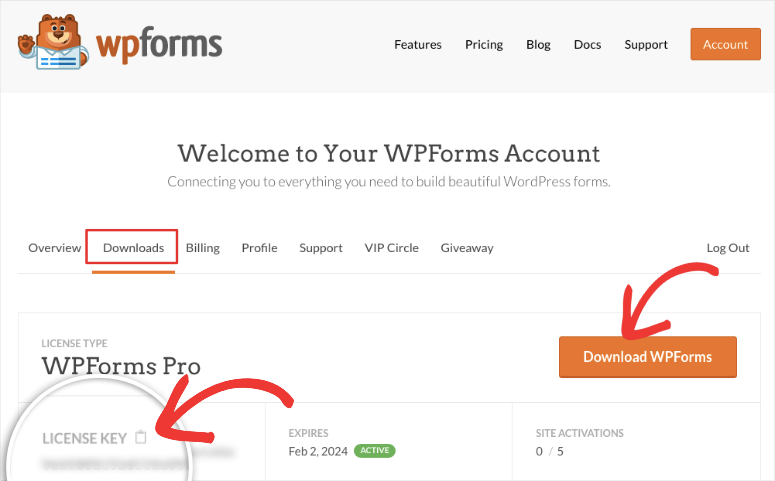
After this, go to Downloads in your WPForms dashboard and download the plugin’s ZIP file to your PC. While on this page, also copy the License Key, you will need it later to activate the pro version.

Next, head to your WordPress dashboard and navigate to Plugins » Add New Plugin. Here, upload the WPForms ZIP file to WordPress, then install it, and activate it as you would any other plugin.
If you experience any issues here, check out this article on how to install a plugin.
After this, you should see the WPForms menu option appear in your WordPress dashboard.
Then, go to WPForms » Settings and then select the “General” tab. Here, paste the activation code you copied earlier into the License Key bar. Complete this process by selecting “Verify Key.”
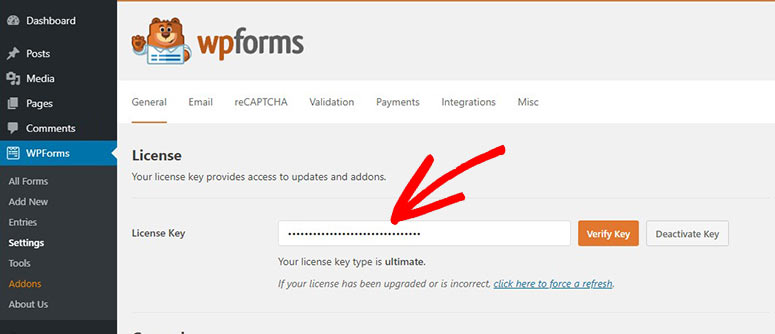

That’s it! WPForms is ready to use.
Step 2: Install Stripe Pro Addon
With WPForms installed and activated, it is time to set up its Stripe addon, which will help you accept Stripe recurring payments.
To do this, go to WPForms » Addons in your WordPress dashboard. On this page, use the search bar to find “Stripe Pro” from the large pool of addons offered by this forms plugin.
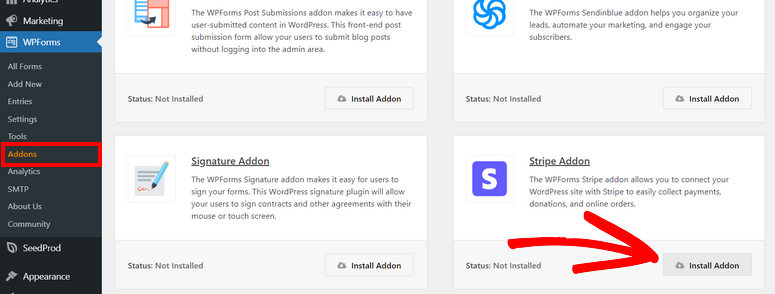

Once you locate it, install and activate it and you should be ready to connect Stripe with WordPress.
Next, navigate to WPForms » Setting and move to the “Payments” tab. After this, scroll down to find the Stripe section on the page and select “Connect with Stripe.”
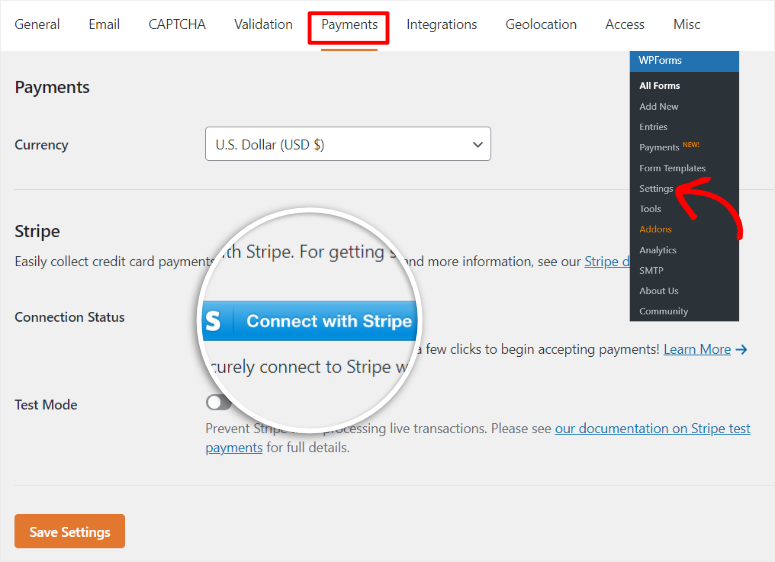

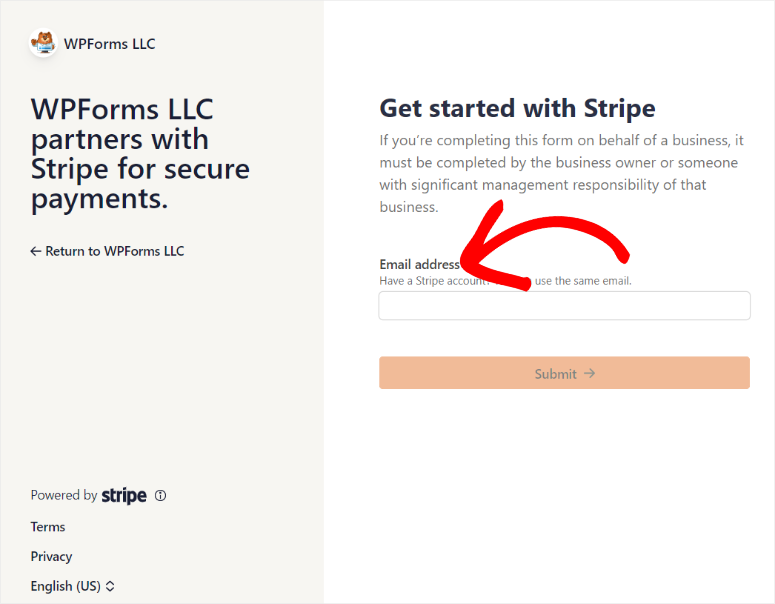
This will redirect you to the Stripe login page, where you can quickly enter your email account to connect it to WPForms. If you do not have an account, don’t worry. WPForms will walk you through the process, and you should be set up in a few minutes.

Once you connect your Stripe account, you will be redirected back to the WPForms payment screen. At this point you should see the connection status color as green to indicate that the integration was successful.


Step 3: Create Payment Form
With both WPForms and the Stripe Pro addon ready, it is time to create an online form so that you can request recurring payments.
To do this, go to WPForms » Add New which will take you to the WPForms form editor. Here you see the +1800 templates displayed so that you can start building with ease.
On the left, the templates are grouped into different categories according to their uses. You can also use the search bar to find exactly what you are looking for. Plus, you can choose to create the form from scratch if you have experience in designing.
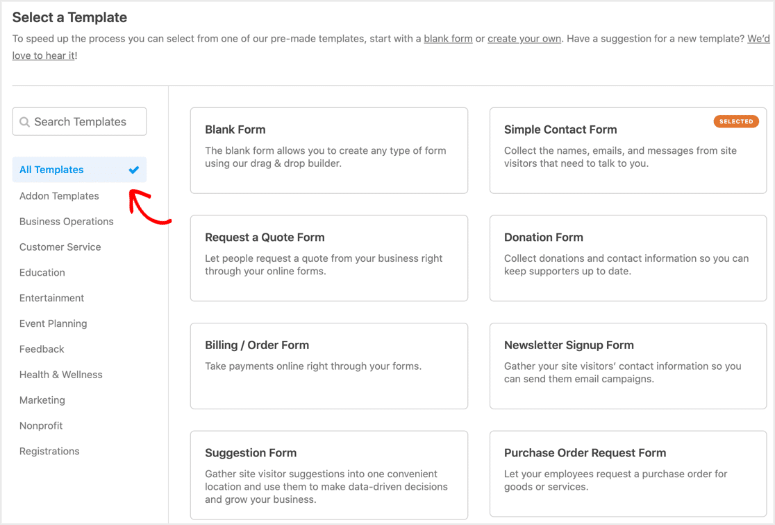

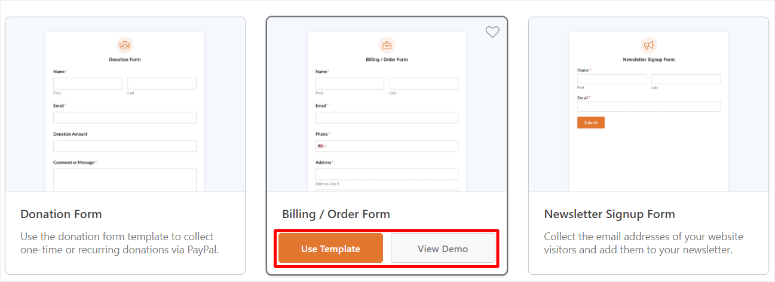
If you want to see if a template is right for you, select “View Demo” to see how it will appear live on your site.
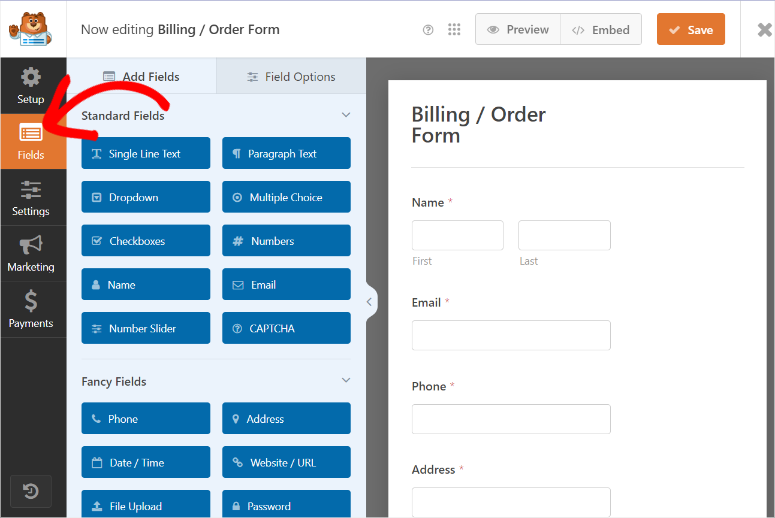
For this guide, we will use the Billing/Order Form template. Select “Use Template” to open the drag and drop form builder page to get started.

On this page, you will see all form elements and fields on the left and a preview window on the right where you can drag and drop these elements to the position you want.
But, since we are using the Billing/ Order Form template, most of the form elements and fields are already set. Select the “Fields” tab, where you can edit, remove, and entirely add new fields and elements to the form.

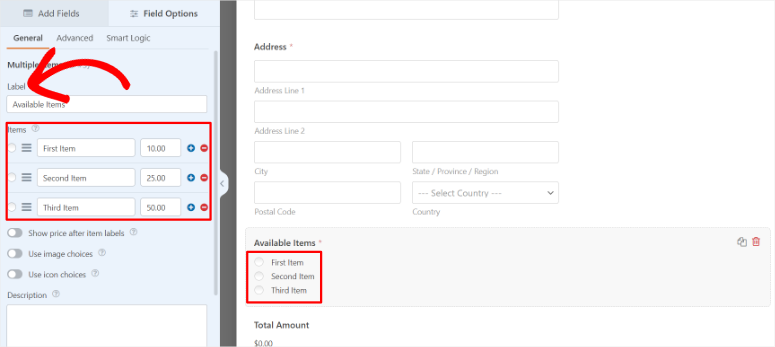
You will also need to customize the placeholder content, such as the “Available Items” section, to relate to your business. While you are here, also set up pricing and add or remove the available items to match your services or products.

When you are happy with your payment form, it is time to add the Stripe credit card payment field.
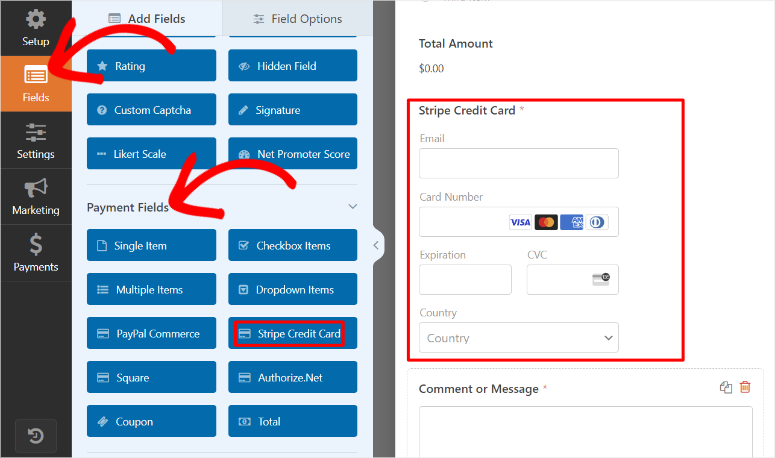
To do this, select “Add Fields” on the left of the screen, then scroll and locate Payment Fields.
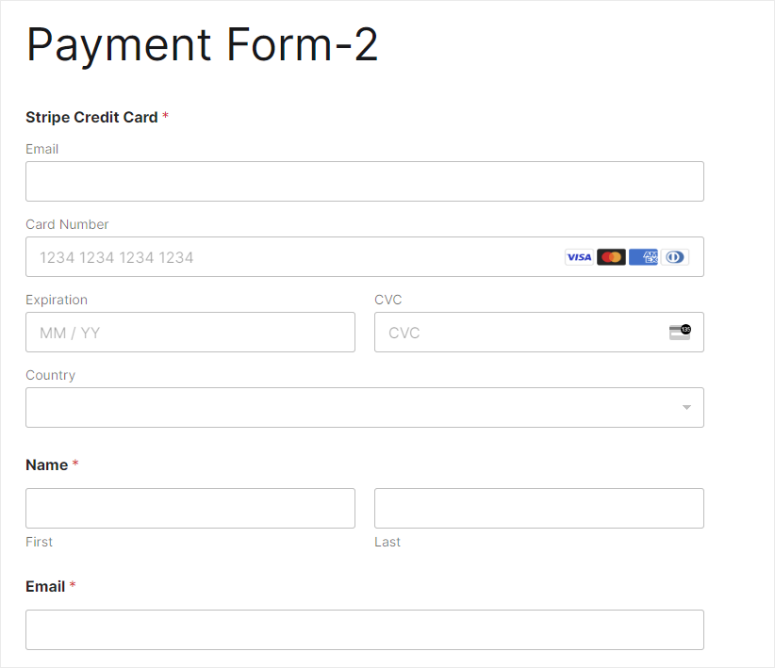
Under this section, find the “Stripe Credit Card” field, then drag and drop it to the location of the payment form you want it to appear. The Stripe Credit Card field already contains email, card details, and country sections for your users to fill out conveniently on your payment form, making it more convenient for you.

Step 4: Set Up Stripe Recurring Payments
To do this, move to the “Payment” tab to access all of the WPforms’ payment gateways. You will see Stripe at the very top of this list as the recommended option.
Once you select Stripe, you will need to activate either Enable One-Time Payments or Enable Recurring Subscription Payments with toggle buttons.
Remember you can only switch one type of payment option.
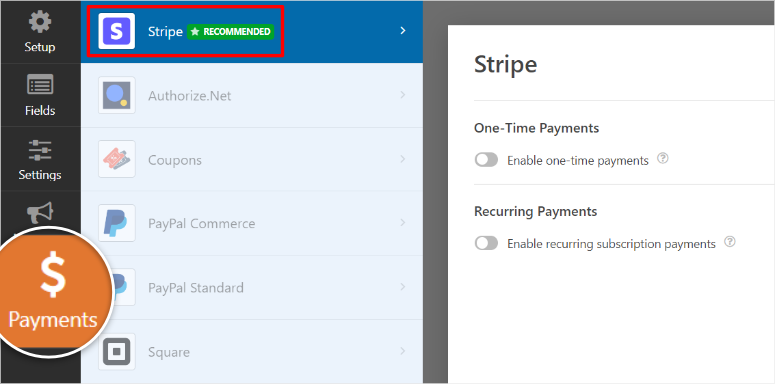

Select Enable Recurring Subscription Payments to create a recurring payment plan. This will also open more customization options for you to select.
From the new options available, first type in the Plan Name. Then, using dropdown options, set the Recurring Period, Customer Name, and Customer Address.
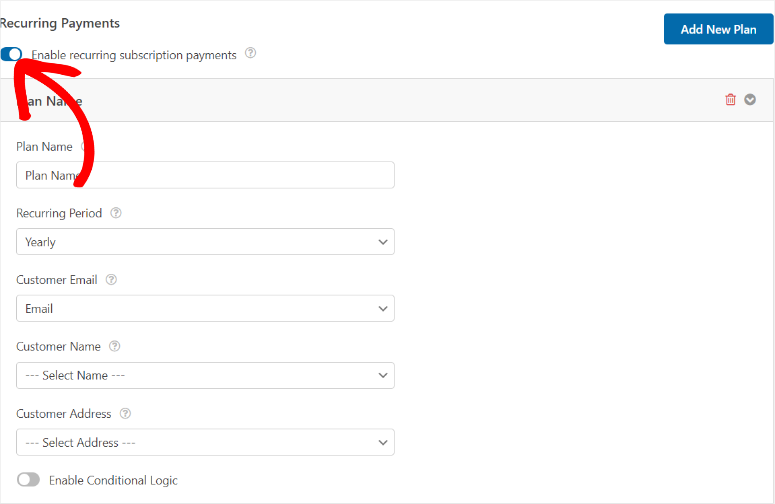

And just like that, you can now accept recurring payments with Stripe and WPForms straight on your WordPress website.
But we also want to customize the payment form to be more user-friendly.
To do this, head to the Settings tab next. Here, you can edit the Form Name from Billing/Order Form to something your users can relate to.
Then, below this, in the “Form Description,” you can offer instructions or describe what the form is all about. After this, you can also customize Tags, Submit Button Text, and Submit Button Processing Text.
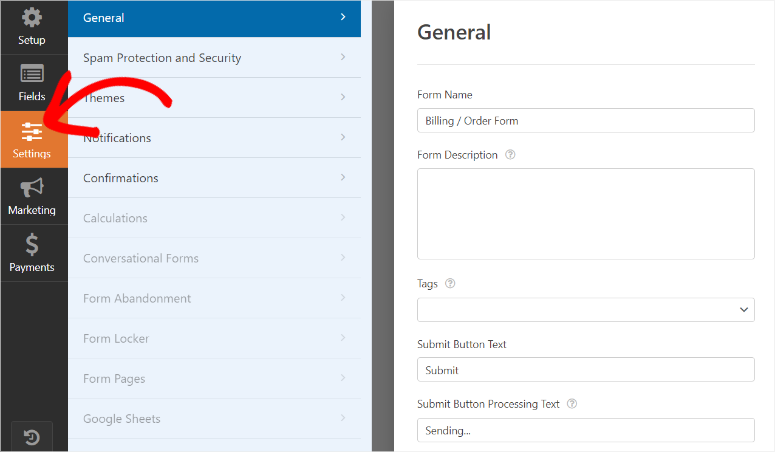

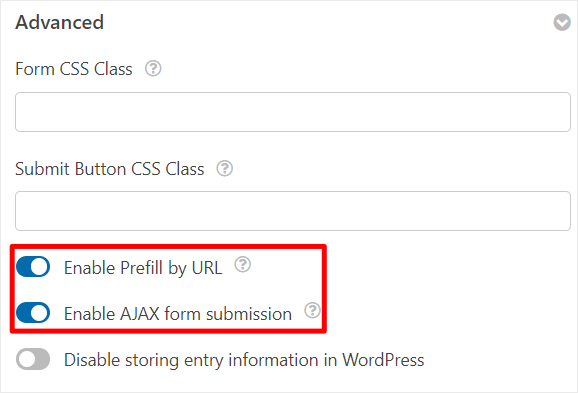
Next, scroll down to the Advanced section, where you can use the toggle button to first Enable Prefill by URL. This option ensures that WPForms prefills the user information it already has automatically, reducing the need for them to repeatedly fill it in.
Below this, also activate “Enable AJAX form submission.” This allows your forms to be submitted without requiring a page reload, which is especially useful for embedding forms on popup windows.

Step 5 (Optional): Add One-time and Recurring payment options
On top of this, we can also give your users the freedom to send one-time payments as well as recurring payments.
To be clear, this is optional, but it can diversify your users so that even people who just want to try out your product for a month can access it.
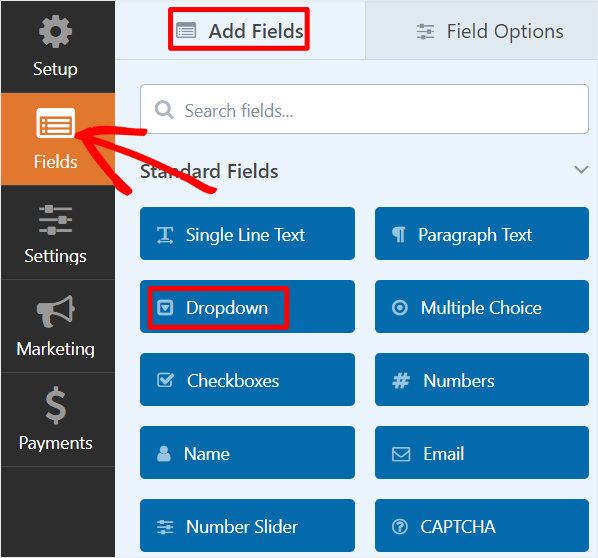
To get started, go to the Fields tab, then look for the “DropDown” field under “Add Fields,” and drag and drop it where you want it on the form.

Next, select the dropdown field you have just added to open its customization options. We will edit both the question and the dropdown options so that they relate to recurring and one-time payments.
In the Label box, type in a question like:
- “Would you like to make this to be a monthly subscription?”
After this, make sure the dropdown choices are only two. Then, in the 2 choices left, type in something like:
- “Yes, I want to subscribe to a monthly plan.”
- “No, I would like this to be a one-time payment.”


With that done, go to the “Payment” tab and then navigate to the Recurring Payments options under Stripe. Here, scroll to the bottom and activate “Enable Conditional logic” with the toggle option to expand more options.
Now, first set “Process” payment as recurring if in the first line using the dropdown options.
Then, from the dropdown below it, select “Would you like to make this to be a monthly subscription?” In the next dropdown, select “Is,” and finally, “Yes, I want to subscribe to a monthly plan.” in the last dropdown.
So the rule would read:
“Process payment as recurring if would you like to make this a monthly subscription is yes, I want to subscribe to a monthly plan.”


Now only users who choose to have a subscription will be charged monthly. Hit on Save at the top of the form builder page once you are done.
Congratulations! You have just created a recurring payment form with conditional logic using WPForms.
Step 6: Publish Payment Form
When your form is ready, there are several ways you can add it to your site with WPForms. You can quickly select the method that is most convenient for you.
First, we will create a new page for the form.
To do this, select “Embed” from the top right corner of the form-building page and hit “Create New Page”
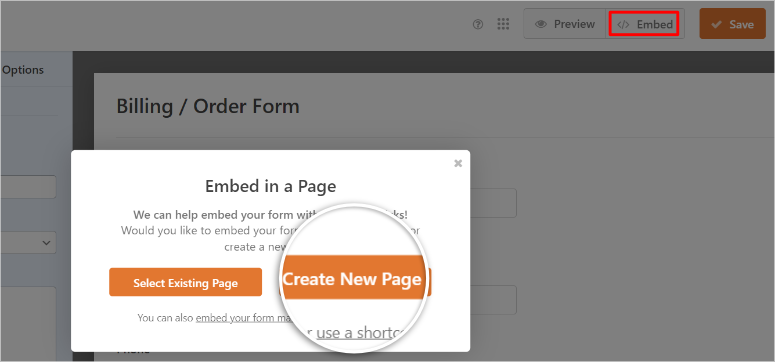

You will be required to name the form on the next popup, which will be the form’s heading and will also act as the URL slug for your payment form.
Finally, select “Let’s Go” to be redirected to a new page with the form already inserted.
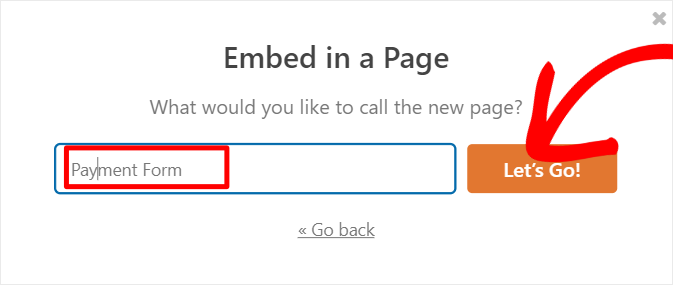

All you have to do is hit Publish for the form to go live.
Next, we can add the form to an existing page.
On the form building page, select “Embed,” but this time, choose “Select Existing Page.”
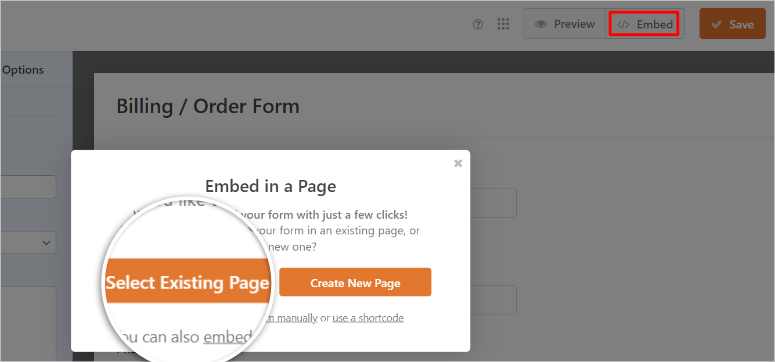

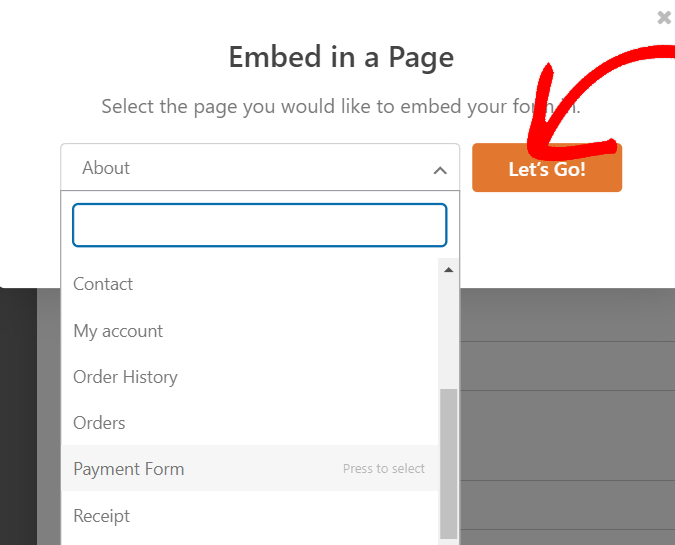
A drop-down menu with all the pages on your site will appear next. Select the page you want to add the payment form to and hit “Let’s Go.”
After this, you will be redirected to the page’s block editor.

Next, hit the Plus (+) sign on the block editor and use the search bar to find the WPForms block.
Then, drag and drop it where you want the form to appear on the page. From the dropdown menu, you see on the block, select the form you created from the list.
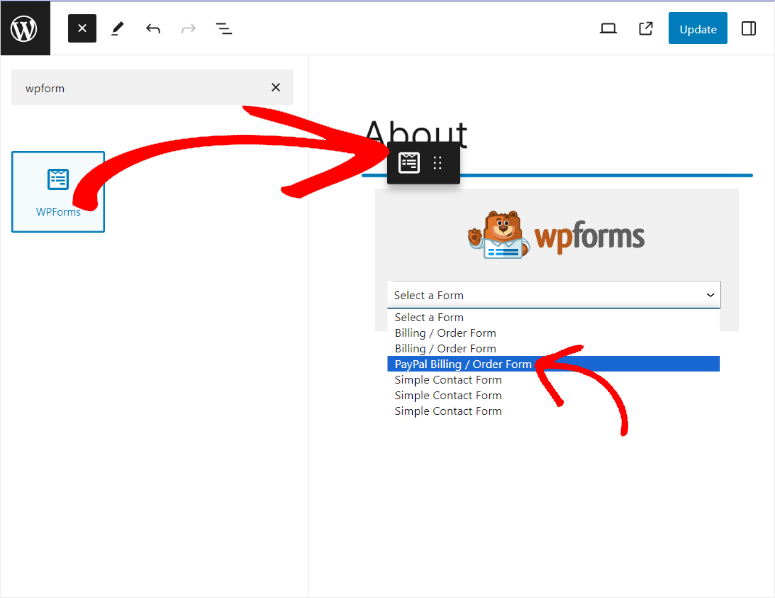

Once the form appears, select Update to make it live.
You can also add the form using a shortcode.
To do this, go to WPForms » All Forms in your WordPress dashboard, where you will see all your forms in one go. Then, next to your payment form, copy its shortcode.
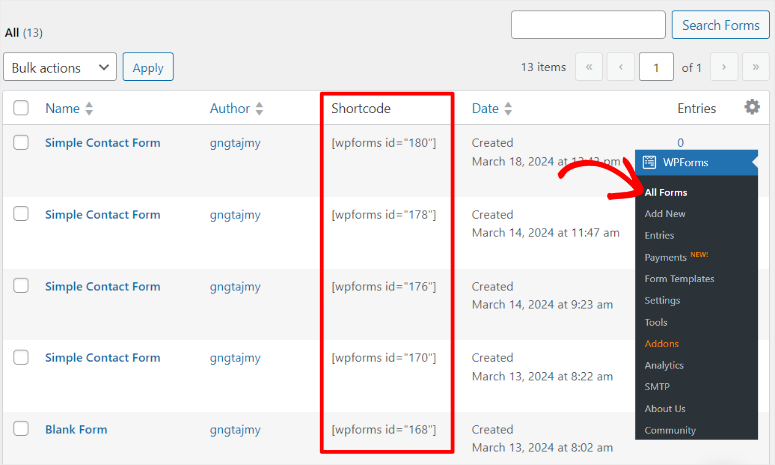

After this, open the block editor for an existing one, just as you did when using the WPforms block. On the page, use the search bar to find the “Shortcode Block.”
Next, drag and drop the shortcode block where you would like the payment form to appear. Once you paste the payment form shortcode, it should appear in that location.
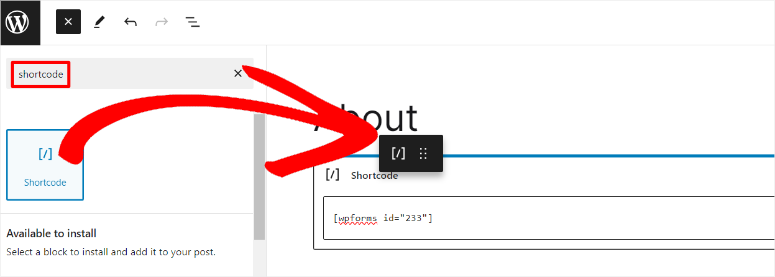

Hit Publish, and you are done!

Method 2: Accept Recurring Payments with WP Simple Pay
Another approach you can take to add recurring payments is using a dedicated billing plugin. These payment plugins offer advanced features geared towards payment collection, like Stripe billing.
Plus, you will not need to use a plugin addon to access the recurring payments option, reducing the chances of your site bulking up. You can easily include options like tax fees, purchase restrictions, and more.
On top of such features, you should also focus on easy-to-use and highly customizable plugins. To get you started, here is an article on the 9 Best WordPress Payment Plugins.
That is why we went with WP Simple Pay.
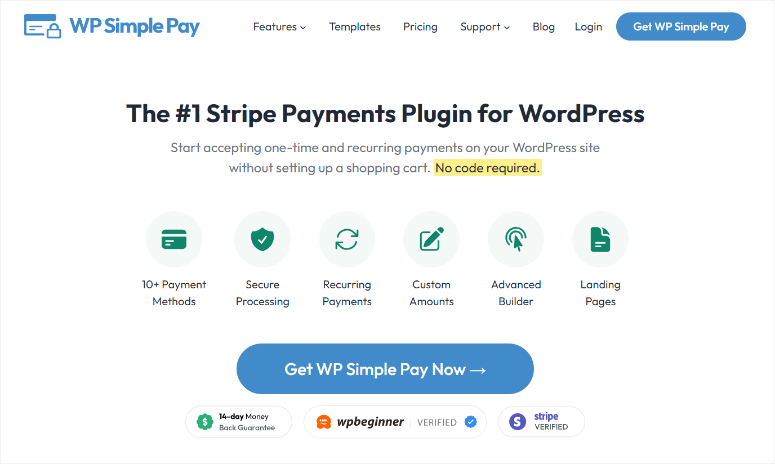

WP Simple Pay is the best Stripe payment plugin. It allows you to receive payments directly on your WordPress site without coding. What really stands out about WP Simple Pay is that you can customize your payment process however you like.
To start with, it comes with 10+ payment methods, ensuring you give your users the freedom they want. It also allows you to offer free trials, giving your users a chance to test out your product first. On top of this, you can easily set up discount codes to encourage your users to make a purchase, making it ideal for membership sites.
You can even set up buy now pay later options. With the installment plans feature, you can create billing intervals of daily, weekly, monthly, or yearly payments. If you have a global user base, WP Simple Pay allows them to pay taxes based on their location. This makes WP Simple Pay the best recurring payment system.
Now, this Stripe Plugin comes with several well-designed prebuilt form templates that you can customize to make them unique to your site with an advanced drag and drop form builder. You can then place your customized payment forms on dedicated pages, which you can also create and personalize with the recurring payment software.
Most importantly, this payment processor makes it incredibly easy to set up recurring payments in Stripe.
Let us show you how.
Step 1: Install and Set Up WP Simple Pay
Like WPForms, WP Simple Pay also has a free and premium version of the plugin. But for recurring payments, you will need a WP Simple Pay Plus plan or higher.
To get started, go to the plugin’s official website and purchase a plan. Once you do this, head to your WP Simple Pay dashboard and locate the Download tab.
Here, download the plugin’s ZIP file to your PC. You should also copy your License Key from the same page, as you will need it later to activate the pro version of the plugin.
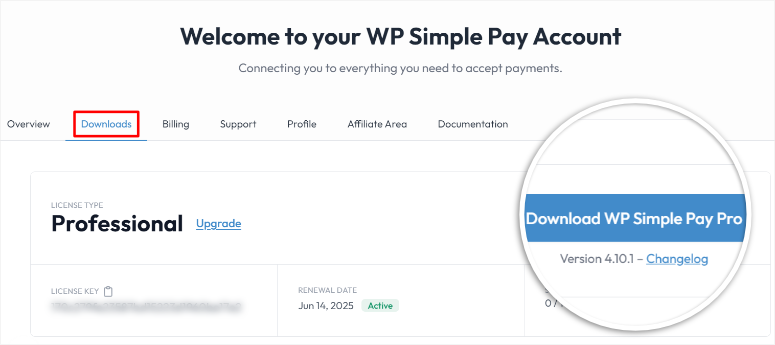

Next, head back to your WordPress dashboard and navigate to Plugins » Add New Plugin. Then, Upload, install, and activate the plugin as you would any other plugin.
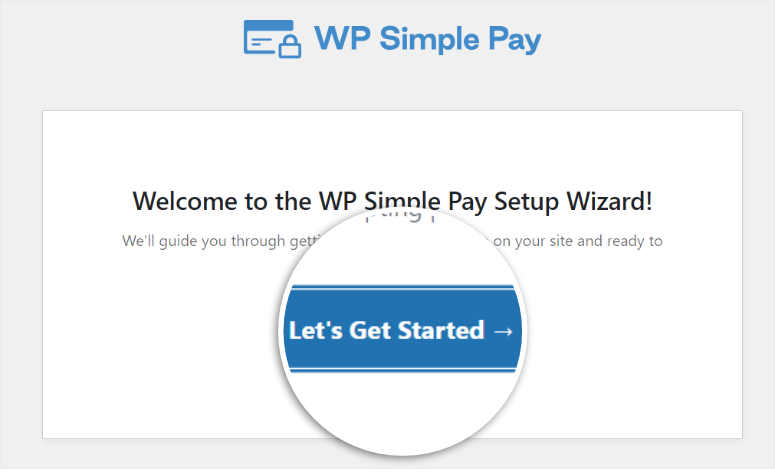
After activating the plugin, you will be redirected to the first page of the setup screen, where you can begin the process by selecting “Let’s Get Started.”

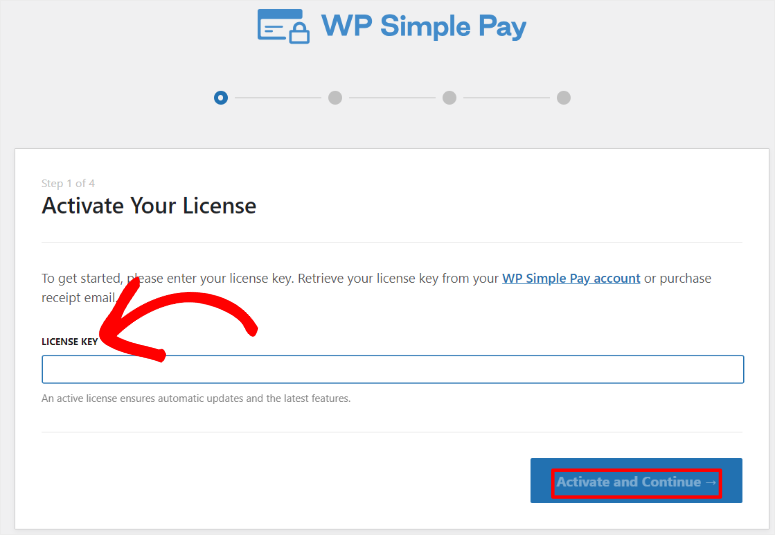
On the next page, insert the License Key you copied earlier in the field provided. To proceed, select “Activate and Continue.”

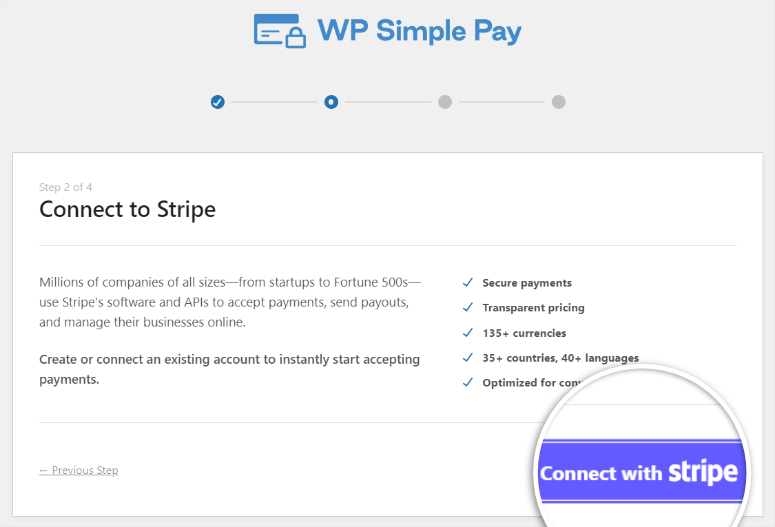
Then on the next screen, hit “Connect with Stripe” to be redirected to the Stripe login page.

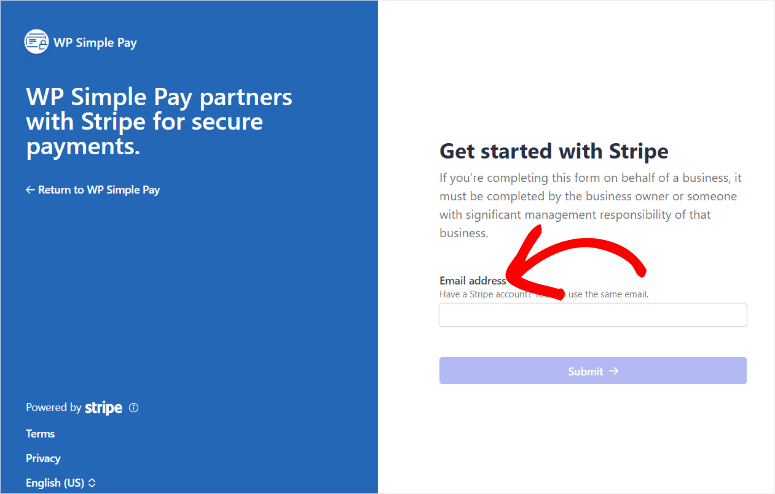
Here, type in the email address you sign up with Stripe and your password to continue. If you do not have a Stripe account, WP Simple Pay will allow you to create one on this page.

Once you successfully connect Stripe to WP Simple Pay, you will be redirected back to the set up wizard in your WordPress dashboard. On this screen, configure emails by using the toggle buttons and select “Save and Continue” when you are done.
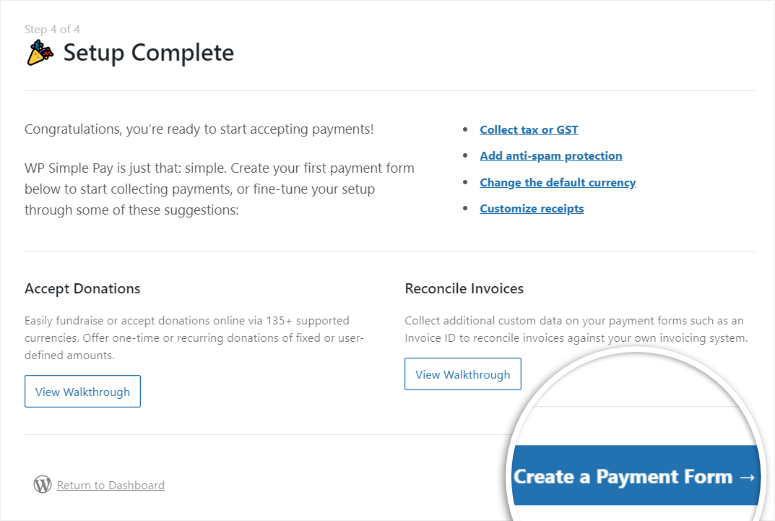
On the last page of the setup window, select Create a Payment Form to get started with WP Simple Pay.

Step 2: Create a Payment Form
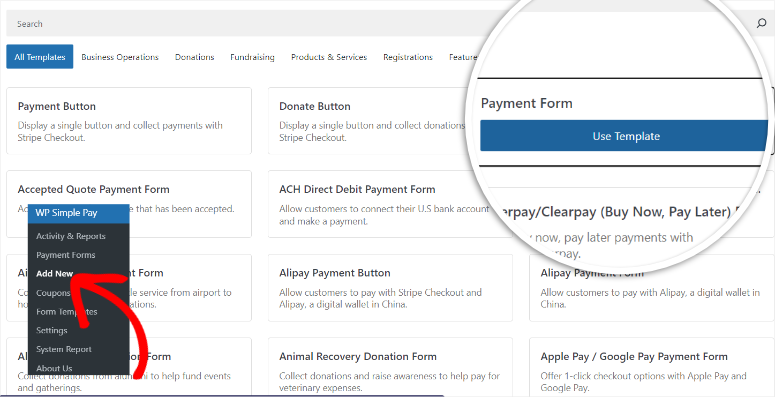
Now, if you selected Create a Payment Form on the last page of the setup wizard you should be redirected to payment form builder. But you can also arrive at this page by navigating to WP Simple Pay » Add New in your WordPress dashboard.
On this page, you will see the numerous WP Simple Pay templates that you can start building with. You can also decide to start the building process from scratch.
But for this tutorial, we will select Payment Form.

Next, in the drag and drop form builder, go to the General tab. Here, first, edit the Title and Description of the form to relate to your audience and branding. Then, using the Type drop-down menu, select “Onsite Payment Form.”
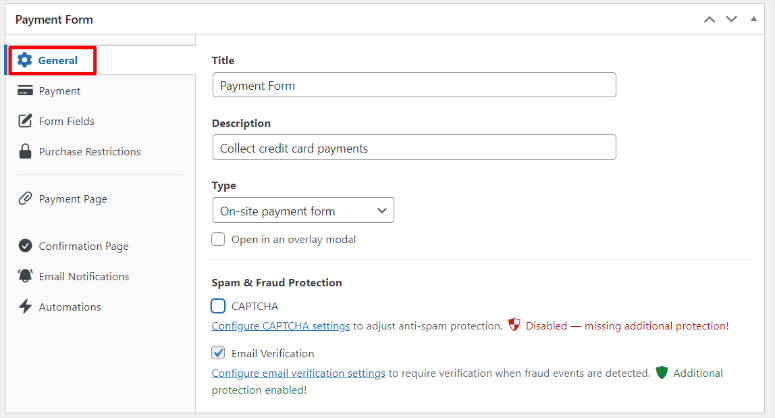

Then, move to the Payment tab to customize the pricing options. With WP Simple Pay, there are 2 ways you can enable recurring options.
Method 1: Use a Subscription Plan
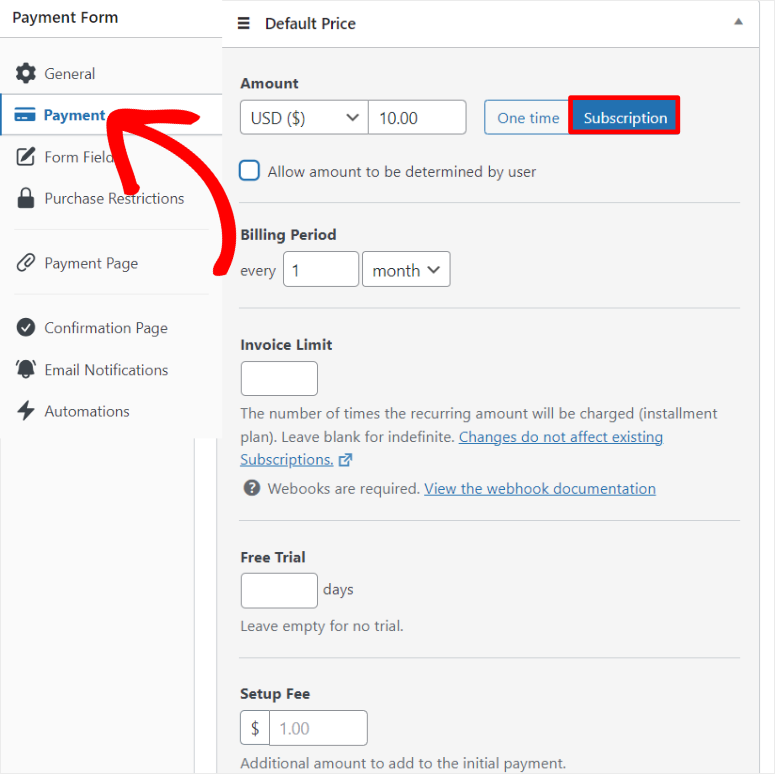
First, go to “Default Price” and select Subscription. If you want to accept recurring donations, you can switch on “Allow Amount to be Determined by User” with a checkbox. The minimum donation is set at $10 to avoid scams, but you can also set one manually conveniently below this checkbox.
Next, set the Billing Period using the dropdown options where you can set it to Day, Week, Month, and Year. If you want to add a payment plan, add the “Invoice Limit” to set the number of installments a user can make.
Below this, you can also add the number of days you want to offer your user a “Free Trial.” Finally, you can also include a Setup Fee to collect even more revenue from your users.

Method 2: Use the One Time Payment Option
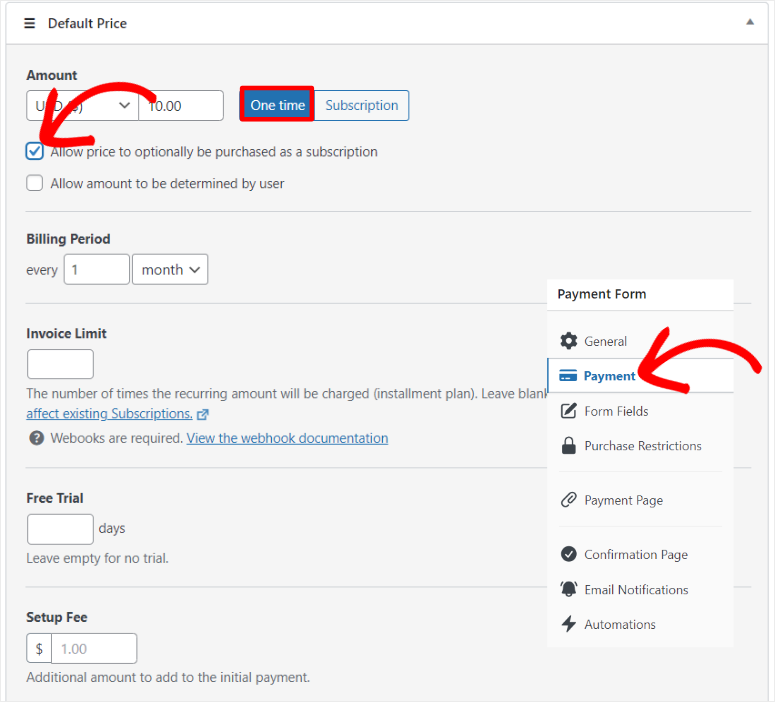
The other method you can accept recurring payments with WP Simple Pay is by selecting the One Time option.
But for this method, enable “Allow price to optionally be purchased as a subscription.” This gives your users the freedom to make a one-time purchase or subscribe for a recurring payment.
Like with the Subscription option, you can also check the “Allow amount to be determined by user” to receive one-time donations from your users.
Now to customize Stripe recurring payments with this option, follow the same steps you used for the one-time payments, as the interface is the same.

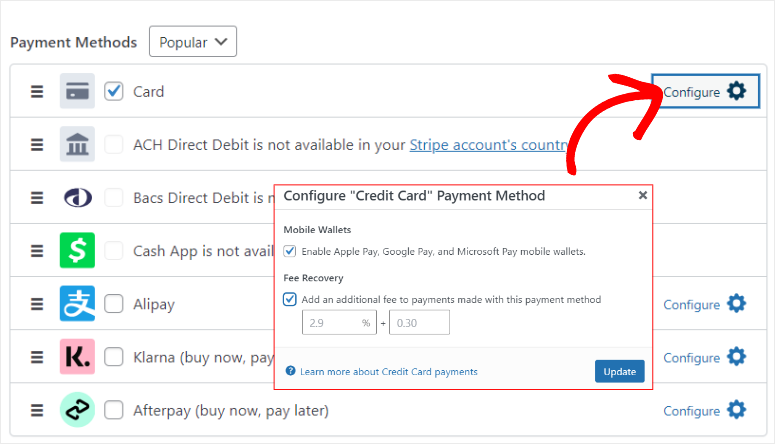
Then, below this, find the Payment Methods section of this page, and select “Configure.” On the popup window that will appear next, enable Mobile Wallets such as Apple Pay, Google Pay, and Microsoft Pay with the checkboxes.
You can also use a checkbox to add an additional fee for payments used with these mobile wallets.

Let us look at how to customize the form.
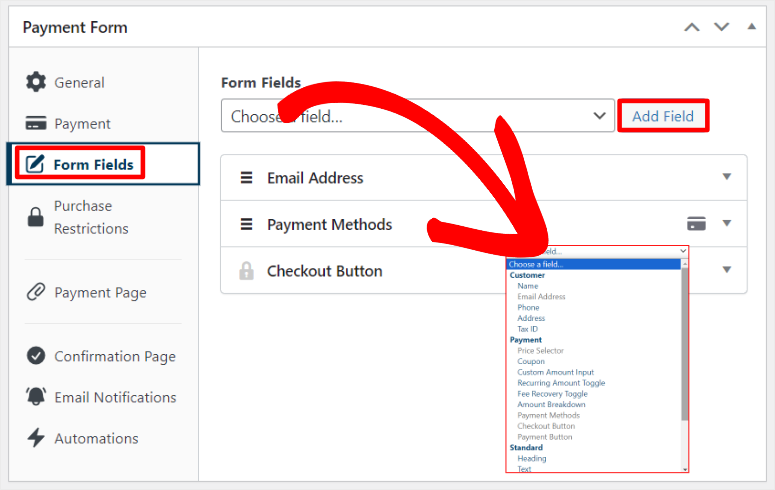
To do this, head to the Form Fields tab. You will find default form fields already in place. But you can add more, edit, or remove any field you want.
You will do this by using the dropdown menu to select a field and hit “Add Field” to include it in your form.
On top of this, you can move the fields on your form with the drag and drop interface to fit your site style.

Next, move to the “Purchase Restrictions” tab.
You can use a checkbox to “Hide the payment form after a set number of payments.” You can also use checkboxes to enable “Show the payment form after a specific date and time” and “Hide the payment form after a specific date and time.”


Step 3: Publish Recurring Payment Form
Now, after you are happy with the customization of the recurring payment form, it is time to publish it on your site.
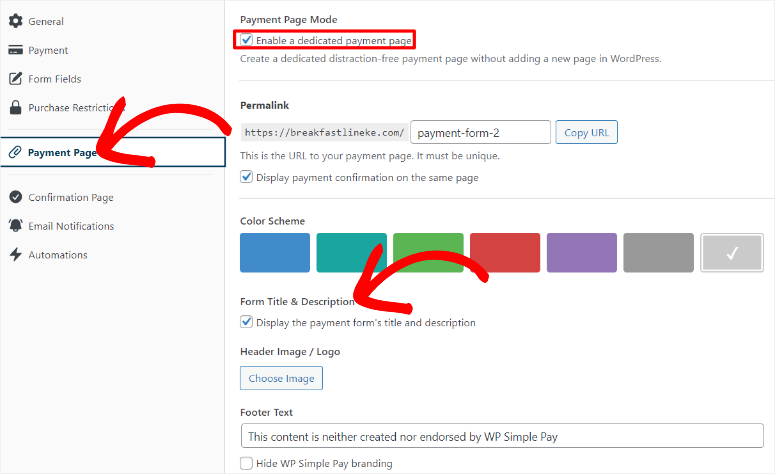
To do this, go to the Payment page tab.
Here, first, use the checkbox to “Enable a dedicated payment page.” This will allow you to create a dedicated distraction-free payment page without creating a new page with WordPress using the traditional methods.
Then, edit your page permalink to make it more user and SEO-friendly. Make sure that this permalink is unique to your site to avoid any conflict with other pages.
After this, you can use a checkbox to allow WP Simple Pay to display the payment confirmation on the same page.
Now, scroll to the Color Scheme section of the page, and select one of the default colors offered. You can also open the color chart so that you can select any color you want by using the color icon.
Below this, use a checkbox to allow this payment plugin to display the form title and description on the form.
Then upload a header image which will also act as the logo of your form, and edit the footer text.
Finally, use a checkbox to hide the WP Simple Pay branding.

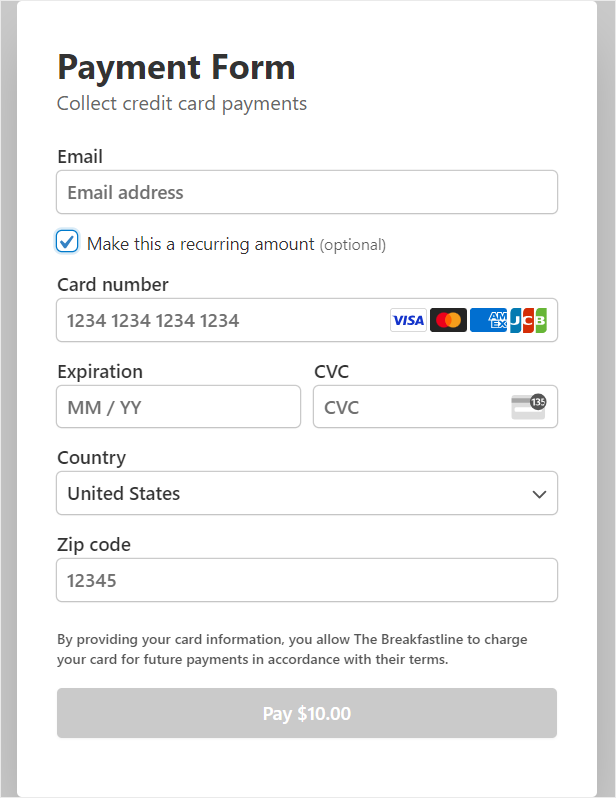
After this, you can use the Preview button to have a feel of how the form will appear on your website.
Then, when you are happy with your recurring payment form, all you have to do is hit Publish, and it will go live.

Now, you can also add the payment form to an existing page with 2 methods.
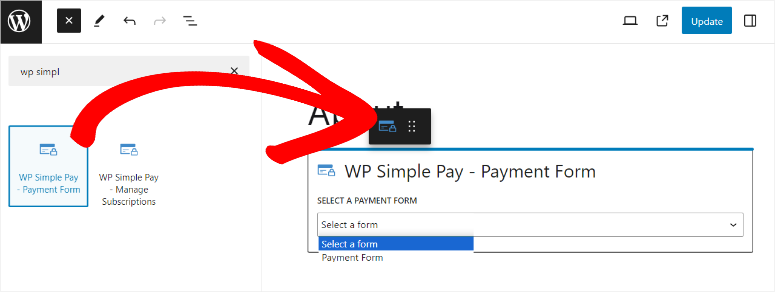
First, you can use the WP Simple Payment Form block.
All you have to do is open the block editor of an existing page or post. After this, use the search box to find the “WP Simple Payment Form” block.
Drag and drop it to the location of the page you want to place it. From the dropdown menu option of the block, select the form you want to add, and it should appear in the area.
Finally, select Update to make it live.

The second is using the form’s shortcode.
To use this method, go to WP Simple Pay » Payment Forms to access all your WP Simple Pay forms. Then, copy the shortcode of the form you want to add to your site.
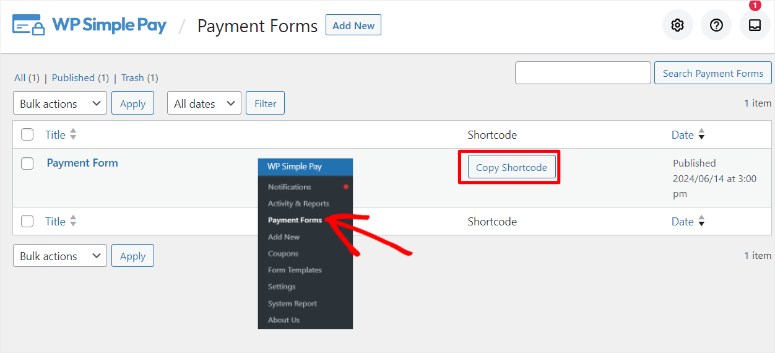

After this, open an existing page and use the search bar to find the shortcode block. Drag and drop it to the section you want to display your form and paste the shortcode.


Once this is done, hit Update, and the form should appear on the live page.
That’s it! You can now set up and publish a recurring payment form with WP Simple Pay.
Step 4(Optional): Set Up Confirmation Messages and Email Notifications
Now, it is always a good idea to have good communication about transactions between you and your users. This allows you and your users to both have proper records about the payment chain. You can reduce the chances of disputes, and your users can plan better for their recurring payments.
The good thing about WP Simple Pay is it allows you to customize the confirmation message and the email notification.
1. Set up a confirmation message
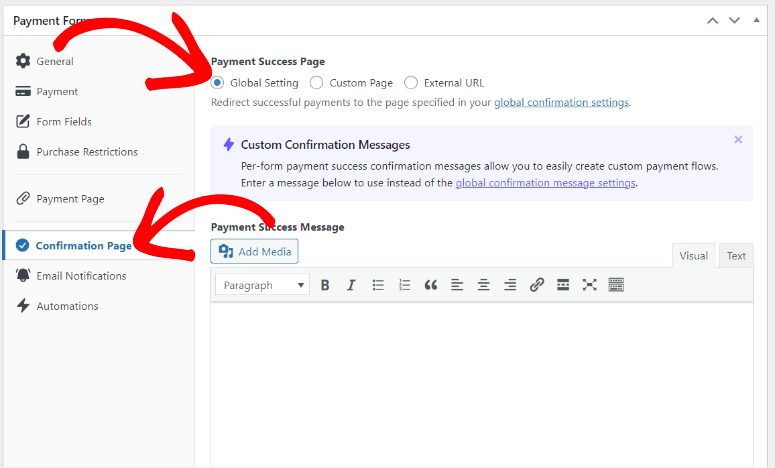
To set up the confirmation message, go to the Confirmation Page tab, then navigate to “Payment Success Page.”
Here, you can create payment notifications for your entire site by ticking the checkbox of Global Settings. You can also be more specific with what page you want a specific message to appear by ticking the Custom Page or the External URL checkboxes.
For this step-by-step guide, we will go with Global Settings to ensure the payment confirmation notification is consistent throughout the website.
Below this, add your custom message in the Payment Success Message box.

2. Set up email notification
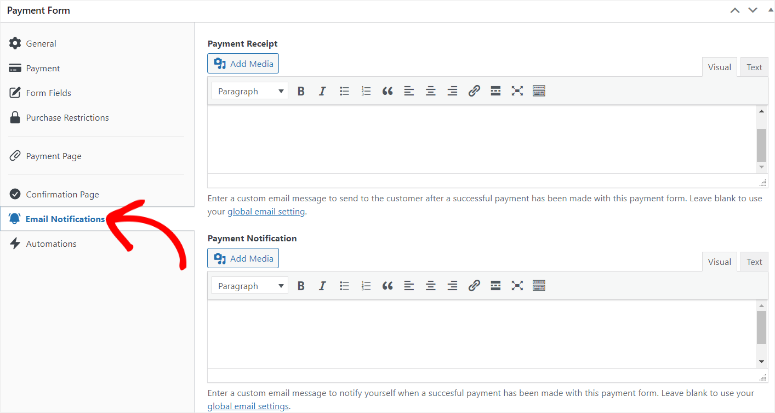
Then to set up the confirmation email go to the “Email Notification” tab. Then, navigate to Payment Receipt and create a message to send to the customer after a successful payment has been made with this payment form.
Below this, also create a “Payment Notification” in the box provided to notify yourself when a successful payment has been made with this payment form.

Congratulations! You can now accept recurring payments with WP Simple Pay. If you have any more questions, check out the FAQs below.
FAQs: How to Accept Online Recurring Payments in WordPress
How to set up recurring payments on Paypal?
WPForms and WP Simple Pay can help you set up recurring payments on PayPal. WPForms integrates with PayPal through its PayPal addon, allowing you to manage subscriptions. WP Simple Pay directly connects to Stripe, which supports PayPal payments, simplifying the process of accepting payments.
Can I make Zelle recurring payments?
No, Zelle does not support recurring payments directly. It focuses on fast, secure transfers between bank accounts. For automatic payments, you need to manually schedule each transfer through your bank’s online or mobile banking system, ensuring timely transactions for recurring bills or subscriptions.
How to see all subscriptions on card?
To see all subscriptions associated with a credit card, log in to your payment gateway’s dashboard (like Stripe or PayPal). Navigate to the subscriptions section, where you can view and manage all active subscriptions, payment history, and customer details.
Can I set up weekly recurring payments?
Yes, you can set up weekly recurring payments with WP Simple Pay. This Stripe payment plugin allows you to create billing intervals on a daily, weekly, monthly, or yearly basis, offering flexibility in how you collect recurring payments from your users.
That’s it! We hope you enjoyed learning about how to set up recurring payments in WordPress. If you are looking to set up a trusted payment gateway, here is an article on How to Add Apple Pay to WordPress (5 Steps).
To add to that, here are other articles you may be interested in reading.
The first article walks you through how to accept Stripe Payments in WordPress. The next post lists the best wooCommerce upsell & cross-sell plugins. While the last article shows you how to accept credit card payments.
منبع: https://www.isitwp.com/how-to-accept-online-recurring-payments-in-wordpress/
