

Are you looking for an easy-to-use page builder?
Beaver Builder is one of the most powerful drag and drop page builders today. Its front-end editor makes it super convenient to create any type of page. Plus, it comes with plenty of modules and templates to help you design. With these, you can also create and save your own page templates that you can use elsewhere on your site.
As a result, Beaver Builder can help you create any type of page, such as a contact page, blog page, about us page, and more. with just a few clicks and no coding experience.
The best part is that you can use Beaver Builder on unlimited sites, helping you keep your site building costs down.
In this review, we will look at the features that set this front-end page builder apart. In the end, you will learn if it is right for you.
What is a Page Builder WordPress Plugin?
When you’re looking for a theme for your WordPress website, you can buy a theme that looks closest to what you have in mind. You will have to rely on the theme’s features to customize it.
Or, you can hire a WordPress developer to work out a theme exactly as you’ve imagined. This will be costly and may not work out as nicely as you’d hope.
Last, you can use a page builder plugin to build your website block by block. This will give you the freedom to use any layout you want, making it more user friendly and great for SEO. Use multiple layouts for different pages and sidebars, and use your own colors, styles, and content anywhere on your site.
There are plenty of page builder plugins. Some of them are very difficult to use, and some of them have too much bloat packed into them.
The perfect page builder plugin for WordPress should allow you to create your website in live mode. It should be fast and easy to use. If you ever decide to use something else, it should not leave a mess behind.
Luckily, Beaver Builder checks all these boxes. Next, let us look at why you should try out Beaver Builder.
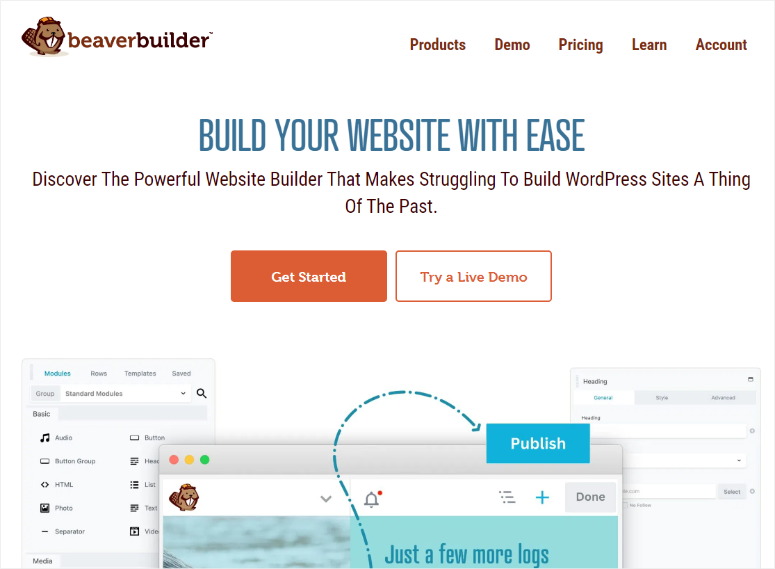

Beaver Builder is one of the best drag and drop page builders today. It is perfect for beginners because it can help create fully responsive pages with no coding or CSS experience.
As mentioned, this page-building plugin also offers over 30 prebuilt templates that can help you create different types of websites. These templates provide a starting point for beginners, helping them structure their pages and ensuring a professional look without starting from scratch.
At the same time, it is perfect for advanced WordPress users because it allows them to add custom code to their designs through CSS. This flexibility enables developers to add complex functionalities or design elements, not just the standard drag-and-drop features.
Plus if you want to build more than just pages, you can try out Beaver Themer. This Beaver addon can help you create an entire site by helping you add headers, footers, archive pages, and more. It does this by helping you edit the theme files without coding.
Whatever your experience level, it is clear Beaver Builder can cater to you. This is because of its balance of user-friendly features and advanced functions for experienced developers and designers.
Now that you understand Beaver Builder better, here is how we have broken down the review to help you understand this WordPress page builder plugin better.
Installation & Set Up
When looking for a convenient page builder plugin, the first thing you should consider is the ease of installing it and setting it up.
With this in mind, Beaver Builder offers both free and premium. The free version comes with basic page-building features and is a great way to test out the plugin before making a purchase.
Getting started with the Beaver Builder Lite is very simple.
All you have to do is go to your WordPress dashboard and head over to Plugins » Add New Plugin. Once you are in your plugin repository, use the search bar and find “Beaver Builder.” You will then install and activate the plugin as you would any other.
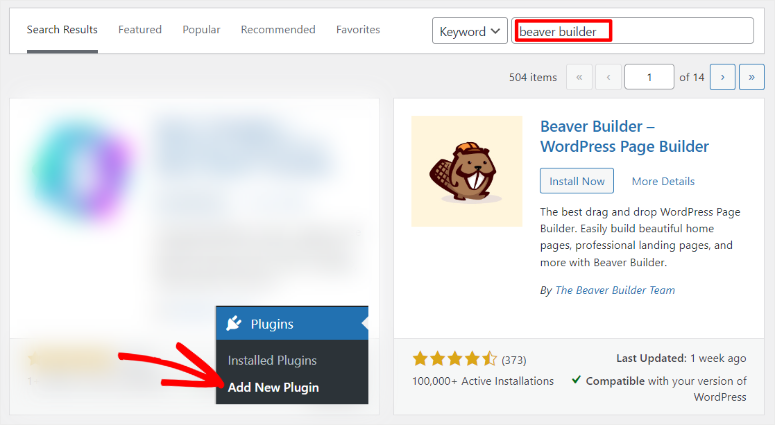

That’s It! At this point, you are ready to use Beaver Builder for free.
To use the Beaver Builder Pro you will need to purchase a plan.
To do this, head over to the official website and sign up. This page builder plugin offers 4 plans, meaning you can find one that suits both your budget and needs.
Once you have paid for your plan, go to “My Account” in your Beaver Builder dashboard and download the plugin’s ZIP file to your PC.
Remember to also copy the “Activation Key” as you will need it to activate the premium version of the plugin.
Now, in your WordPress dashboard, first, delete the free version if you have it installed. This will ensure that there is no plugin conflict.
Then, head over to Plugins » Add New Plugin as before. But instead of using the search bar, hit “Upload Plugin.”
You will then drag and drop the Beaver Builder file you downloaded early to the upload area and “Install.” Once it installs, follow this up by hitting the “Activate” button.
Then, when the plugin activates, it will automatically redirect you to Settings » Beaver Builder under the “License” tab.
Now, paste the Activation Key you copied earlier, and just like that you are ready to use Beaver Builder Pro.
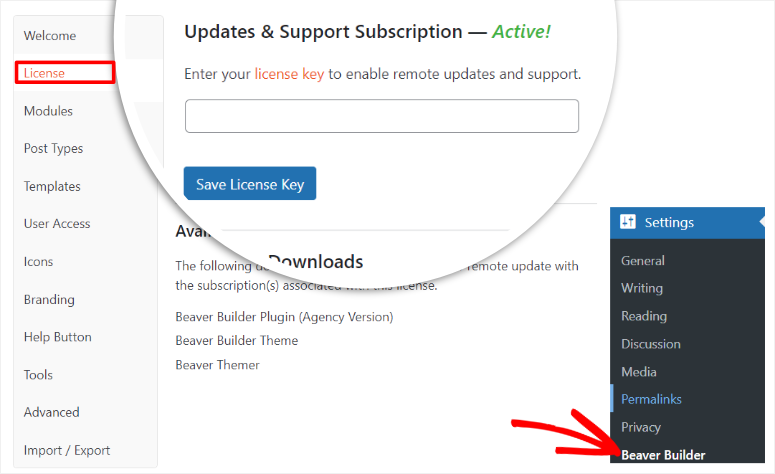

As you can see, it takes a really short time to install this plugin. If you need any help, check out this article on how to install a plugin.
With Beaver Builder installed, let’s see how to set it up!
What we really like about this plugin’s setup process is that Beaver Builder has separated its “Settings Menu” from its “Feature Menu.”
As you have seen, Beaver Builder settings are under your WordPress Settings menu. This ensures you do not get confused when you want to set up the plugin.
To add to this, Beaver Builder settings options are well arranged in a vertical tab, making it even more convenient to find what you are looking for.
Now, when you go to Settings Beaver Builder, you are able to set up the following.
- Welcome: Here, you will get a walk-through of how to use Beaver Builder. You will get links to their Knowledge base, Facebook groups, forums, and more.
- License: As you have already seen, you will insert your activation key in the license tab.
- Modules: On this tab, you will activate different modules with a checkbox under different categories. These categories include Basic, Media, Actions, Layout, Info, and Posts.
- Post Types: Again, using the checkbox, decide if you want to use Beaver Builder on posts, pages, or both.
- Templates: On this tab, decide if you want to enable or disable templates in the builder interface. You can also go a step further and use the dropdown list provided to select if you want to use only the Core Templates or the User Templates in the builder interface.
- User Access: Using a combination of dropdown menus and checkboxes, define who you will give access to. You have options to give access to both the front-end users and the backend admin access.
- Icons: Using checkboxes, you will enable or disable icon sets. To add to this, you can also upload custom icon sets if you want to.
- Branding: This is the only Setting tab where you will need to type anything. Here, Beaver Builder allows you to white-label and brand your theme by adding a Theme Name. Theme Description, Theme Company Name, The Company URL, and Theme ScreenShot URL.
- Help Button: Depending on your level of using Beaver Builder, on this tab, you can use checkboxes to turn on or off help documentation.
- Tools: On this tab, you can enable caching tools and also clear individual caches.
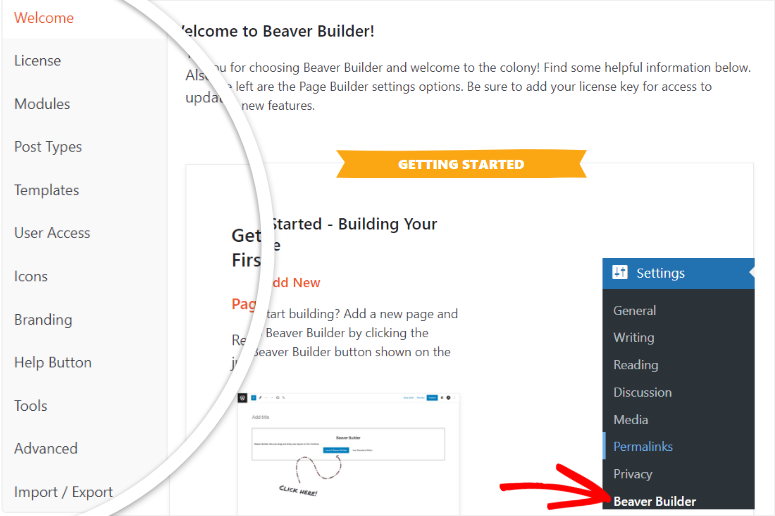

As you can see, Beaver Builder ensures that you have everything set up in a very simple way before you start building pages.
This ensures you do not need to go back and forth between your WordPress dashboard and Beaver Builder front-end editor while you are building pages. As a result, you can enjoy a better user experience.
Speaking of user experience, let’s look at Beaver Builder’s ease of use next.
Page Builder (Main Feature)
You may recall from Beaver Builder’s settings that you can switch on or off the front-end editor for posts and pages. So, before you get started, it is important to ensure that you have switched on the page builder for the content you want to edit.
For this Beaver Builder review, we will focus on the page builder for pages. But remember it is the same for posts as well.
There are 3 main ways to access Beaver Builder in your WordPress dashboard.
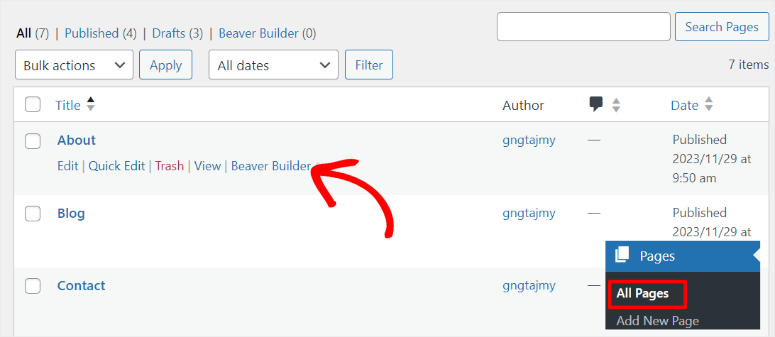
The first is going to “All Pages” where you will see a list of all your pages. Here, hover over the page you want to edit, and the “Beaver Builder” option will appear. Once selected, you will be redirected to the front-end editor.

The next way you can access Beaver Builder page builder is by selecting “Edit” on a new page or an existing one. By default, you will open the block editor (Gutenberg Editor), but remember we want to use Beaver builder to build the page.
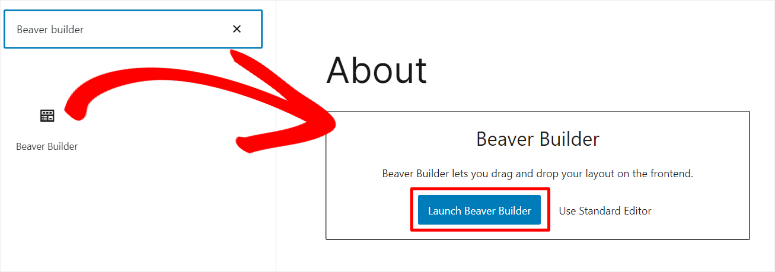
So you will use the Plus(+) icon to search for the “Beaver Builder Block.”
Then, when you find the block, you will place it anywhere on the page. The block will then give you the option to use the Standard Editor(Block Editor) or Launch Beaver Builder.
All you have now is to hit “Launch Beaver Builder” to open its live editor.

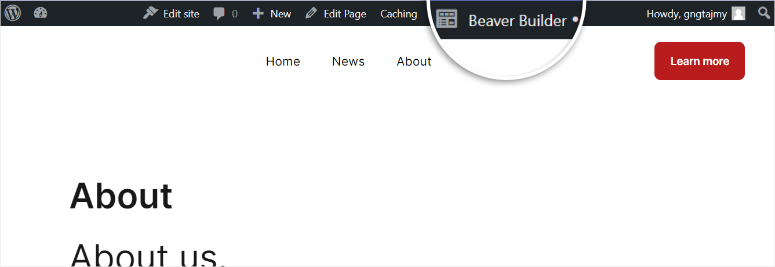
Now, the third way you can launch Beaver Builder is by opening any page while you are logged in to your WordPress dashboard. There are plenty of options at the top, such as Edit Site, Edit Post, Caching, and so on.
You will also notice the Beaver Builder Icon here. Select it, and you should be redirected to the visual page builder.

You may wonder why the creators of Beaver Builder found it necessary to have so many ways to access their visual builder.
But, Beaver Builder is all about making page building convenient for you. So, wherever you are on your site, be it in the front end or back end, you can launch this drag and drop builder with 1 click.
Let’s take a look at the actual front-end editor for Beaver Builder works.
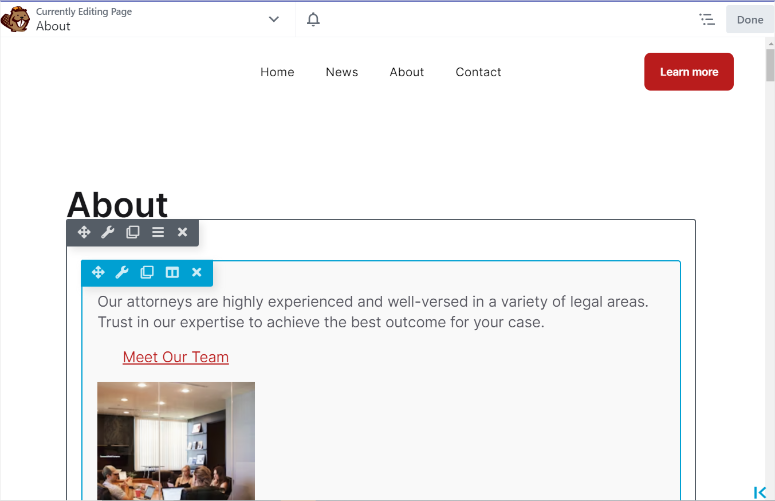
The first thing we noticed is that Beaver Builder offers a full-screen preview screen unlike most page builders today. This makes it more user-friendly as you can see the entire page at a glance, which makes page building easier.

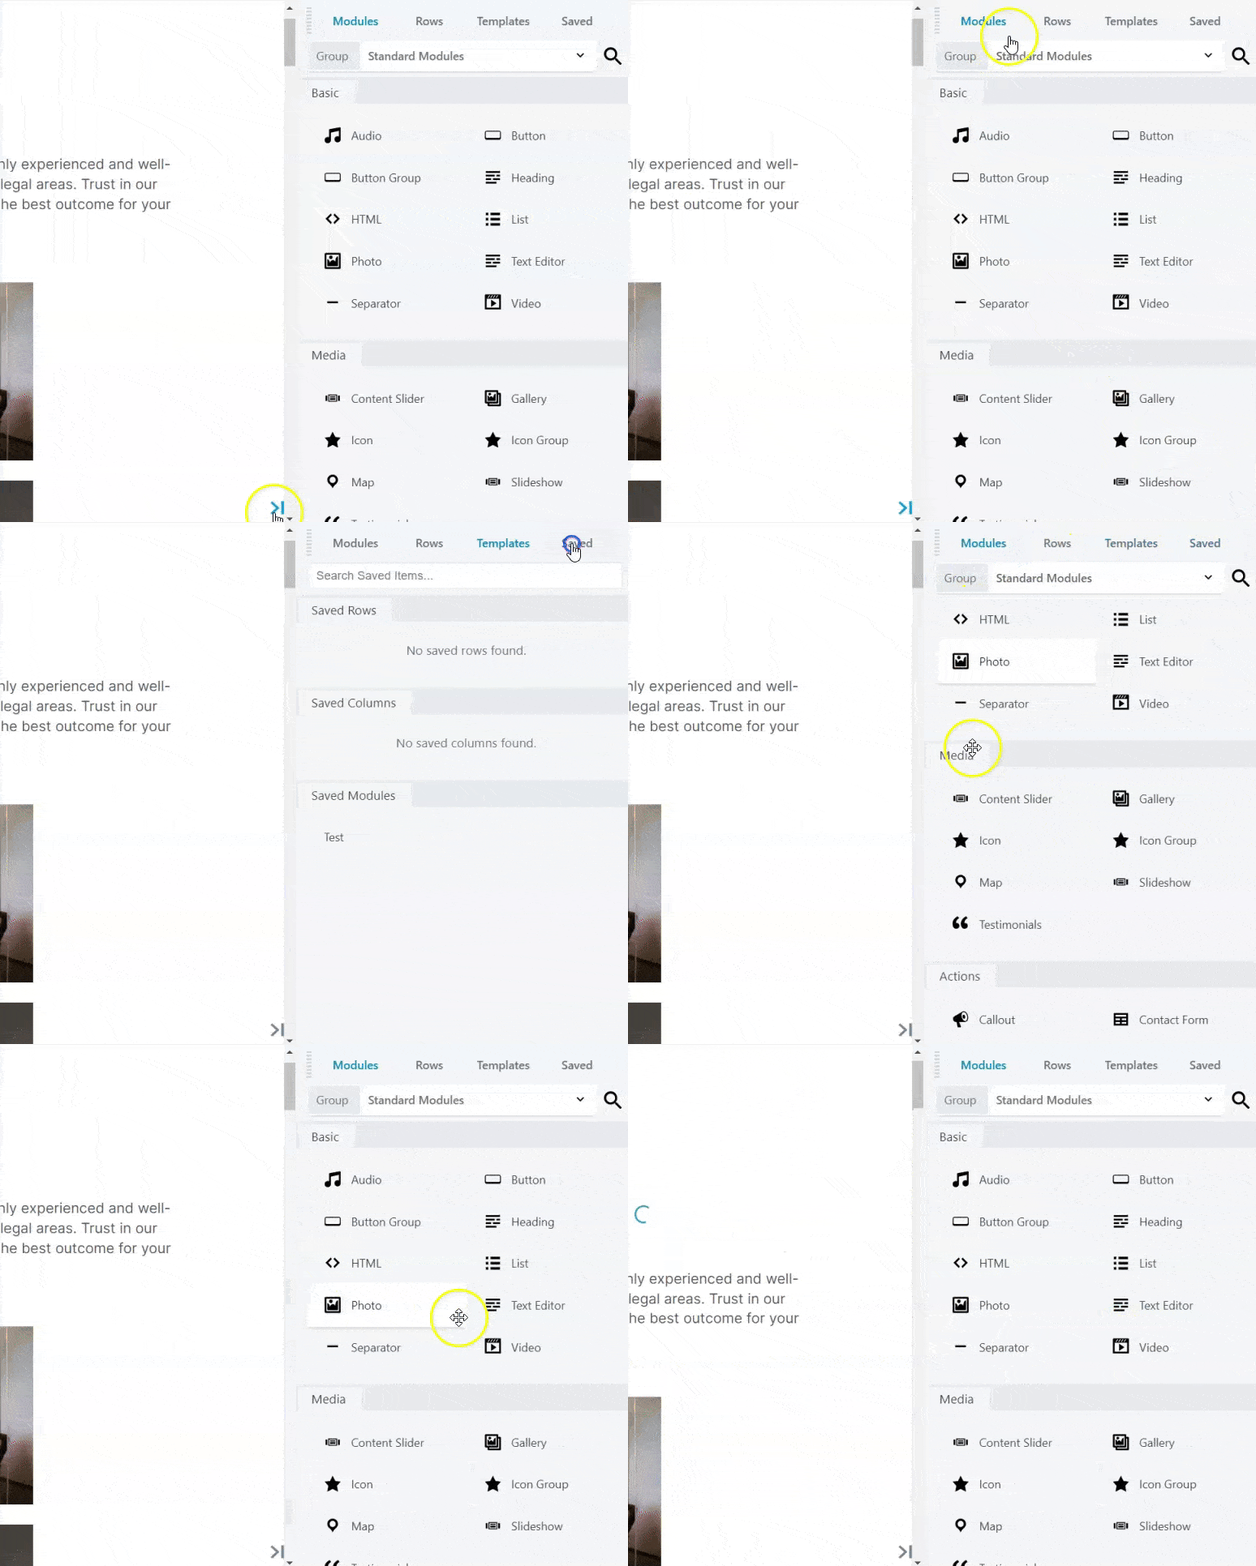
The Customization menu has been tucked neatly at the side, and to access it, you will need to first click on the section you want to edit. The Customization menu has been divided into Modules, Templates, Rows, and Saved.
To edit your page, all you have to do is select any of these options and, using the drag and drop interface, move it to where you want on the page.
- Modules: Modules are the different ways to add content with Beaver Builder. You need to place a module inside a row or column. So, under this tab, you will see Beaver Builder modules divided into different groups, which include Basic, Media, Actions, Layouts, Info, and Posts.
- Rows: Remember that rows are how Beaver Builder dives a page horizontally, while columns divide the page vertically. Beaver Builder will give you several column options on this tab, and you can select one that best matches your page design.
- Templates: Beaver Builder offers different types of templates. It divides them into Content and landing Page templates which allows you to pick one from the long list with ease.
- Saved: Here, you can access all your saved Beaver Builder modules, rows, and columns which you can reuse.
By default, the Customization menu is on the right. But you can move it permanently to the left if it makes more sense for you, making your page-building efforts more convenient.

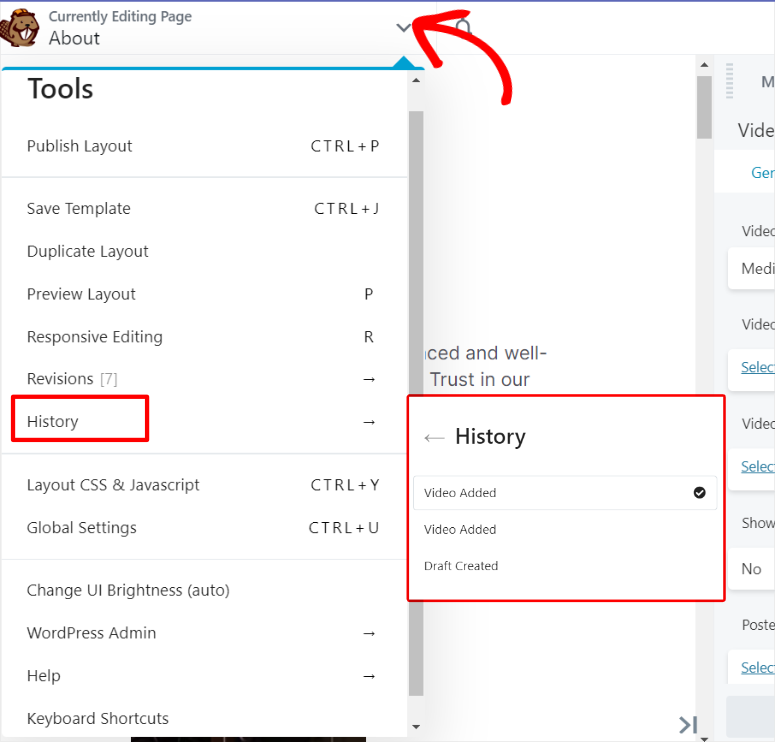
Now, to access the Tools menu, hit the down arrow next to the Beaver Builder icon on the left. The Tools menu consists of options to Publish Layout, Save Template, Preview Layout, and more. This can help you quickly make adjustments to the live page without moving from the drag and drop visual builder.
We should also mention that though Beaver Builder is very easy to use, we had issues finding the “Undo” or “Redo” buttons. These options are usually well displayed on other page builders as they make it easy to go back when you make an error or go forward if you want to redo something.
Instead of getting these buttons straight on the preview window, you will have to go to the “Tools” menu and access History. Here you will see a list of your past editing actions you can select and undo. While this is a good Undo Redo feature, it may not be practical in all situations.

Next, let’s look at how to use Beaver Builder to edit or create a page.
A feature that really caught our eye is how easy it is to adjust the size or number of columns and rows without using the Row tab in the Customization menu.
First of all, when you hover over a section on the page, 2 borders will appear around it. The outermost is the row border, and the innermost is the column border. On top of each border, you will see options to edit, duplicate, remove, or move the section.
Now, when you move your mouse to the side column border, you will be able to easily adjust the width by using the drag and drop feature. This allows you to better place your column exactly how you envisioned it.
To add to this, if you add a new module to the page, the visual editor will automatically adjust to accommodate the new page element by creating a new column or row. This ensures that your Beaver Builder modules fit easily on your page without you needing to carry out additional steps.


Now that you know how to add and edit the page modules, rows, and columns, the question is, how do you edit the page text?
As you have seen by now, Beaver Builder loves giving you options. And when it comes to adding content, it is no different. With that said, Beaver Builder gives you two ways to add content to the page.
The first and most straightforward is adding content directly to the page itself.
When you select a column, you can edit the content just as you would any other module on the page. So, you can just delete what is presently there and add the new content you want.
But, the biggest problem with this content-adding method is limited styling options. Even so, you can add bold, italics, underline, links, and text alignment.


Now the second method you can add content using Beaver builder is through the Text Editor in the Customization menu. Here, you can simply delete and add content like with the other method.
But on top of that, you can add media, change the font style, add text shadow, change margins, and so much more. You can even edit the content page in HTML or add header tags with Beaver Builder’s Text Editor.
Since the Text Editor is still part of the front-end editor, it gives you the perfect opportunity to make any type of text adjustment and still view the page as it would look live.


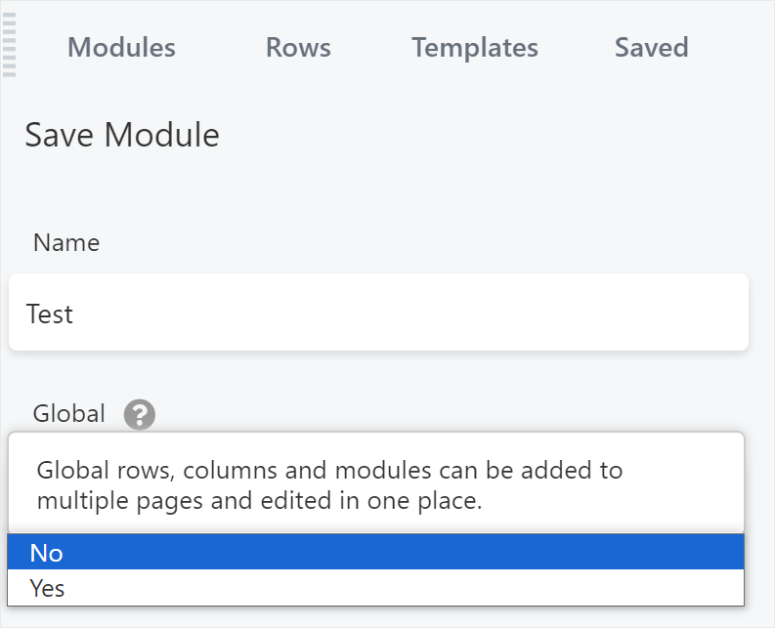
Now, once you make all the content and column adjustments to the row as you would like, Beaver Builder allows you to save it as a module. This means you can use the row again on other pages, making your site-building process easy.
To add to that, you can also save the module as “Global,” ensuring that the module is added across all your pages automatically.

But, other than saving a module, Beaver Builder also allows you to easily create and save templates.
All you have to do is go to Beaver Builder » Templates. This will open a page where you see all the templates you have created. On top of this, each template has a shortcode which you can use to add it to any page.
Next to each template you also have the option to edit it by launching Beaver Builder page build.


Now, below the Beaver Builder Template submenu, you also get Saved Rows, Saved Columns, And Saved Modules. You can use these submenu options to view saved items and use them on other pages.
To add to this, you can simply hit “Add New” which will allow you to create a new template. On this page, you will also see a dropdown that you can use to add a saved row or module.
Beaver Builder will also give you the option to add the row or module to “Global.” This means the row or module will be added across your site not just to a specific page. This makes it super easy to build consistent pages with similar spacing, layouts and styles.


On top of that, you can also create and save categories easily from the backend. You can use these categories to classify your content and pages later with your front-end page builder to help improve user experience and navigation for your visitors.
Now that you understand more about the drag and drop builder, Beaver Builder’s main feature, let us look at what else it can do.
Other Features
Whether you’re a WordPress beginner or a seasoned professional, you’ll love the powerful capabilities and intuitiveness of the Beaver Builder plugin.
1. Dozens of Creative Page Templates to Choose From
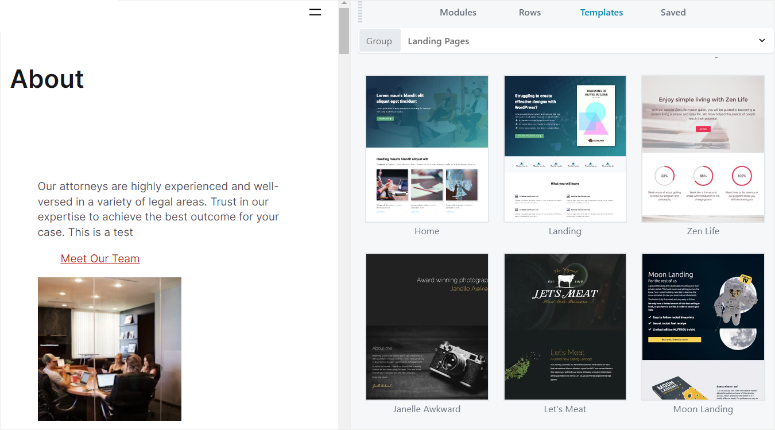

Beaver Builder comes with over 30 stunning page templates. The Beaver Builder plugin works on all WordPress themes, so you don’t have to change your favorite theme to start using the plugin. In case you find any compatibility issues with your WordPress theme, you can reach out to their friendly support team and get the issues sorted out.
As long as you’re using a responsive WordPress theme, all the pages you create will be 100% responsive, meaning they look great on all devices.
You can use all Beaver Builder templates with any of your premium plans, with no hidden charges. To add to this, you can find templates for small businesses, eBooks, law firms, and many more.
You can also find many inner page templates such as contact pages, newsletter signups, about pages, pricing tables, and a lot more.
To save even more time, the plugin also allows you to save an infinite number of templates in the builder. Similarly, you can save both the raw and modules in the builder.
2. Position Your Content With Great Precision
Positioning images and text in your default WordPress page editor is a pain. With Beaver Builder’s frontend drag and drop page editor, you can easily position your content with great precision. Once you’ve finished editing, you can save the changes directly from the frontend or revert back to the last published state.
3. Get Complete Control of Your Content
Beaver Builder allows you to switch your theme without losing your content. If you decide to stop using Beaver Builder, your content gets ported right back into the WordPress editor.
4. Available as Both a Plugin and a Theme
Beaver Builder is available as both a plugin and a theme. The theme is a perfect balance of settings and functionality. You can customize the theme just as you edit your pages.
The Beaver Builder theme allows you to make live edits via the WordPress customizer. All your theme settings can be found in the customizer. That way, you can live-preview any of your theme settings changes.
The theme also comes with a wide variety of presets. With the click of a button, the presets automatically update the theme settings to create dozens of different styles.
Documentation & Support
Beaver Builder makes its documentation super easy to access whether you are a customer or not. First off, on its official website home page, You will see a menu option called Learn. This opens a dropdown menu that consists of a Blog, Knowledge Base, Videos, courses, and an About Us page.


The Learning menu is static on most pages on the Beaver Builder website, making it convenient to access it wherever you are on their site. Here is what it consisted of.
- Blog: This opens to a list of articles that are well-written and easy to understand. These pieces of content ensure you do not need to look for another resource online to help you use Beaver Builder.
- Knowledge Base: Takes you to a page with the tabs arranged in tile format making it easy to find what you are looking for. To add to that you can also use the search bar to look for learning material. On this page, you can also access Beaver Builder Forums and communities. Here, you can find like-minded individuals and discuss Beaver Builder with your fellow peers.
- Video: This will redirect you to Beaver Builder’s YouTube channel. Here you can check out their tutorial in video form. This gives users who do not like reading documentation an alternative way to learn about this visual page builder.
- Course: Beaver Builder gives you access to a list of free and paid courses. Each of these courses’ lengths is shown so that you know how long it will take you to complete it, helping you plan. You can also download a course certificate after completing it. This can be an awesome way to show clients or your fellow site owners what you can do as a website builder.
- About: This page explains what the Beaver Builder team is all about. This page explains why Beaver Builder was formed and what they hope to achieve in the future. You can also check out testimonials and learn about the founders.
On the other hand, Beaver Builder makes it possible for you to access their documentation in your WordPress dashboard. This ensures you do not need to visit Beaver Builder’s website to access the documentation, once you log into WordPress.
All you have to do is go to Settings Beaver Builder in your WordPress dashboard. Next, you will access all the information you need under the tab Welcome.
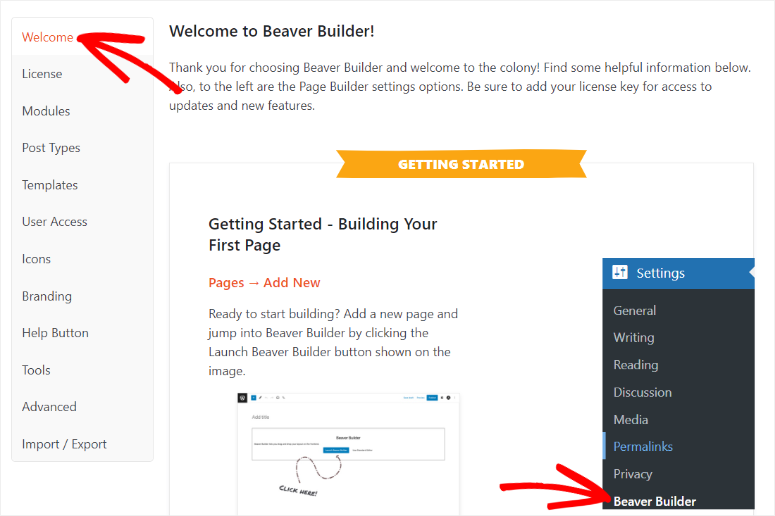

Now, if you do not get help from the documentation, your first course of action should be to check out the forums and the Facebook groups to see if the issue has already been discussed. If not, you can contact support through a ticketing system to get assistance.
But to access Beaver Builder’s support, you first need to be a customer because you are required to log into your Beaver Builder account to fill out their contact form.
Pricing
Unlike most WordPress page builders available on the market, Beaver Builder allows you to download a lite version of the plugin for free from the official WordPress repository.
If you don’t have a budget for all the premium features, you can get started with the lite version of Beaver Builder. The lite version comes with limited features and support.
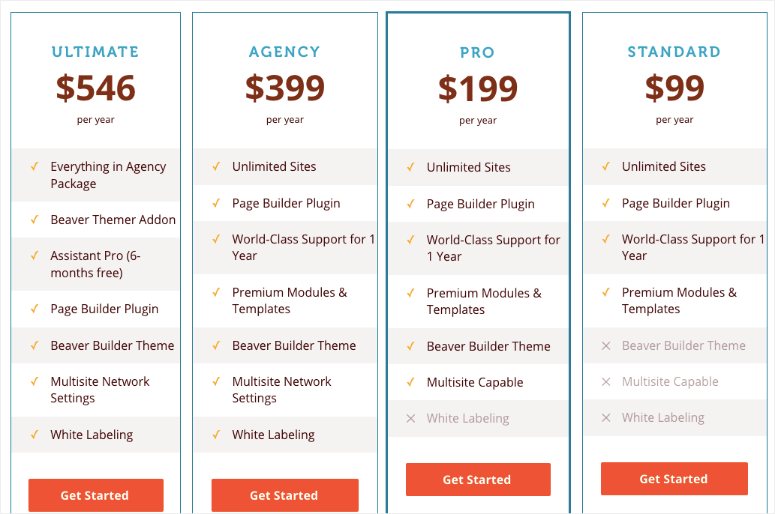

The premium version of Beaver Builder is available in 4 different plans: Standard, Pro, Agency, and Ultimate. All plans allow you to use the page builder for unlimited sites and also offer world-class support for one year.
The only difference is that the Standard plan doesn’t come with the Beaver Builder theme. The Pro plan is shipped with the theme and multi-site capability. The Agency plan gives you all the features of the Pro plan. Plus, it enables you to white-label the builder. That way, you can build websites for your client sites while changing all instances of the words Page Builder and Beaver Builder in the WordPress admin area.
Take a look at the different Beaver Builder pricing plans (per year) here:
- Standard: $99
- Pro: $199
- Agency: $399
- Ultimate: $546
For the best deal, check out our Beaver Builder coupons!
Pros & Cons
Pros:
- No coding required
- Easy to integrate third-party tools
- full-width preview window
- Comes with prebuilt templates
- Comes with plenty of addons
- Easy to add Global settings
- Offers a free version of the plugin
- Can be used on unlimited sites
- Comes as both a plugin and a theme
Cons:
- Does not offer many prebuilt templates like its competitors
- limited features on Beaver Builder Lite
- Reliance on Beaver Builder shortcodes
- Pricing may be expensive for beginners
Alternative to Beaver Builder
The best alternative to Beaver Builder is SeedProd.


SeedProd is an awesome website theme builder and landing page builder.
It’s incredibly easy to use, making it a great choice for beginners.
First, it comes with built-in coming soon and maintenance mode. So you can hide your website while it’s under construction.
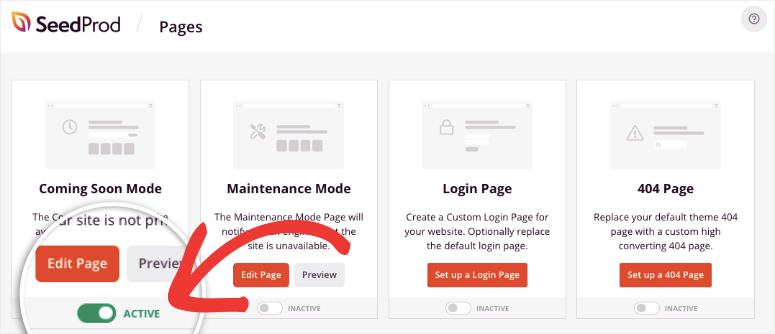

You can display a beautiful placeholder page with your logo and branding.
Next, there are plenty of themes to choose from to create pages, custom post types, and even an entire website.
Then, there’s a drag and drop builder to customize your site. There are so many blocks to choose from, including animated headlines, countdown timers, optin forms, and more.
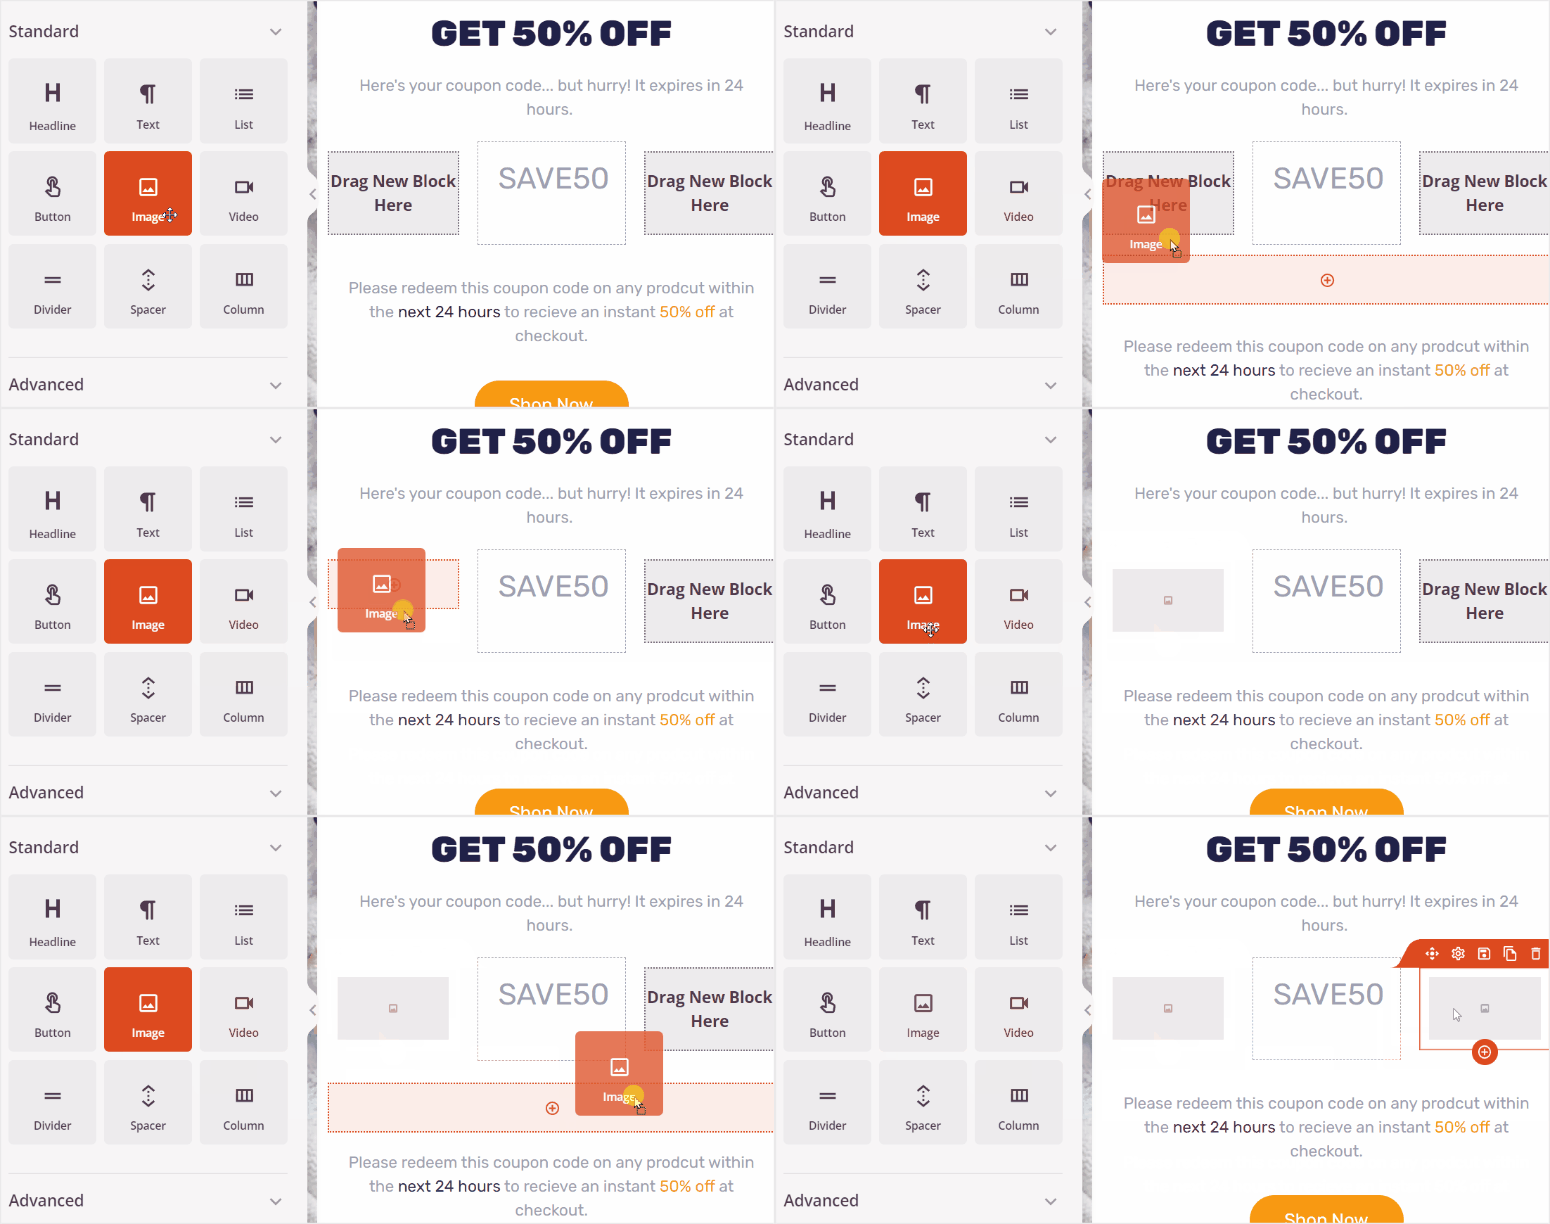

In a nutshell, here’s SeedProd’s highlights:
- Readymade templates and page blocks
- Drag and drop page builder
- Subscriber management
- WooCommerce support
- Email marketing integrations
Want to know more? See our complete SeedProd Review.
Get started with SeedProd »
You may also want to check out more options here: The Best WordPress Page Builders.
Our Verdict on Beaver Builder as the Best WordPress Page Builder
We believe that Beaver Builder is one of the best and easy to use drag and drop page builder plugins for WordPress. Without a doubt, it’s one of the most downloaded WordPress page builders in existence and is best suited for websites of all sizes. Its easy-to-use user interface makes it convenient for anyone to build a highly customized WordPress website. It comes with all the powerful page-building features you could ever ask for.
We hope you enjoyed learning about Beaver Builder. If you have any more questions, check out the FAQs below.
FAQs: Beaver Builder Review
Is Beaver Page Builder free?
Yes, Beaver Builder offers a free Lite version with limited features. But to access all its features and advanced functionalities, you will have to purchase the premium version of the plugin.
How do I add a PDF to Beaver Builder?
First, you will need to upload the PDF to your media library as you would any video or image. Then you will add a “Button” module with the Beaver Builder editor and customize it to match your branding or site style. Finally, you will add the PDF link to the Beaver Builder button module. That’s it! You can now add a PDF with Beaver Builder.
How do I open the Beaver Builder in WordPress?
You can open Beaver Builder by navigating to the page or post you want to edit in your WordPress dashboard. Then, all you have to do is select the “Page Builder” tab, which is located above the
content area, to launch the Beaver Builder interface.
Can I use third-party widgets with Beaver Builder?
Yes, Beaver Builder supports third-party widgets. In fact, they will show up in the Beaver Builder’s widget menu along with other default WordPress Widgets.
Now that you understand Beaver Builder in detail and you are ready to use it, here are 15+ best Beaver Builder themes for WordPress you can get started with.
To add to that, here are other articles you may be interested in.
The first article lists over 8 best WordPress page builders and themes. The second one talks about the 7 best Divi Builder alternatives to help you create a WordPress site. While the last post guides you on how to create a custom WordPress layout, step by step.
With that said, we give Beaver Builder 4.2 out of 5 stars. Here is a breakdown of our scoring system:
Get Beaver Builder Now »
See Beaver Builder Coupon »
منبع: https://www.isitwp.com/wordpress-plugins/beaver-builder/
