Are you wondering how to set form tracking in WordPress?
Forms help you connect with your audience, allowing your users to contact you and give you feedback. They also act as lead magnets, ensuring you get more subscribers.
By tracking forms, you can better understand your audience helping you improve engagement and conversions.
In this article, we will look at the best way to carry out WordPress form tracking using Google Analytics 4. We will walk you step by step to ensure you can also do it yourself without expert help.
Importance of Form Tracking
As mentioned, forms act as an easy-to-use communication tool between you and your users. You can create contact forms, testimonial forms, registration forms, and more to ask for user information conveniently.
This makes forms an awesome way to learn more about your audience or collect data without being intrusive or pushy.
You can use the information you collect to help you improve your services to serve your audience better.
You can also use forms as lead magnets to grow your audience. And depending on how you set them up, forms can help you segment your audience so that you can deliver the right message to the right inbox.
Plus, forms also provide secure transaction portals where users can pay for your services directly.
On the other hand, forms present a convenient way for your users to contact you without looking for emails, contact details, or using different platforms. They can also book appointments and sign up for events directly on your WordPress website.
Now, as you can see, there are a lot of ways to use forms in WordPress. This makes them a very important asset to have on your site. As a result, it is important to track different aspects of this asset.
As an admin, form tracking can help you gain insight into the following.
- Submissions: You can see how many people completed and submitted your form.
- Most Viewed: Through the analytics, you can inspect which forms were viewed most. You can then compare this with how many submitted the form to get a better picture of the form conversions.
- Abandoned Forms: With GA4, you do not need to do any math. It can help you quickly see how many people abandoned the form.
- Track Events: Monitor when users click on specific fields. This can help identify which fields are drawing the most attention.
Navigation Paths: You can analyze the sequence of user actions leading up to and following form interactions. This can help you understand the context in which forms are used.
Drop-off Points: Identify the exact points where users abandon the form process, enabling targeted improvements.
With that said, let us look at the steps to take in WordPress form tracking.
Steps to Take to Track Forms in WordPress
As you can see, you can get a wide range of data about WordPress forms. But, setting up form tracking in GA4 can be challenging.
You can set it up manually in Google Analytics 4 using Google Tag Manager. You can also add a tracking code in your theme or fuction.php file.
All these methods need a level of coding experience which can make them difficult to use. And even if you have the experience and knowledge, it can be time-consuming, and a small error can lead to you breaking your site.
That is why we highly recommend you use MonsterInsights for form tracking.


MonsterInsights is the best WordPress Google Analytics 4 plugin. You can connect it to Google Analytics without touching code or Google Tag Manager, making it convenient for beginners and small businesses.
It simplifies Google Analytics data into user-friendly data that you can easily understand. With MonsterInsights, the analytics data is displayed in WordPress, meaning you will not need to go back and forth between different platforms.
You can customize the data you want with this analytics plugin so that you can quickly go through the information that is most important to you. This can also help you track your SEO and marketing campaigns to see if they are successful.
MonsterInsights is not just built for form tracking; it can also track:
- Outbound links
- Affiliate links
- Video and media files
- eCommerce traffic
- File downloads
- Page views
- And more…
Check out the latest MonsterInsights review here to learn more about this Google Analytics plugin.
Now that you understand more about MonsterInsights let us see how you can use it to track forms in WordPress.
Step 1: Install and Set Up MonsterInsights
Before you install MonsterInsights, you should have a GA-4 account already set up.
But do not worry. Creating a Google Analytics account is straightforward. In fact, you will use your Gmail account to create an account, and GA4 will walk you through the process.
All you have to do is visit the Google Analytics website and select Get Started Today to get the ball rolling.
If you need any help with this, check out this article on how to set up Google Analytics 4 in WordPress.


With that out of the way, we will also point out that MonsterInsights offers a free and premium version of the plugin.
MonsterInsights Lite will help you track basic metrics on your WordPress site. But if you want to do form tracking with MonsterInsights, you will need a Pro Plan or higher.
So to get started, head to the official MonsterInsights website and sign up for a plan.
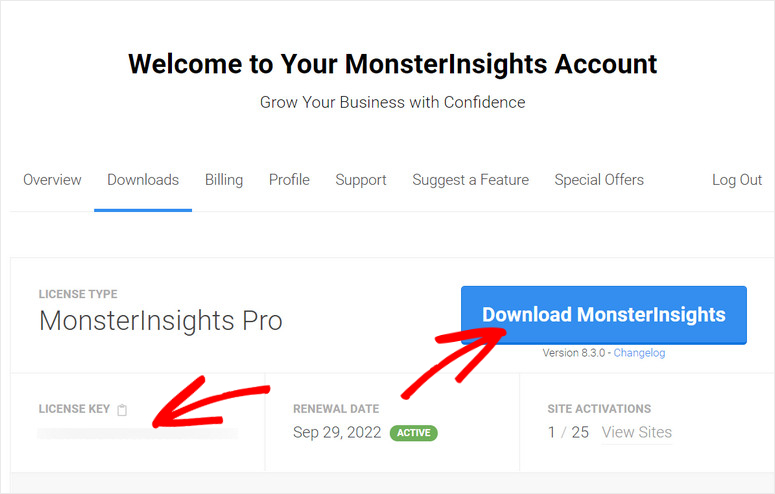
Once you pay for the package that best suits your needs, go to your MonsterInsights dashboard and select the “Downloads” tab.
Here, download the MonsterInsights plugin ZIP file to your PC. While you are on this page, also copy the License Key, as you will need it later to activate MonsterInsights Pro.

After this, head to your WordPress dashboard and select Plugins » Add New Plugin. Then, upload and activate the MonsterInsights ZIP file as you would any other plugin.
If you face any difficulties, check out this article on how to install plugins for assistance.
Now, with MonsterInsights installed and activated, head to the Insights » Setup Checklist. Here, you will find a detailed step-by-step process for setting up MonsterInsights.
Next, expand the “Step-1 Set Up MonsterInsights” and select Launch Wizard. This setup wizard will help you set up and customize MonsterInsights features using toggle buttons and checkboxes.
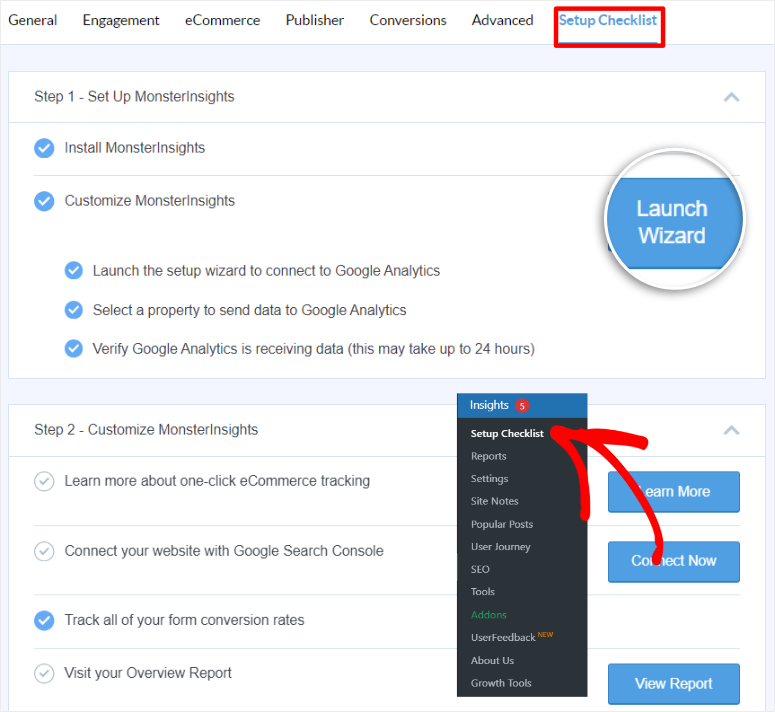

As a result, configuring MonsterInsights with the wizard is easier and ensures you don’t forget anything. All you have to do is follow the pages provided.
On the first page of the setup wizard, use a checkbox to tell MonsterInsights if your WordPress site is a Business Website, a Blog, or an eCommerce store.


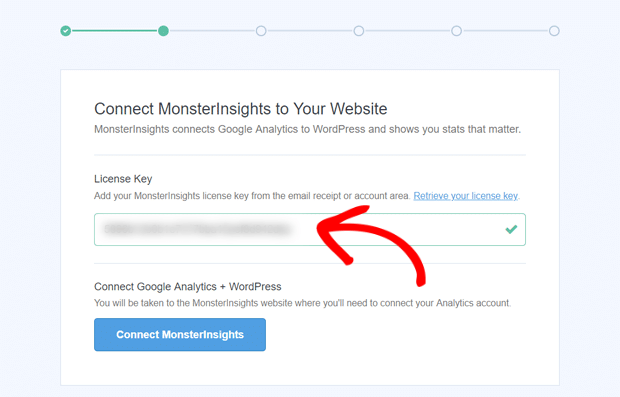
On the next page, enter the License Key you copied earlier and hit Connect MonsterInsights to activate the pro version of the plugin.
Then, select “Connect MonsterInsights” so that you can integrate WordPress with Google Analytics using MonsterInsights.

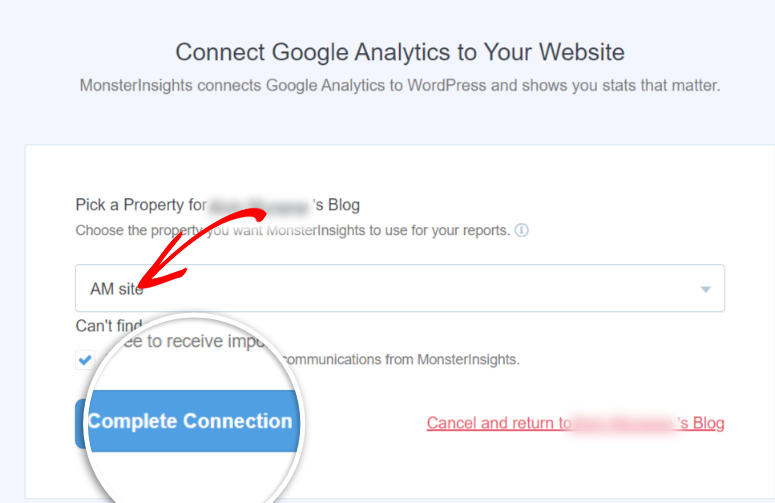
Then, sign in using the Gmail account you used to register for Google Analytics 4. Follow this up by granting MonsterInsights permissions.


Then, pick the property you want to see form reports for and select “Complete Connection.”

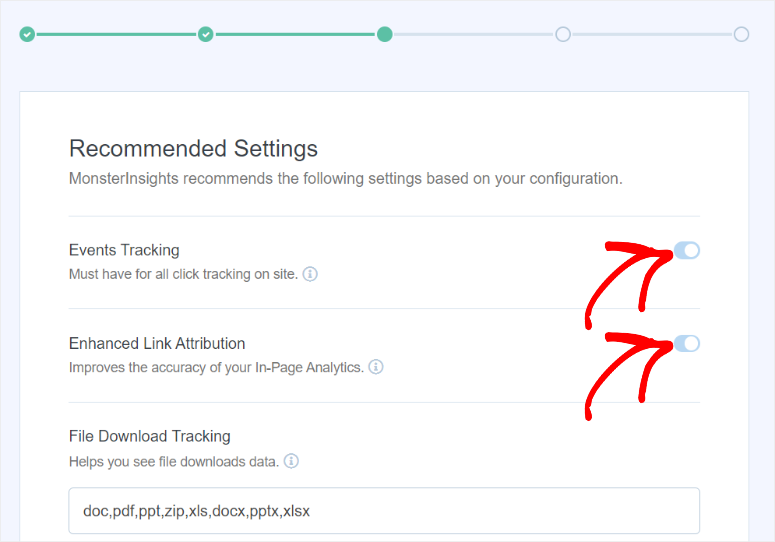
On the next wizard page, use the toggle buttons to activate Event Tracking and Enhanced Link Attribution. Below this, you can add what file downloads to track apart from the default file formats already set by this metrics plugin.
This can be especially valuable if you plan to use your forms as lead magnets.

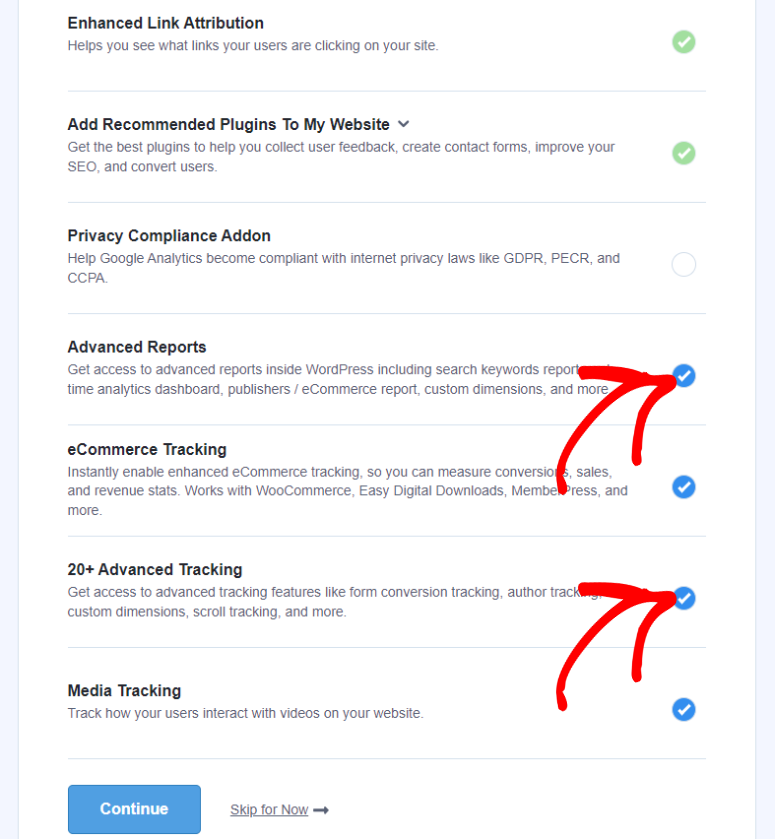
Then, on the next screen, use checkboxes to activate even more MonsterInsights features. There is a short explanation offered for each checkbox, ensuring you understand what you are switching on.
On this screen, make sure you switch on “20+ Advanced Tracking,” which is the feature that allows for form tracking using GA-4.
We also recommend you switch on “Advanced Reporting” so that you can do things like search keywords, real-time metrics, eCommerce reports, custom dimensions, and more.
This will allow you to customize your form data better.

On the final page of the setup wizard, MonsterInsights will tell you which configurations were successful and which ones were not. If you activated “20+ Advanced Tracking,” you should see “MonsterInsights Forms Installed” marked as Success.
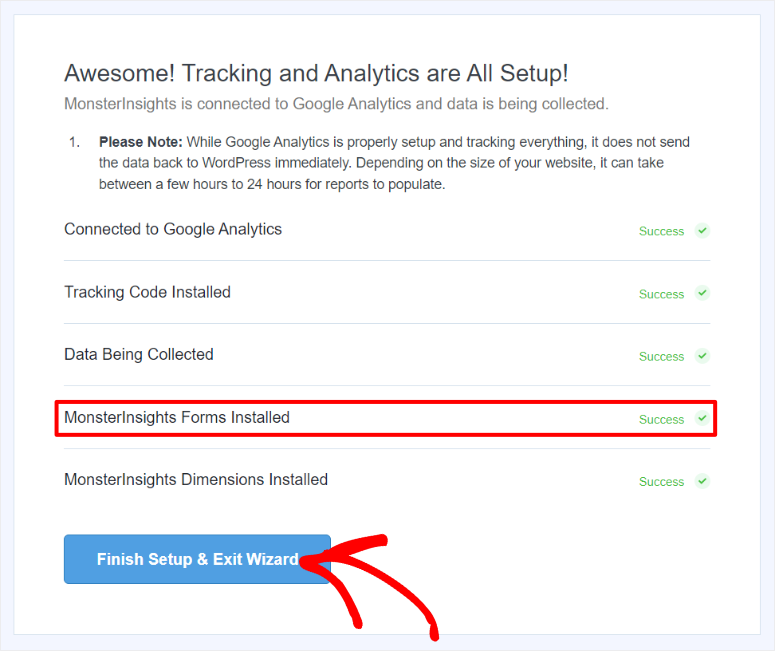

That’s it! You have successfully set up MonsterInsights.
Step 2: Install and Set Up WPForms
Now, before you can track form submissions and other form metrics, you must have a trusted form builder plugin.
There are plenty of WordPress form plugins out there with unique features designed for different users in mind. You can check out this article on 18 Best Form Plugins for WordPress to get started.
But to ensure you find the right form plugin, make sure that it is user-friendly, comes with practical features, and is easy to integrate with other tools.
That is why we selected WPForms!
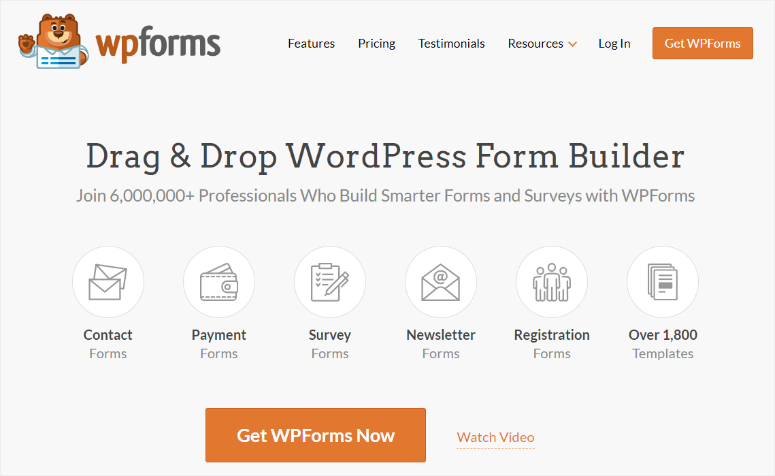

WPForms is the best drag and drop form builder. Its user-friendly interface allows anyone to create forms in minutes without coding experience.
WPForms comes with +1,800 form templates to help you build. You can then further customize each template with the drag and drop builder to fit your style and brand.
You can enjoy features like conditional logic, spam protection, and form abandonment tools, ensuring a smooth and efficient form-building experience.
WPForms integrates easily with email marketing, CRM tools, and payment gateways. This makes it ideal for both beginners and experts who want to enhance website functionality and user engagement.
Most importantly, it easily connects with MonsterInsights to allow for custom form tracking using Google Analytics 4.
The best thing about WPForms is that it offers a free and paid version, just like MonsterInsights. Plus, you can connect MonsterInsights with both versions easily and quickly without any coding experience.
Check out the latest WPForms review here to learn more about this form builder.
So, how do you get started with WPForms?
If you want WPForms Pro, head to its official website and select a plan. WPForms offers 4 packages ensuring you get one that fits your budget.
In case you experience any issues, check out this tutorial on how to set up WPForms Pro.
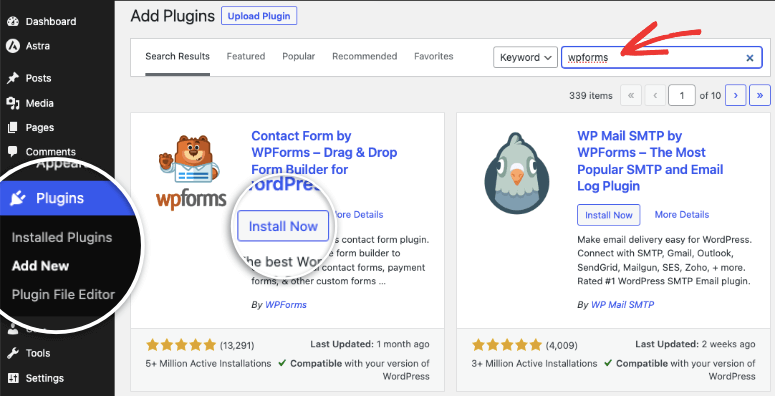
If you want to use WPForms Lite, head to your WordPress plugin repository by navigating to Plugin » Add New Plugin. Then, use the search bar to look for “WPForms” in the repository.
After this, Install and Activate this free plugin just like you would any other plugin. Once WPForms is ready, you can easily start building any type of form you want.

Check out this article to learn how to set up your first form with WPForms.
Once you publish your forms, you should be able to view your reports after setting up form tracking.
Step 3: Set Up MonsterInsights Form Tracking
At this point, you should have Google Analytics 4, MonsterInsights, and WPForms all ready to use.
But to track form data with Monsterinsights and GA4, you need to install an additional MonsterInsights addon called “Forms.”
As mentioned, if you activated the “20+ Advanced Tracking” with MonsterInsights’ wizard, you should have the MonsterInsights Forms addon already set up.
But you can also install this forms addon manually.
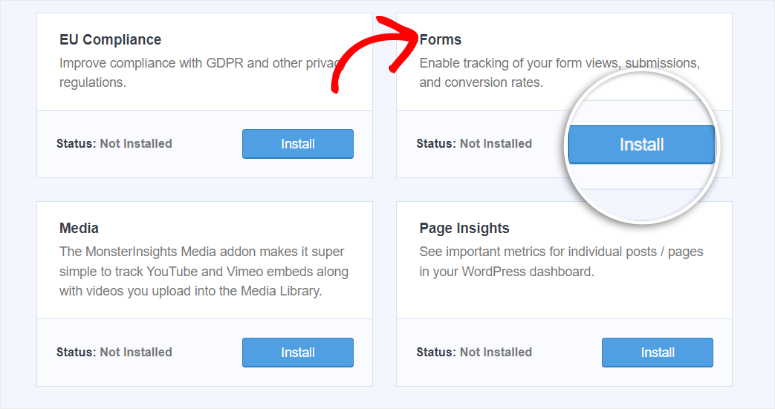
To do this, head to Insights » Addons in your WordPress dashboard and use the search bar to find “Forms.”
Once you locate this addon, install and activate it. And just like that, you are ready to track form data.

So, how do you check your form insights in your WordPress dashboard?
All you have to do is head to Insights » Reports. Here, you will see separate tabs displaying different site analytics such as Overview, Traffic, Search Console, eCommerce, and more.
As mentioned, you will only see the data that you have selected displayed.
Next, select the “Forms” tab, where you can access information like Form Name or ID, Impressions, Conversions, and Conversion Rate.
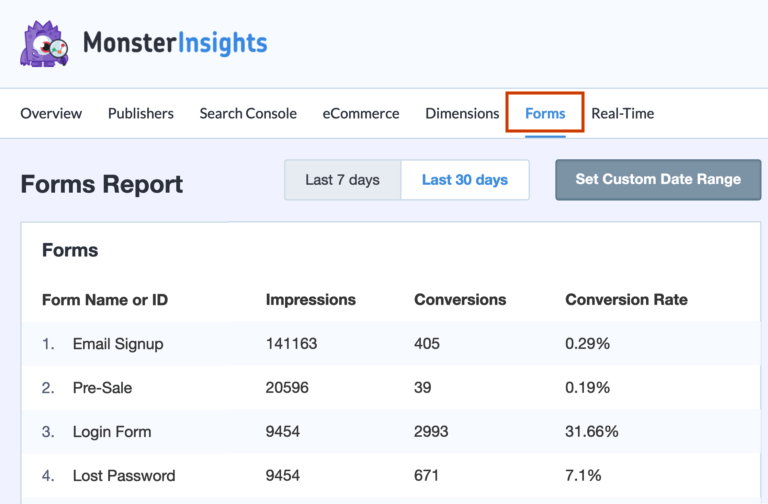

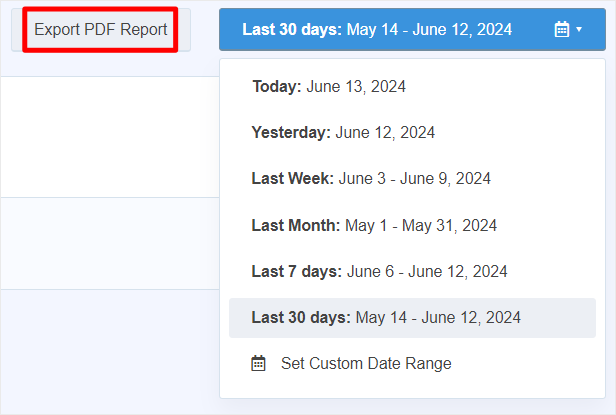
You can define the date range to focus on Today, Yesterday, Last Week, Last Month, Last 7 days, and Last 30 Days. On top of this, you can set a Custom Date Range to get more specific insights.
If you want to store this data locally so you can share it with your team or client, you can select “Export PDF Report” with a click of a button.

Great! You can now track forms from your WordPress dashboard with MonsterInsights.
Step 4: Set Up User Journey
While tracking forms allows you to get insights into the numbers your site is doing, user journey reports help you see activities before and after form submission for each user.
It helps you see each user’s navigation path, how they found your form and the pages they visited after.
You can quickly see the fields that your users took a lot of time on, which can show what they struggled with while filling out your form. The user journey can show you where the user dropped off, which can also show you which fields users struggle with mostly.
This information can help you optimize your forms better for conversion by shortening the form or changing the fields. With WPForms, you can also optimize the form by using conditional logic so that your users only see fields triggered by their response.
In a nutshell, user journey reports help you see user intent and asses lead qualification so that you can improve conversions.
So, how do you set up User Journey?
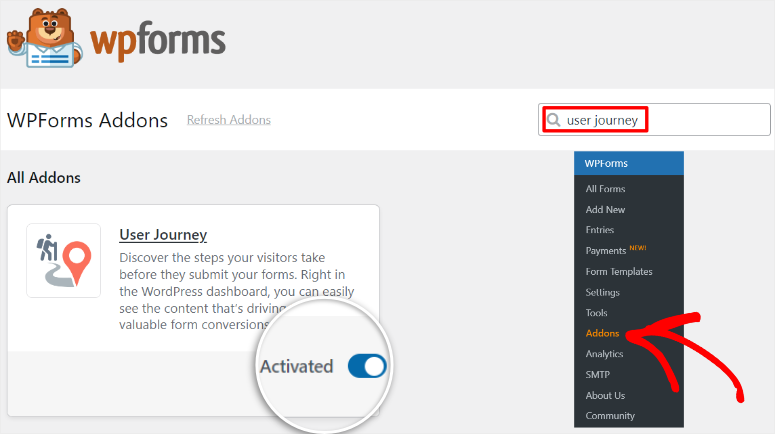
To get started with this, head to WPForms » Addons in your WordPress dashboard and search for the User Journey addon, then install and activate it.

Then, to see the user journey reports, head to WPForms » Entries, where you will see the Name, Date of Birth, Address, Date, and Actions of each user. This will give you a quick overview of each person who interacted with your forms before going into in-depth details of the user journey.
Next, select “View,” then scroll to the new page until you locate the Journey Box.


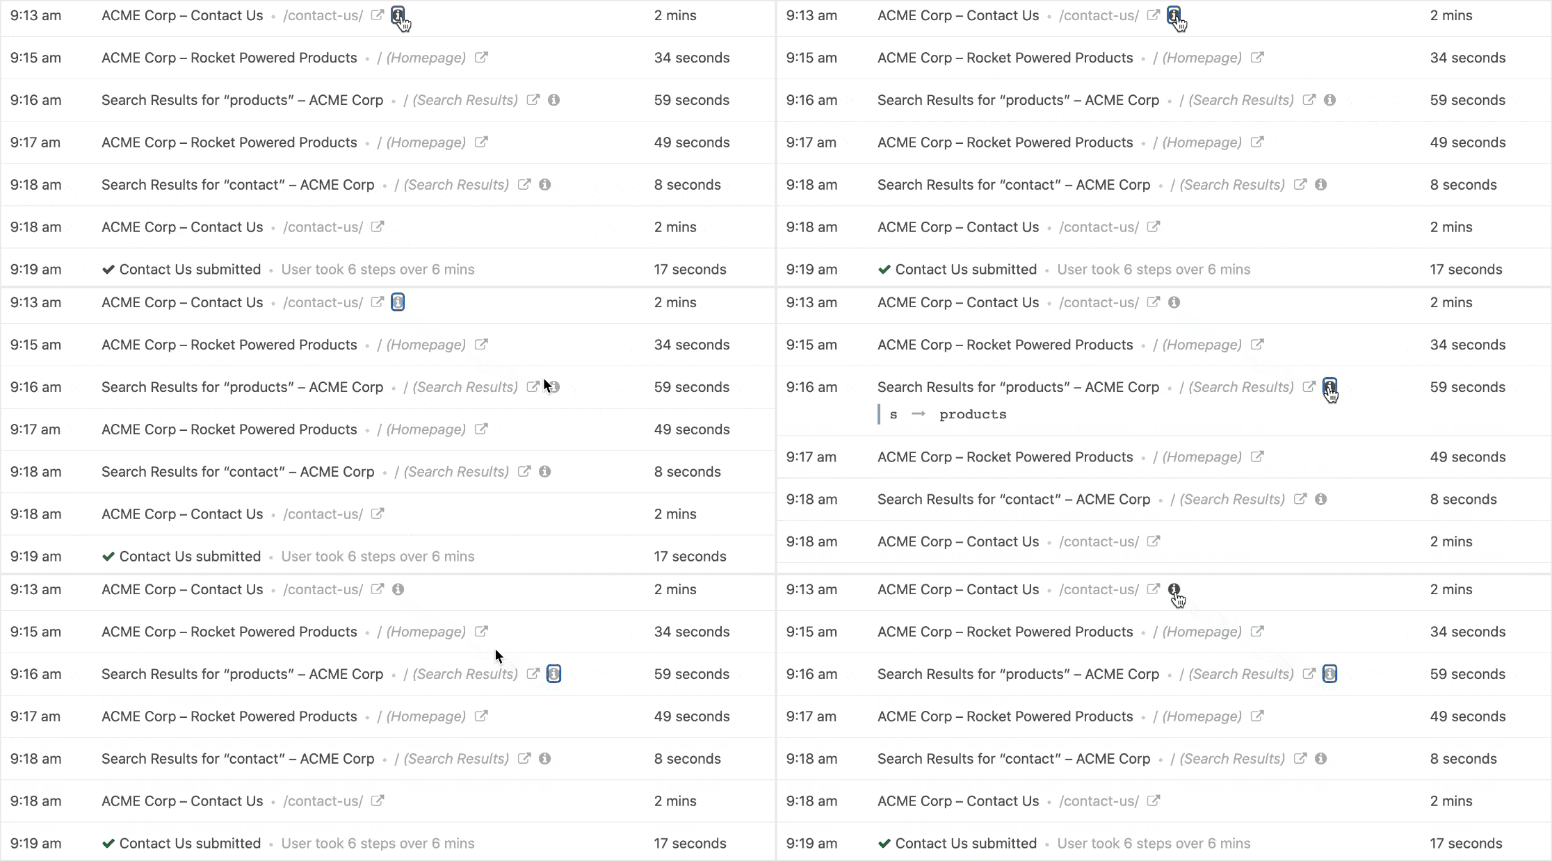
Once you select the Journey Box, you will see everything the user did with a timestamp and also how long it took to perform that action.
With the WPForms User Journey addon, you can do the following:
- Pages and posts browsed before and after form submission
- The search they made to land on your site
- Identify the URL used to get to the site
- The UTM tags for the campaign
- Time spent on your site

Bonus Optional Step: Advanced Form Tracking in Google Analytics 4
As mentioned, MonsterInsights simplifies GA-4 data so that it is simple to understand and follow. If you want to check advanced or raw form data, you can set it up and view it in Google Analytics 4.
But, if you would like to skip this step, do not worry; the WPForms User Journey addon provides similar data and form metrics right in your WordPress. You can use it without the fear of missing out on any critical data.
So, how do you set up advanced custom form tracking in your GA4 account?
To start, log into your Google Analytics dashboard and select the Explore tab. Here, choose the “Blank” report option to create a new custom report.


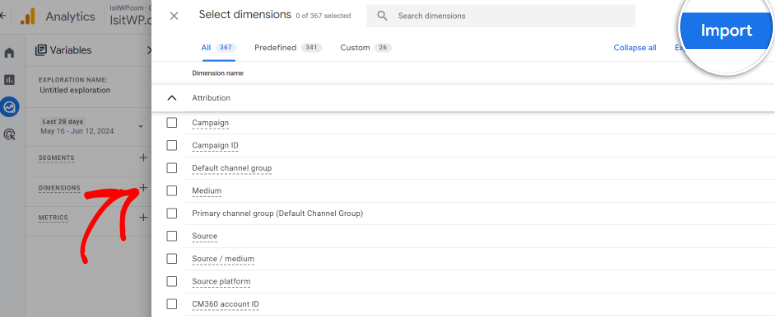
Then, hit the Plus (+) icon next to Dimensions and search for the following dimensions.
- Session source/medium
- Page path + query string
- New/established
- Event name
- Form ID
When you locate a dimension, add it by ticking the checkboxes next to each of them. Then, once you’ve selected all the dimensions, Hit the “Import” button to add them to your report.

Next, add the metrics you need to measure the quantity of the data by selecting the Plus (+) icon next to Metrics.
To do this, search and add “Event Count” to Metrics to measure how many times the user triggers a GA4 event, such as submitting a form.


Now that you have all the necessary dimensions and metrics, it’s time to build your report.
To do this, drag and drop “Form ID” and “Session source/medium” from the Dimensions box into the Rows box.
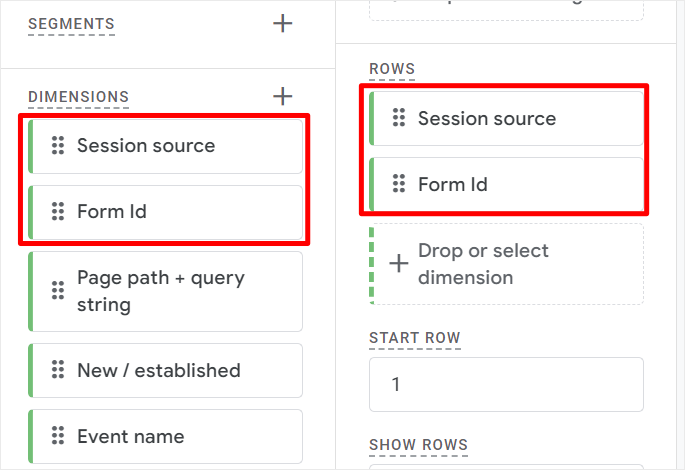

Then, drag and drop “Event Count” from Metrics to the Values box.
At this point you should notice that your report populates with data. But it will include all website events and custom events, so we need to narrow it down to display form submissions.
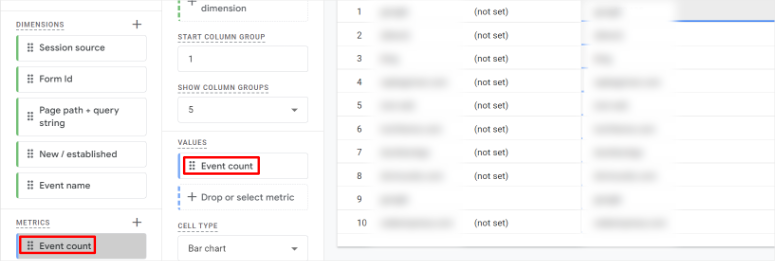

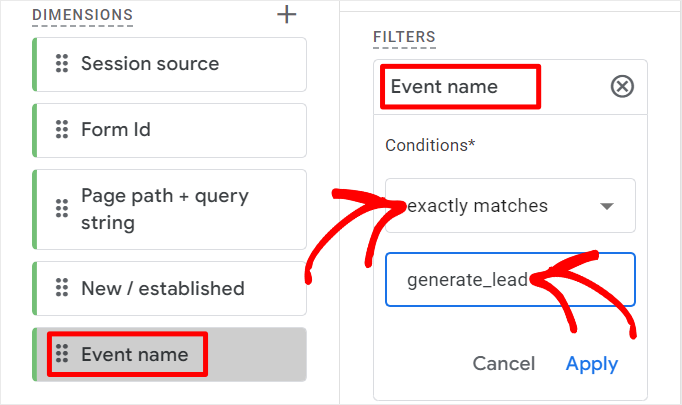
To do this, add a filter by dragging and dropping “Event Name” from the Dimensions box to Filters.
Then, choose “Exactly Matches” from the Filters dropdown menu. You will then type in “generate_lead” in the field below this.
Once this is done, hit Apply.

Congratulations! You can now set form tracking using MonsterInsights and Google Analytics 4. If you have more questions, check out our FAQs below.
FAQs: How to Set Up WordPress Form Tracking in Google Analytics
How to do form abandonment tracking?
Use the WPForms Form Abandonment addon to easily track this metric. This addon allows you to capture partial entries from users who start filling out a form but do not complete it. You can also use MonsterInsights to automatically track form abandonment straight in your WordPress dashboard. The other option is to use Google Analytics 4 to create a custom report.
Is MonsterInsights free?
Yes, MonsterInsights offers both free and premium versions. The free version, MonsterInsights Lite, provides basic Google Analytics integration and essential tracking features. But, for advanced tracking features like form tracking, you will need the Pro Plan or higher. The premium plans also come with additional features such as enhanced eCommerce tracking, affiliate link tracking, and detailed reports.
Can I track form submissions without a plugin?
Absolutely, you can track form submissions without a plugin by manually adding tracking code to your WordPress site. This involves using Google Tag Manager to set up triggers and tags for form submissions. You’ll need to add specific JavaScript code to your form elements to capture submission events. While this method offers flexibility, it requires coding knowledge and can be time-consuming. For a more straightforward solution, using a plugin like MonsterInsights simplifies the process and does not require any coding skills.
Can WPForms save form data?
Yes, WPForms can save form data. When users submit a form created with WPForms, the data is stored in the WordPress database. You can view and manage these entries from the WordPress dashboard by navigating to WPForms » Entries. This feature is available in both the free and premium versions of WPForms. To add to this, WPForms integrates with various email marketing and CRM tools. This allows you to automatically send form data to your preferred platforms for further processing and follow-up.
Thats it! we hope you enjoyed reading this step by step guide on how to set up form tracking in WordPress. If you would like to know what’s new in GA4, check out this article on Google Analytics 4 vs Universal Analytics: Full Comparison.
To add to that, here are additional articles you may be interested in reading.
The first article will teach you how to set up conversion tracking in WordPress. The next post lists the 7 best WordPress Google Analytics alternatives. While the last article walks you through how to track and monitor user activity in WordPress.
منبع: https://www.isitwp.com/wordpress-form-tracking/
