

Want to learn how to track affiliate links in Google Analytics?
By tracking your affiliate links, you can find out exactly how your users are interacting with them on your site. With this data, you can optimize your links for better conversions and revenue.
In this step-by-step tutorial, we’ll show you how to track affiliate links in WordPress in just 3 easy steps.
We’ll be using Google Analytics and a WordPress plugin to do this. So, first, we need to explain why tracking affiliate links is so important so that you understand why we’ve chosen this method.
Why Track Affiliate Links?
Without a doubt, affiliate marketing is one of the most popular ways to make money online. If you have a good amount of regular traffic coming to your WordPress site, you can earn a tidy sum of money by adding affiliate links to your site.
These links redirect users to sales pages of vendors’ products with your affiliate ID attached. So, when people buy products through that link, you earn a certain amount of commission money.
You can randomly add links and hope the money comes in, but if you want to be successful at affiliate marketing and earn a high income from it, then you need proper affiliate link management and organization.
Truth be told, successful affiliate marketing isn’t possible without proper data and analytics.
You need actual statistics on how your referrals are interacting with the affiliate links. This will help you optimize your marketing strategy and place the links strategically to maximize revenue.
Without this data, you stand to lose so much revenue that’s on the table.
That’s why it’s so important to track your affiliate links. When you track this data, you can do the following really well:
- Get actual data on user interaction: You can find out exactly how referrals interact with your affiliate links. Analyze where people are clicking the most.
- Identify your most profitable links: Focus on the links that are driving the most conversions.
- See most converting pages: View which pages are leading the most affiliate sales and optimize them for more revenue.
In summary, affiliate tracking helps you see how referrals view and interact with your affiliate links. It provides comprehensive data that can help you optimize your affiliate marketing campaigns and maximize your earnings.
Step 1: Install and Activate MonsterInsights
The first thing you need to do is install MonsterInsights on your WordPress site.


MonsterInsights is the best Google Analytics plugin because setting it up is super easy.
In fact, you will not even need to import your Google Analytics activation code or use the Google Analytics API to connect to MonsterInsights; it will do everything for you.
It is the best way to view your site metrics directly on your WordPress site in real-time, so you will not need to work on multiple dashboards. Plus, it simplifies this complicated data from GA4 in a simple, easy-to-understand way.
Now, while there are many GA-4 plugins out there, we used MonsterInsights for this tutorial because of the many affiliate program features it comes with. It makes it super easy to set up affiliate link tracking without any technical hassle.
With that said, first, head to the MonsterInsights official website and select a plan. Here, make sure you purchase the MonsterInsights Plus or a higher plan.
Sure, MonsterInsights offers a free version of the plugin which can help small businesses and bloggers scale. But, the affiliate link tracking feature is available only in a Plus Plan, with pricing starting from $99.60 per year.
After that, download the MonsterInsights plugin and copy the license key as well; you will need it to activate the pro version.
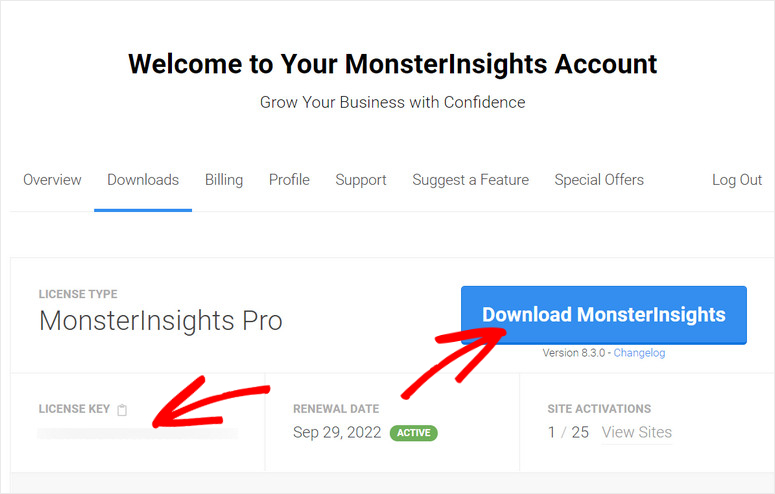

Now, go to your WordPress dashboard and upload the plugin ZIP file to WordPress like any other plugin.
To do this, simply navigate to Plugins » Add New » Upload Plugin. Then, hit Install Now, and finally, activate the plugin.
Then, go to Insights » Settings and open the “General” tab. Here, paste the license key you copied earlier and hit “Verify.”
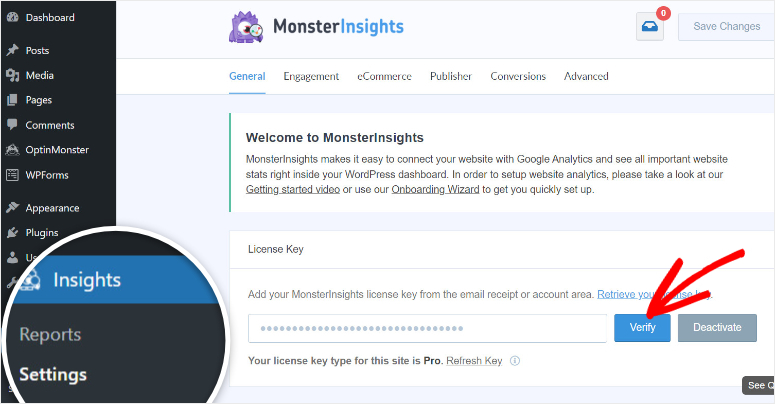

That’s it! You have successfully installed and activated MonsterInsights.
If you have any issues, here is an article on how to install a WordPress plugin.
Step 2: Connect Google Analytics with Monster insights
If you already have a Google Analytics account, the next step is to connect MonsterInsights with it through the setup wizard. But if you don’t have a Google Analytics account, don’t worry; getting one is very straightforward.
If you are concerned about the Google Analytics fee, rest assured that it is completely free, and you can access all its features without paying anything.
Just head over to the Google Analytics website and click on “Get Started Today” to create your account.


Once you do this, Google Analytics will provide a step-by-step process for creating an account.
If you face any problems along the way, you can refer to our step-by-step guide on how to set up Google Analytics 4 on your WordPress site for assistance.
Now, at this point, you should have both your MonsterInsights account and GA-4 dashboard ready.
The next step is to navigate to Insights » Settings » General in your WordPress dashboard and then scroll down to select “Launch Setup Wizard.”


The MonsterInsights setup wizard is designed to simplify the initial setup process and ensure you follow all the steps. So, you will enjoy a quick setup process and have MonsterInsights connected to Google Analytics in minutes.
Now, on the setup wizard’s first page, specify the site type you are running. Then, select “Connect MonsterInsights” on the next page.
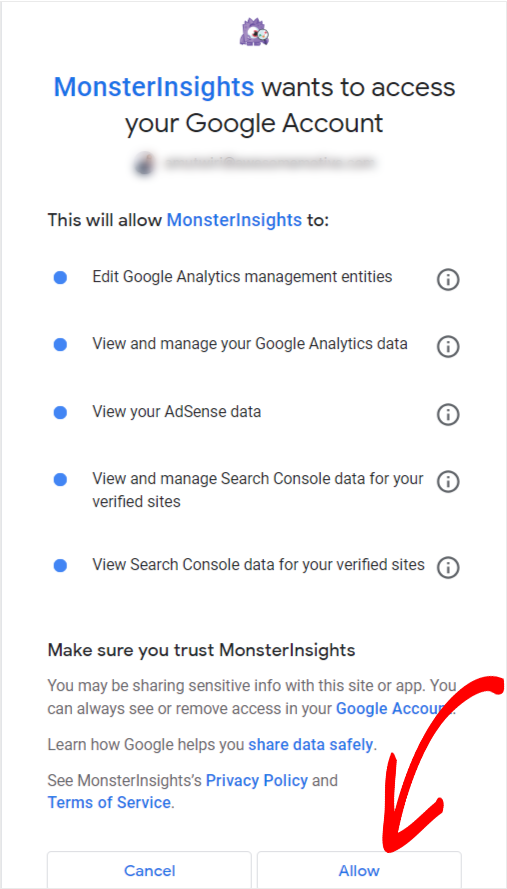
This will prompt a popup window displaying all the Google Accounts on your computer.
On the list, choose the Gmail account linked to your Google Analytics account and select “Allow” to grant MonsterInsights access to your Google Account.

Finally, on the last page of the MonsterInsights Setup Wizard, use the checkboxes to indicate what metrics you want to track.
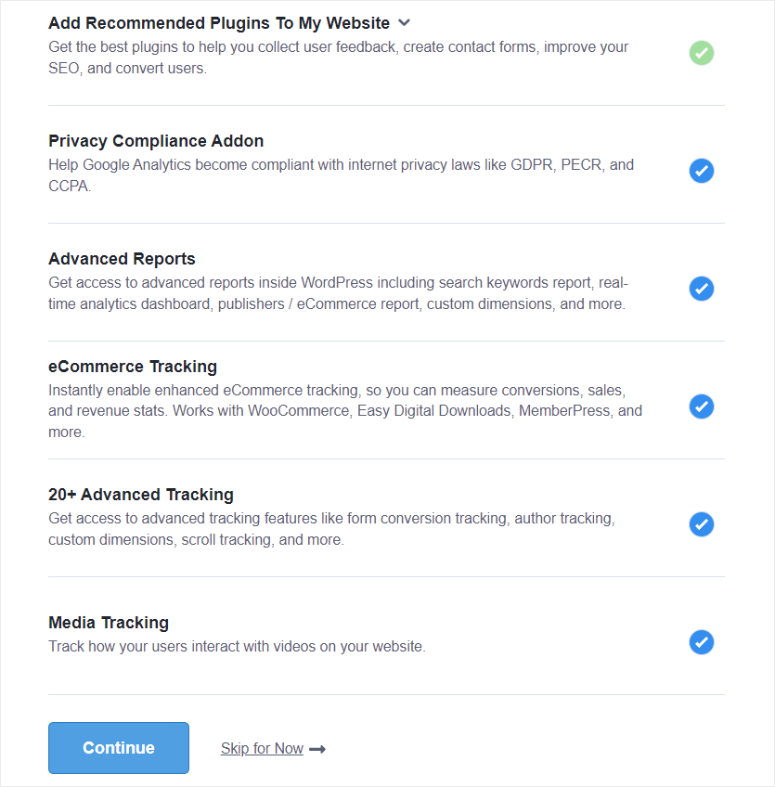

Once you’ve selected, click “Continue” to finalize the setup.
With the connection created, MonsterInsights will automatically start tracking your WordPress website data through Google Analytics.
Step 3: Cloak Affiliate URLs with Pretty Links
Now, cloaking your URLs is important to ensure accurate tracking of clicks from your outbound affiliate links using MonsterInsights. This will help you maintain clean and user-friendly URLs and increase the efficiency of tracking affiliate activity on your website.
For this tutorial, we used Pretty Links.


Pretty Links is the best affiliate link cloaking plugin. This free plugin allows you to shorten and manage your outbound links directly from your WordPress dashboard.
It lets you customize your affiliate links to what you want and even include your domain name in the URL. This improves the overall look of your links and builds trust with your audience.
The free Pretty Links plan offers everything you need to get started with affiliate link cloaking. However, advanced features, like in-depth click tracking reports, are only available in the pro plans.
Check out this page if you want to buy the premium version of this plugin.
To add to this, setting up Pretty Links is easy! Just head to your WordPress dashboard, select Plugins, and then Add New Plugin. Then, in the search bar, type “Pretty Links” and hit Install Now.
Once installed, you can access the plugin’s features from your WordPress dashboard by selecting the new menu option “Pretty Links.”
Next, hit “Add New” on the next page to add your affiliate link to Pretty Links.
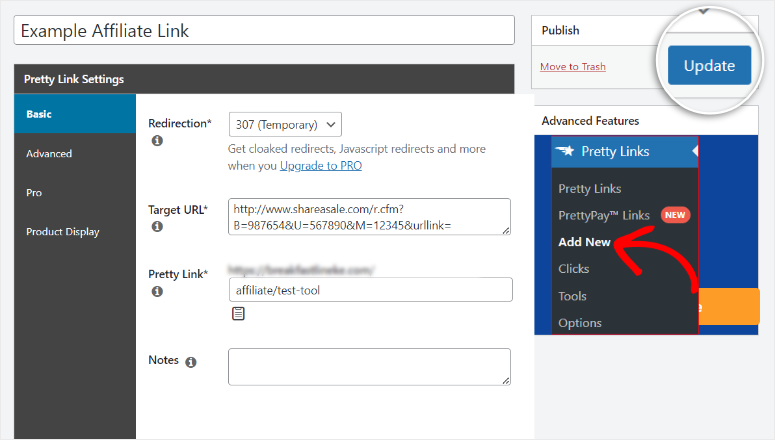

Now, at this point, it’s time to configure your link!
For MonsterInsights to accurately track your affiliate links, you must redirect your original, lengthy affiliate links to URLs on the same path.
We will show you how to do this with the demonstration below.
If your website is mysite.com, and you’re promoting MonsterInsights through Shareasale. Your affiliate link to MonsterInsights will resemble the following link:
http://www.shareasale.com/r.cfm?B=940284&U=3982035&M=1982305&urllink=
With Pretty Links, you have the flexibility to customize this lengthy link into a user-friendly, SEO-optimized and branded URL.
For instance, you could create a new URL like mysite.com/affiliate/tool.
Now, users will see and interact with the personalized URL while being seamlessly redirected to your original Shareasale affiliate link.
mysite.com/affiliate/monsterinsights
Now, as mentioned, you need to ensure consistency in the path structure of your links.
In the example above, we used /affiliate/ followed by the product name. Depending on your preference, you can use any path you want, such as /refer/tool or /go/product.
But at the end of the day, you need to use the same path for all your affiliate links.
If you are looking for an alternative to Pretty Links, you can check out ThirstyAffiliates.
Step 3: Set Up Tracking in MonsterInsights
Now that your affiliate URLs are cloaked and ready for tracking, it’s time to configure the tracking settings within MonsterInsights.
To do this, go to Insights » Settings » Publisher in your WordPress dashboard. This will take you to MonsterInsights features.
Then, in Publisher Settings, scroll down and locate the Affiliate Links section.
Here, enter the URL path you used for cloaking your affiliate links (e.g., /affiliate/) and assign it an easy-to-remember Label.
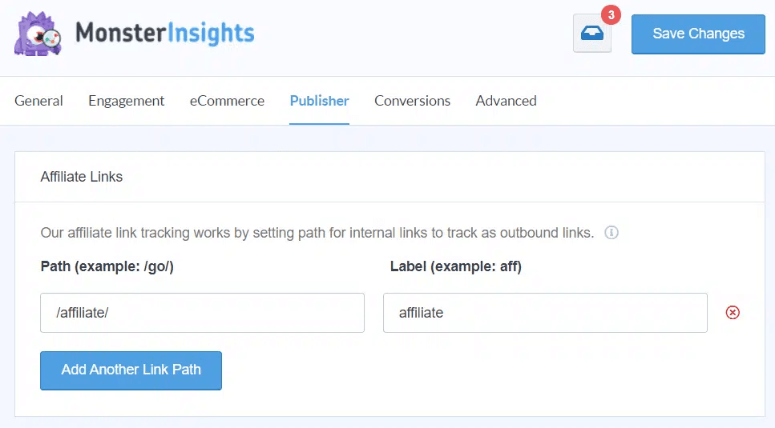

This label will appear in Google Analytics when you want to analyze your affiliate links.
MonsterInsights allows you to add multiple paths. So, all you have to do is select “Add Another Link Path” and repeat the steps above.
Once this is done, Save changes.
Finally, you will decide how you want MonsterInsights to track Pretty Links URLs using checkboxes.


That’s it! You can now track affiliate links using MonsterInsights.
Step 4: View Your Tracking Report
Now that you have set up affiliate link tracking, you can easily view the metrics on your WordPress dashboard using MonsterInsights.
To access your affiliate link tracking report, go to Insights » Reports » Publishers from your WordPress dashboard. Then scroll down to locate “Top Affiliate Links.”
Here, you will find valuable insights into the top-performing affiliate links, including the total number of link clicks.
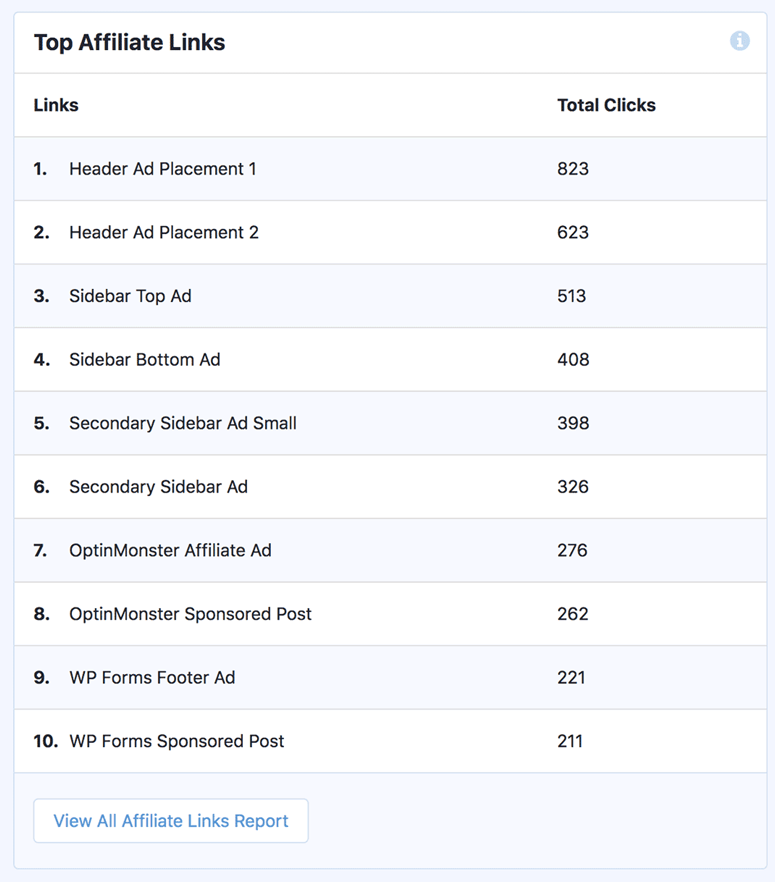

If you want to see more detailed data, select the “View All Affiliate Links Report” button at the bottom of the report. This will redirect you to the affiliate link data in your GA 4 dashboard.
But you can also view the full reports of your affiliate links in Google Analytics 4.
You can get information such as what pages the visitors were on when they clicked on the link.
To do this, head to the Explorations tab in your Google Analytics and create a Blank report to start from scratch.
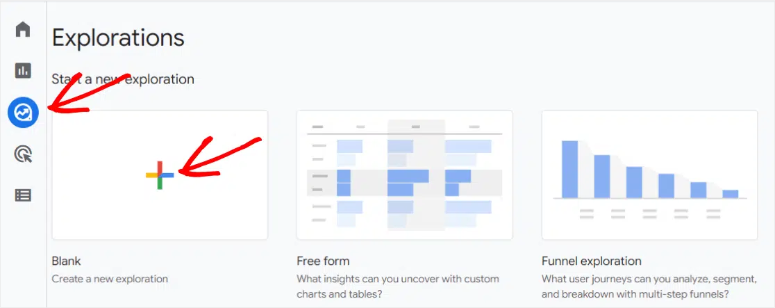

You will then search and import the following dimensions to the report.
- Event name
- Is affiliate link
- Page title
- Affiliate label
- Link text
Once these dimensions are imported, proceed to the Metrics box and add the “Event count” metric by selecting the Plus (+) sign. Now, arrange the dimensions and metrics in your report to create consistency in your event tracking.
Drag and drop “Page title,” “Affiliate label,” and “Link text” from the Dimensions box to the Rows section.
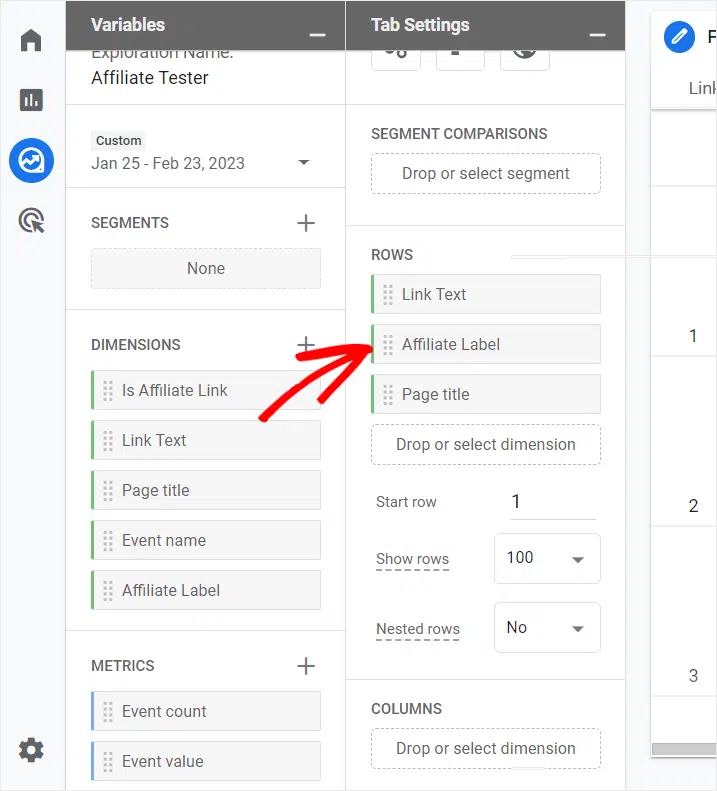

After this, move “Event count” to the Values section from the Metrics box.
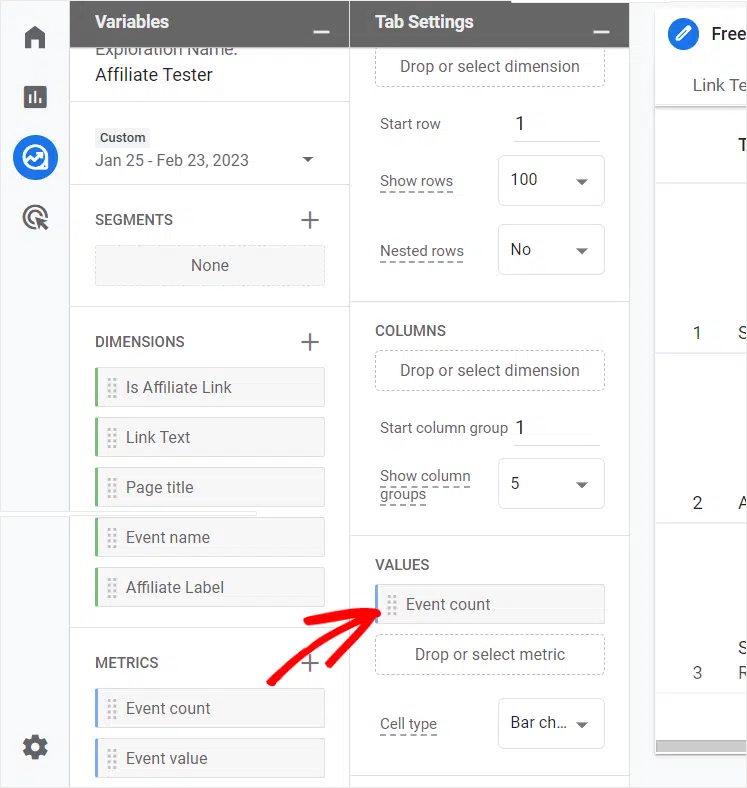

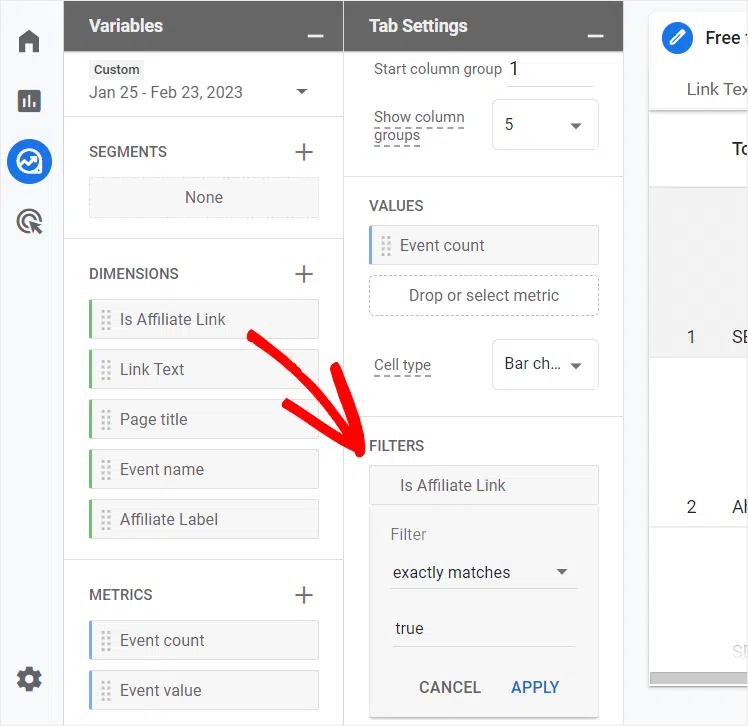
Now, to ensure accurate reports, it’s essential to apply appropriate filters.
Begin by selecting and dragging the “Is affiliate link” dimension from the Dimensions box to the filters section. Then, select “exactly matches” and set it to “True.”
After this, hit “Apply.”

Finally, drag the “Event name” dimension from the Dimensions box to the filters section and select “exactly matches.”
Then select “Apply” to activate the filter.
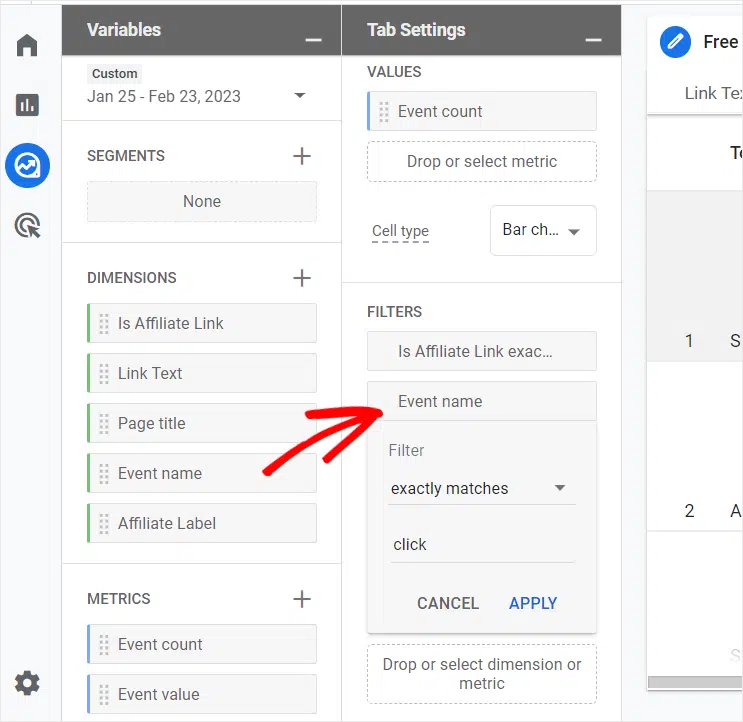

Congratulations, you can now build a custom report in GA-4 that shows you which of your affiliate links were clicked on, which pages they were on, and how many times!
FAQs: How to Track Affiliate Links in WordPress
What is a metric in Google Analytics?
A metric in Google Analytics helps you understand how users interact with your website. Metrics are represented by numbers, percentages, or currency and provide insights into various aspects of your website’s performance, such as traffic, engagement, conversions, demographics, and more.
What is the difference between Google Search Console vs Google Analytics?
Google Search Console focuses on how your website appears in search engine results pages (SERPs) and helps you optimize your site for search visibility. It provides data on keywords people use to find your site, crawl errors, and mobile usability. Google Analytics focuses on how visitors interact with your website once they arrive. It provides data on traffic sources, user behavior, conversions, and more. Both are free Google tools.
How to find bounce rate in Google Analytics 4?
The best option is to download MonsterInsights, and you should find your bounce rate automatically in reports. But you can also use Google Analytics 4. You can find the bounce rate by navigating to the “Reports” section in your Google Analytics 4 property. Then select “Engagement” in the left-hand menu. After this, select “Overview” under “Engagement.” You will find the bounce rate displayed among other engagement metrics like average engagement time and sessions per user. You can also just use the GA-4 search bar and type in “Bounce Rate,” it should appear in the search results.
What data Google Analytics goals unable to track?
Google Analytics goals cannot track offline events, such as phone calls or in-store purchases unless integrated with other tools or platforms. It can also not track qualitative data. It focuses on quantitative data (numbers) and can’t capture user sentiment, opinions, or motivations.
Which goals are available in Google Analytics?
Destination Goals track when a user reaches a specific webpage URL on your site. Event Goals track specific user interactions on your website beyond just page views. Duration Goals track how long users stay on a particular page or set of pages for a specific amount of time. Pages per Session Goals track the number of pages a user views in a single session.
With that, you’ve learned how to track affiliate links in WordPress. MonsterInsights is just one of the plugins you’ll need as an affiliate marketer. You may want to see our guide: Best WordPress Plugins for Affiliate Marketers.
These marketing plugins will help you with coupons, popups, automation, landing pages, social media, and adding more functionality.
We hope this article, and if so, you may also want to see our guides:
The first guide is a review of AffiliateWP, one of the best affiliate program plugins. The next post will help set up click tracking to see which affiliate outbound links/buttons get more engagement. The last one there will help you track eCommerce products on your site.
We also have this guide that you’ll find helpful: Affiliate Marketing Made Simple for Beginners: Step by Step.
منبع: https://www.isitwp.com/how-to-track-affiliate-links-google-analytics/
