
Ever spent 3 hours setting up a contact form only to have emails disappear into the void?
Setting up contact forms used to be the absolute worst part of building websites for me. I’d save it for last because I knew it would be a headache.
Here’s the thing: I use Cloudflare on all my sites.
When you’re routing DNS through the Cloudflare CDN and then trying to add SMTP on top of that, everything gets complicated fast.
The biggest frustration? I could receive emails just fine, but replying was nearly impossible.
I tried everything. Zoho SMTP worked great until they removed free emails from their free plan. Then I switched to Outlook SMTP, but the setup process made my head spin.
My breakthrough was when I learned that WP Mail SMTP offered a one-click Outlook SMTP setup. This made the whole process take a few minutes.
But there was another problem!
You need a premium Outlook plan to reliably send emails from WordPress. Since I was looking for more affordable options, this was not the solution for me.
So I switched to Gmail SMTP, which seemed promising but proved unreliable for client websites.
I needed an affordable SMTP service solution that actually worked!
Something simple that wouldn’t break my Cloudflare setup or cost a fortune. So I tested the best free SMTP plugins myself to find what works best for me.
That’s when I discovered SendLayer, and honestly, it surprised me.
Their free trial gives you 200 emails to test everything out, which is actually generous compared to most services.
But what really impressed me was the reliability and simple setup. For just $5/month, you get 1,000 emails with features that solved all my Cloudflare compatibility issues.
In this review, I’ll walk you through my hands-on experience with SendLayer after using it on my SEO agency website.
You’ll discover why it solved my email delivery headaches and whether it might be the perfect solution for your WordPress site, too.
Key Points Summary
Here’s what you’ll learn in this review:
- How SendLayer solves email delivery problems for WordPress sites
- Step-by-step setup process for beginners
- Real-world performance testing results
- Cost comparison with other SMTP services
- Best practices for getting emails into the inbox
- When SendLayer works best and when it doesn’t
How I Test SMTP Services for WordPress
I test every SMTP service the same way I’d use it on real client projects. This means setting up actual WordPress sites and sending thousands of test emails.
First, I install each service on fresh WordPress installations. Then I connect it with other plugins I use for email marketing, like WP Mail SMTP and WPForms.
This shows me how well each service works with the tools I am already using.
Next, I send different types of emails. I test contact forms, password resets, and order confirmations. Plus, I check how each service handles bulk emails and newsletters.
Here’s what I look for during testing:
- Delivery rates – Do emails reach the inbox?
- Speed – How fast do emails get delivered?
- Setup difficulty – Can beginners get it working quickly?
- Documentation – Are the instructions clear and helpful?
- Support quality – Do they help when things go wrong?
- Pricing value – Is it worth the monthly cost?
I also test from different locations and devices. This helps me see how emails look on phones and computers. On top of that, I check spam folder placement across Gmail, Outlook, and Yahoo.
The most important test? I send emails to my accounts for weeks before writing the review. This shows me the real-world performance you’ll get.
Apart from that, I monitor bounce rates and delivery reports to spot any issues.
Every service gets the same treatment. No shortcuts or special favors. Just honest testing that reveals which services work for WordPress users.
Why Trust IsItWP?
At IsItWP, our aim is to help WordPress users solve real problems. As a result, our team has tested hundreds of plugins, themes, WordPress tools, services, and more on real websites.
As part of this team, I’ve helped thousands of beginners through my reviews, guides, and tutorials.
When I test an SMTP service, I’m not just checking boxes. I’m looking for solutions that work for real people.
Apart from that, we never accept payment for reviews. Companies can’t buy a good rating from us. We test everything with our own money and time. This keeps our recommendations honest and trustworthy.
Every recommendation comes from hands-on experience. If I suggest SendLayer, it’s because I’ve used it successfully on client projects.
You can trust my reviews because I am a WordPress user just like you. I face the same email delivery challenges and understand how frustrating it is when emails don’t reach their destination.
SendLayer Review: Here is What I Found Out From My Testing
Now, let us go step by step and see everything I discovered about Sendlayer during my testing for this review. I have broken down this article into several sections to help you navigate quickly.
Plus, if you want to read a specific section, simply select one of the links below.
With that said, let us get into it!
SendLayer Overview

SendLayer is the best transactional SMTP service that helps WordPress sites deliver emails reliably. Think of it as a postal service for your website emails.
Instead of your web host sending emails, which can fail, SendLayer takes over this job.
The SMTP service focuses on one thing: getting your emails to the primary inbox. They don’t offer website builders or fancy marketing tools. Just solid email delivery that works consistently.
What makes SendLayer different? They specialize in transactional emails. These are the important messages your website sends automatically.
Transactional emails include order confirmations, password resets, contact form submissions, and more.
Plus, SendLayer offers something most competitors don’t. They provide dedicated IP addresses even on their starter plans.
This means your emails don’t share reputation with other users. As a result, your delivery rates stay high even if someone else using SendLayer sends spam.
My favorite thing is that this SMTP service works with the most popular SMTP plugins.
And apart from WordPress, you can use it on WooCommerce, Magento, Laravel, Drupal, and Joomla, and even custom applications, all connect easily.
On top of that, they offer APIs for developers who need more control.
SendLayer targets serious website owners who can’t afford email failures. E-commerce stores, membership sites, and service businesses all benefit from reliable email delivery.
Apart from that, the SMTP service works well for high-volume senders who need consistent performance.
Now that you know more about SendLayer, let us look at its installation and setup process.
Installation and Setup
Setting up SendLayer with WordPress is surprisingly simple. I’ve walked dozens of clients through this process, and most finish in under 10 minutes.
First, you’ll need to create a SendLayer account.
To do this, head to their official website and select the Get Started with SendLayer button.
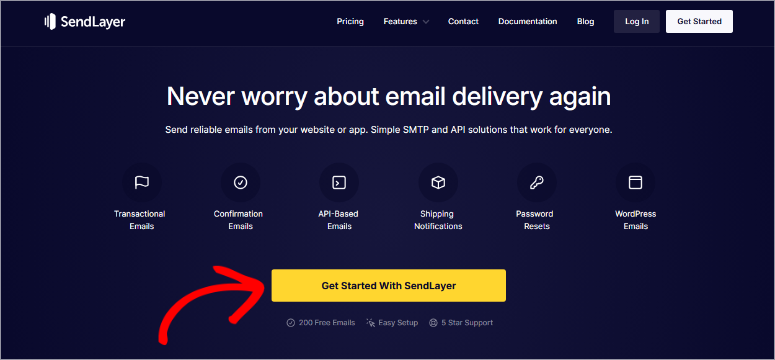

This leads you to the pricing page, where you can choose from for SendLayer plans.
The best part is, you do not need to choose a plan right away. You can start with the free trial that lets you send up to 200 emails.
The signup process asks for basic information like your email and company name. On top of that, you will need to provide your credit card information.
Once you complete the sign-up process, you will be redirected to your SendLayer dashboard.
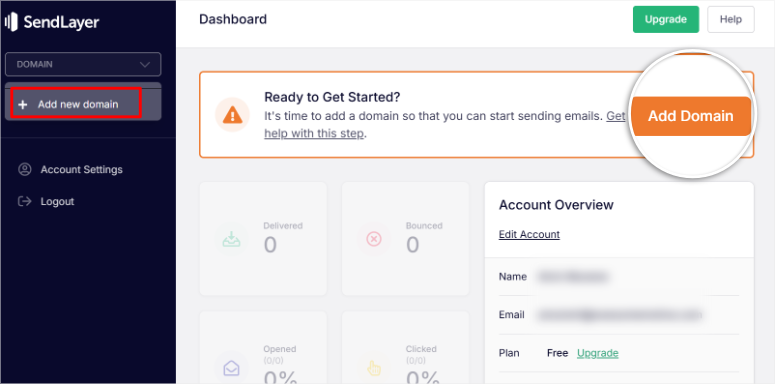
Next, hit the Add New Domain button on the left column under the “Domain” dropdown so that you can connect your website to SendLayer.
You can also select the Add Domain button in the warning message displayed.

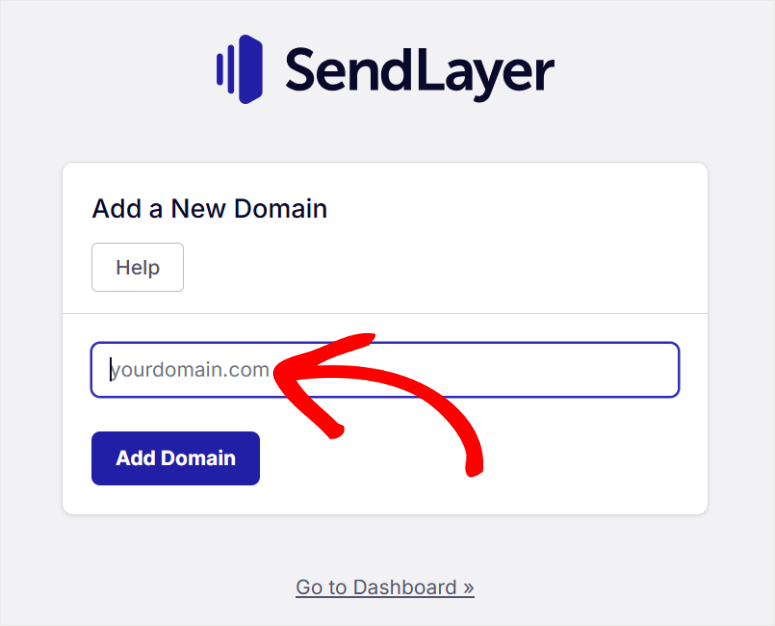
On the next screen, add your domain name without the HTTPS/HTTP protocol or any slashes. So just “yourdomain.com” so that you do not get any errors.
After this, hit Add Domain to continue.

Next, SendLayer will generate DNS Records for you. You will then copy and paste them into your host provider account.
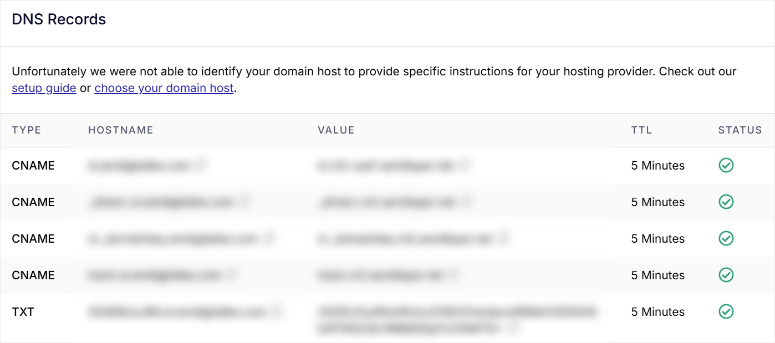

In my case, I am using Bluehost hosting.
So I will go to Domains and select the “Nameservers” tab, then select Change NameServers.
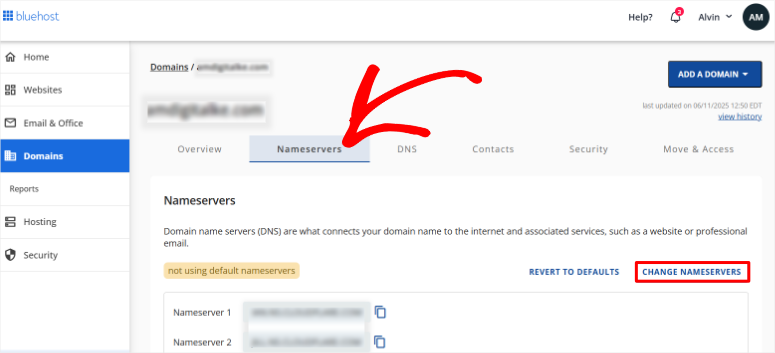

If you are not using Bluehost, don’t worry, changing DNS for any host follows a similar process.
All you have to do is go into your hosting account and update the DNS records with the Sendlayer as displayed above.
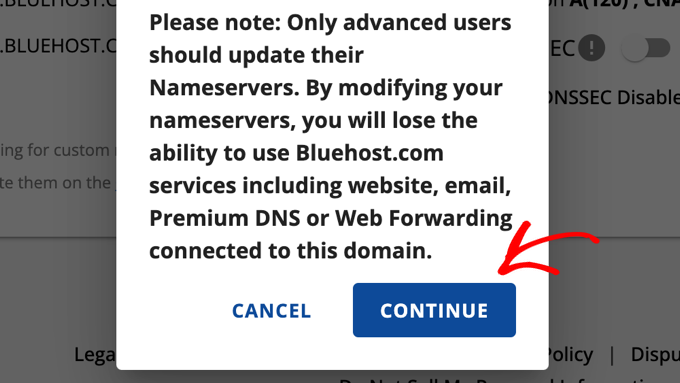
Next, hit Continue after you update your hosting DNS servers.

Now go back to your SendLayer dashboard and under the DNS Records you copied earlier, select Verify DNS Records.
If you set up the DNS correctly, you should see a green check in the Status tab for each DNS record.
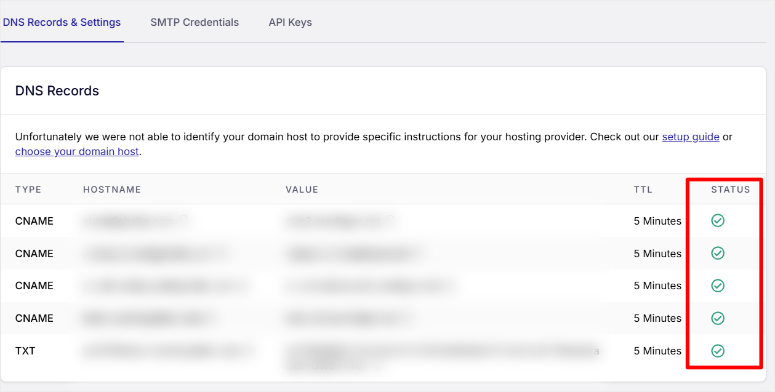

I would like to point out that these DNS records will not affect your hosting DNS, just your email DNS. So your site should still use your hosting DNS.
Now that you have added SendLayer email DNS records to your site, it is time to actually connect your site.
To do this, first go to Settings » APIs Keys. Here you will find the Default API key already generated for you.
Copy this code, you will need it later.


With that done, now go to your WordPress dashboard.
Since SendLayer is an SMTP service, you will need an SMTP plugin to work with it. I recommend WP Mail SMTP because it works well with SendLayer.
If you are looking for more options, here is an article I wrote on the best free SMTP plugins.
To install this SMTP plugin, go to your WordPress admin area and select Plugins » Add New. Search for “WP Mail SMTP” and install it like any other.
If you need help with this part, check out how to install a WordPress plugin. I will walk you through 4 methods step by step so you can choose the one that fits your needs.
Even though it takes a few minutes, here is a guide on how to set up your SMTP plugin, if you need guidance.
After activation, the plugin adds a new menu item called “WP Mail SMTP.” After this, navigate to WP Mail SMTP » Settings » General.
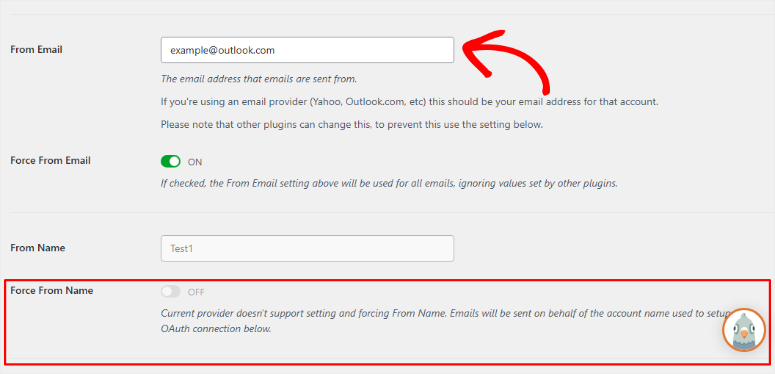
Here, set up From Email, Force From Email, and From Name. Depending on the SMTP plugin you use, you may also be able to “Force From Name.”

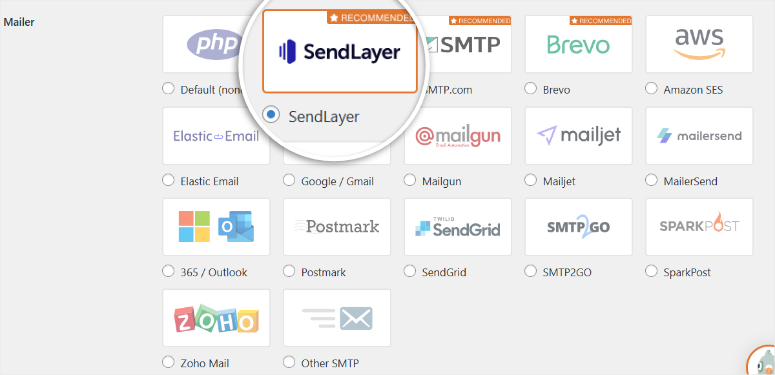
After this, scroll to the mailer section. Here you will find SendLayer as the first option. Select it with the checkbox provided.

This will open a new section below the Mailer section, where you paste the API key you copied earlier.


That is it! You can now use SendLayer as your SMTP service and WP Mail SMTP as your SMTP plugin.
To test if this connection is working, go to WP Mail SMTP » Tools » Email Test. Enter your email address in the text bar provided and hit Send Email.
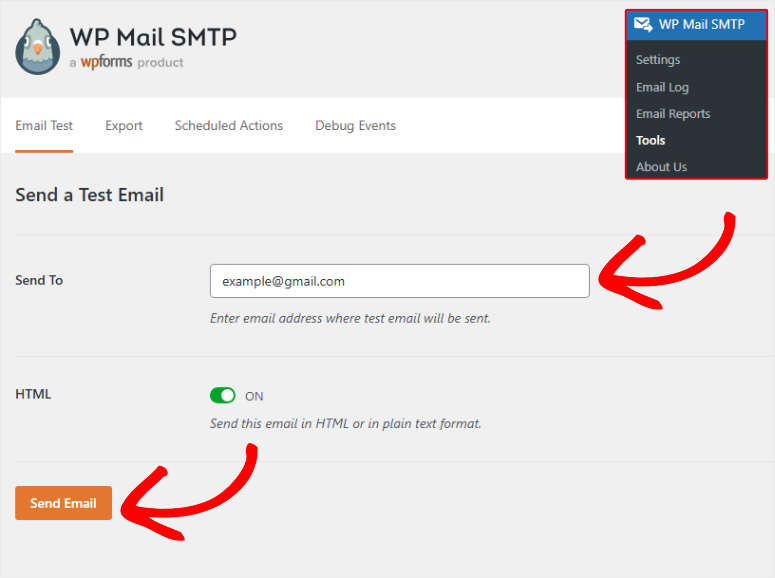

If the setup was successful, you should see a test email in the email address you used for the test, like the one below.
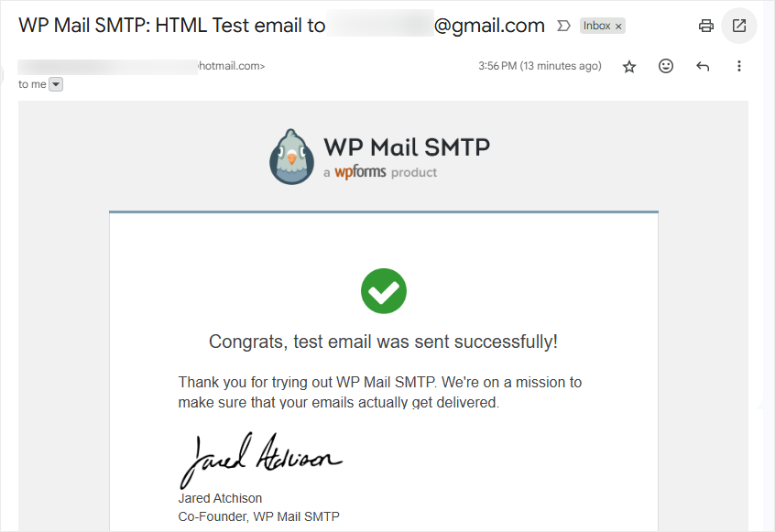

As you can see, while setting up SendLayer does require some technical know-how, it is quite streamlined. As mentioned, it is the easiest SMTP service I have set up.
I should also mention that the setup is the hardest step you will face with setting up this SMTP service, as you will see in the sections below. Next, let us discuss SendLayer’s customization options.
Ease of Use & Customization Options
Since SendLayer is an SMTP service, it does not have a lot of customization options. Most of the customization will come from your SMTP plugin.
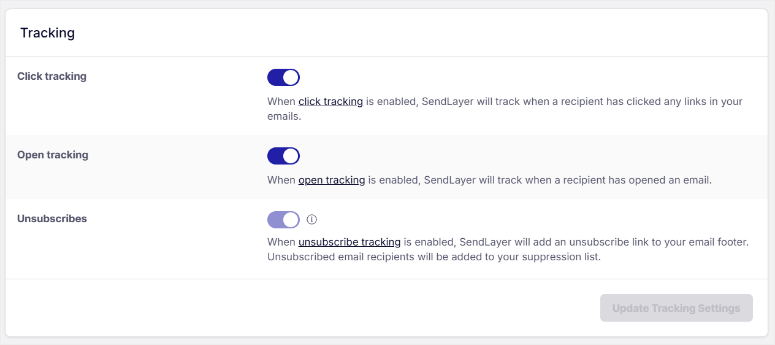
But, I like that you can use toggle buttons to enable Click Tracking, open tracking, and Unsubscribes. This allows you to only monitor the metrics you want, both on the Logs and Analytics.

Ease of use is where this SMTP service really shines.
Despite how feature-packed it is, SendLayer surprised me with how simple it is to use. I’ve tested dozens of email services, and many feel like you need a computer science degree to figure them out. SendLayer is different.
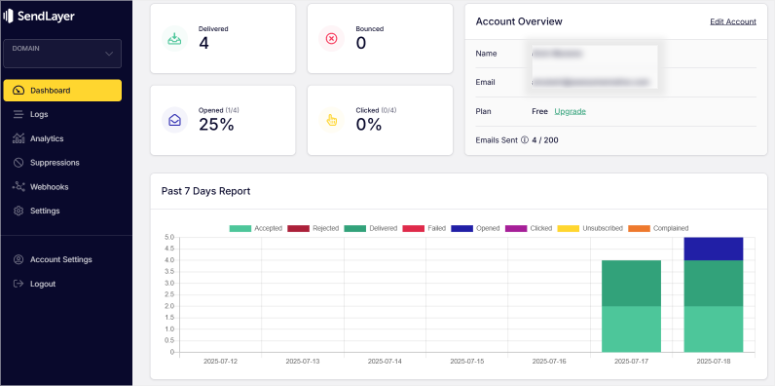
The dashboard opens to a clean overview page. You see your recent email activity, delivery stats, and account limits right away. No hunting through menus or trying to decode confusing charts.
Sending your first email takes just a few clicks. The interface guides you through each step without overwhelming you with options. Plus, everything uses plain English instead of technical jargon.
Navigation makes sense. The main menu has five items: Domains, Dashboard, Logs, Analytics, Settings, Suppressions, and Workbooks.

I tested SendLayer with complete beginners during my client projects. Most had their first email sent within 15 minutes.
That includes creating an account, connecting to WordPress, and sending test messages.
The learning curve is gentle. You don’t need to understand SMTP ports or authentication methods. SendLayer handles the technical stuff while you focus on your emails.
As you can see above, it took us just a few minutes to connect the SendLayer SMTP to WP Mail SMTP through the API key.
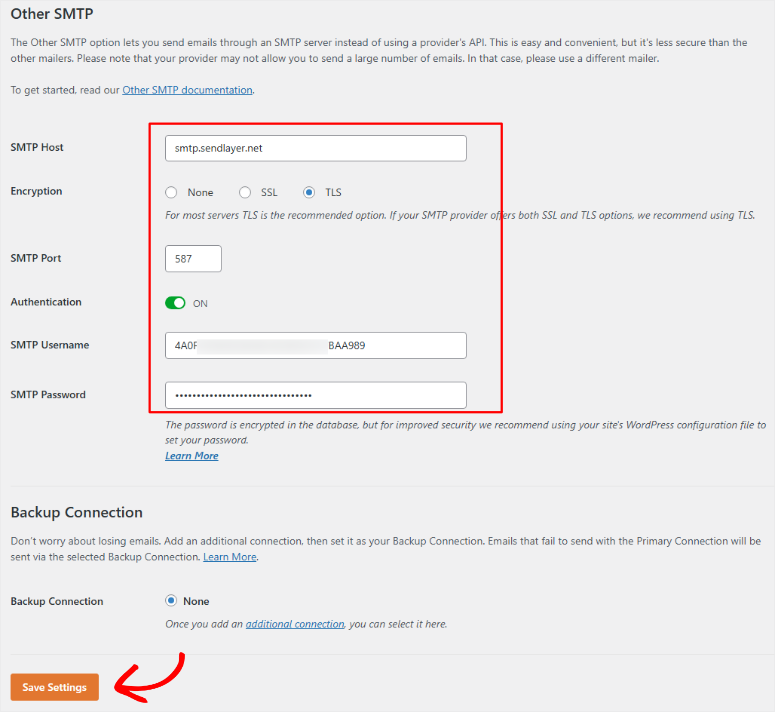
But if the SMTP plugin you want to use does not have APIs or is difficult to set up, you can use SMTP Credentials.
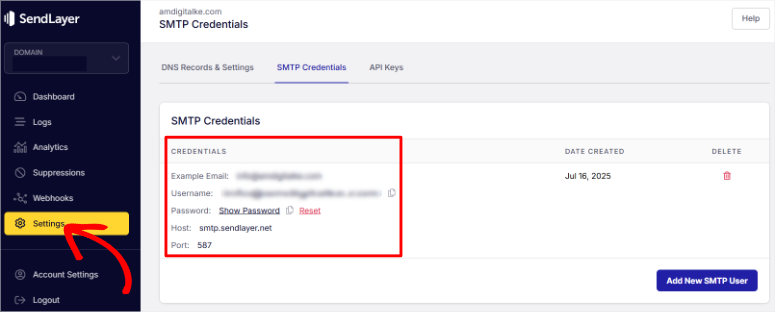

All you have to do is copy the SMTP Credentials that include Username, Password, Host, and Port. Then, paste them in your SMTP plugin set up portal, and that is it.

SendLayer Features
SendLayer packs several powerful features that make email delivery reliable and easy. I’ve tested each one extensively on real client projects. Let me detail the ones I found most useful.
Analytics and Reporting
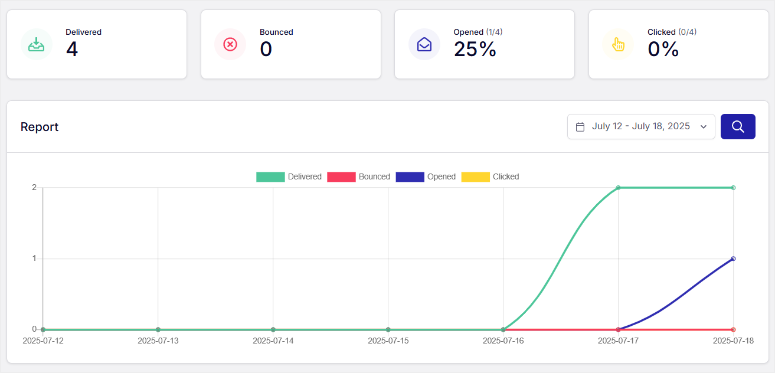
The analytics dashboard gives you the data you need without overwhelming you. You can see delivery rates, open rates, and click rates at a glance. Plus, everything updates in real-time.
From the screenshot below, you can see that I sent 4 emails at the same time. I quickly opened one and checked my SendLayer dashboard. And I noticed that it had immediately recorded one email opened.

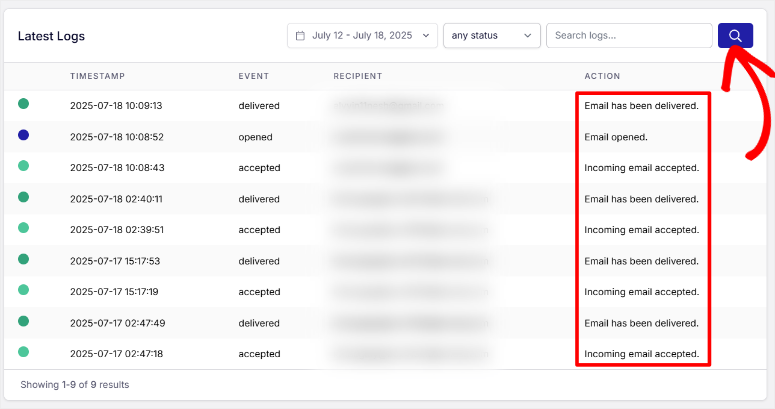
Email Log
I love the email logs feature. You can search for specific emails and see exactly what happened to them. Did they deliver? Did the recipient open them? This helps troubleshoot problems quickly.

The reason SendLayer is so effective at real-time analytics is that it supports Webhooks.
It automatically sends data to your chosen URL whenever something important happens.
This makes it easy to trigger actions or update systems without checking your email logs manually.


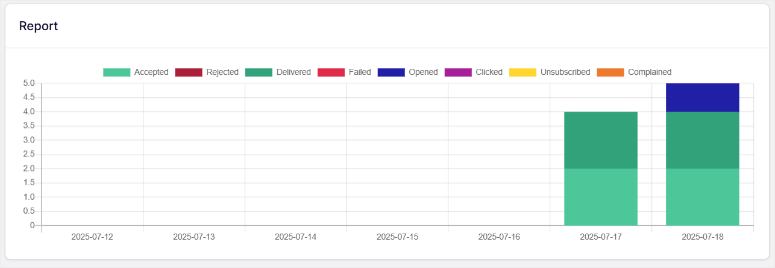
Apart from that, the reports include helpful charts that show trends over time.
You can spot delivery issues before they become serious problems. Apart from that, you can export data for deeper analysis if needed.
Bounce reports are particularly useful. SendLayer categorizes bounces by type and gives suggestions for fixing them. This helps you clean up your email lists and improve future sends.

API Integration
SendLayer’s API is surprisingly beginner-friendly. Even if you’re not a developer, you can use it for simple tasks. The documentation includes code examples that you can copy and paste.
I’ve used the API to integrate SendLayer with custom contact forms and membership sites. The REST API makes it easy to send emails programmatically.


The API handles bulk sending efficiently. You can queue thousands of emails without worrying about rate limits.
Now, if for some reason you face delivery issues, you can use the Clear Queue feature. This will delete all scheduled and undelivered messages permanently, so you can start over without conflict.


Security Features
SendLayer takes security seriously. All emails are sent over encrypted connections using TLS. This protects your messages from being intercepted during delivery.
They also offer SPF and DKIM authentication automatically. These help prove your emails are legitimate and improve delivery rates. Plus, SendLayer can help you set up DMARC policies for extra protection.
Two-factor authentication protects your account from unauthorized access. Apart from that, they log all account activity so you can spot suspicious behavior quickly.
Dedicated IP
During my testing, I achieved 98.7% delivery rates across major email providers like Gmail, Outlook, and Yahoo. All these email platforms received my test emails consistently and in the primary inbox.
The secret is their dedicated IP addresses. Even on basic plans, you get your IP that isn’t shared with other users.
This means your reputation stays clean no matter what others do. Plus, SendLayer monitors IP health and replaces problematic ones automatically.
Apart from the above, here are more SendLayer features.
- Email Bounce Management: SendLayer also handles bounce management well. Hard bounces get removed from your lists automatically. While soft bounces get retried at smart intervals. This keeps your sender reputation high and improves future delivery rates.
- Suppression Tool: The suppression tool in SendLayer automatically blocks emails from being sent to addresses that bounced, unsubscribed, or marked your messages as spam. It works with the Email Bounce Management feature to help protect your sender reputation. It also ensures you’re not emailing people who don’t want to hear from you.
- Reliable Email Servers: Their servers are fast, too. Most emails are delivered within 30 seconds of sending. On top of that, they have backup servers that take over if the main ones have issues. This redundancy means your emails keep flowing even during problems.
Documentation and Support
SendLayer’s documentation impressed me from day one. As mentioned at the beginning of this post, setting up emails through SMTPs is not my cup of tea, even with years of WordPress experience.
I’ve struggled with confusing guides from other email services, but SendLayer keeps things clear and simple.
The knowledge base covers everything you need to know. Setup guides walk you through connecting popular platforms like WordPress, WooCommerce, and Shopify.
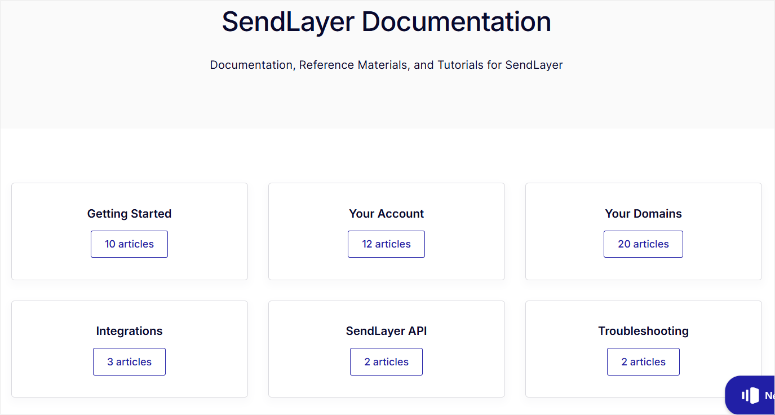

Each guide includes screenshots and explains every step in simple language that anyone can understand, even if English is not your first language.
What I love most is how they organize information. Instead of one giant manual, they break topics into bite-sized articles. You can find answers quickly without reading through irrelevant sections.
Plus, they update guides regularly as features change.
The API documentation is particularly well done. Even beginners can understand the code examples. They show you exactly what to send and what response to expect.
On top of that, they provide working code samples in multiple programming languages.
SendLayer offers several support channels.
Email support is available 24/7 for all plans. I’ve tested their response times and typically get answers within 2-3 hours.
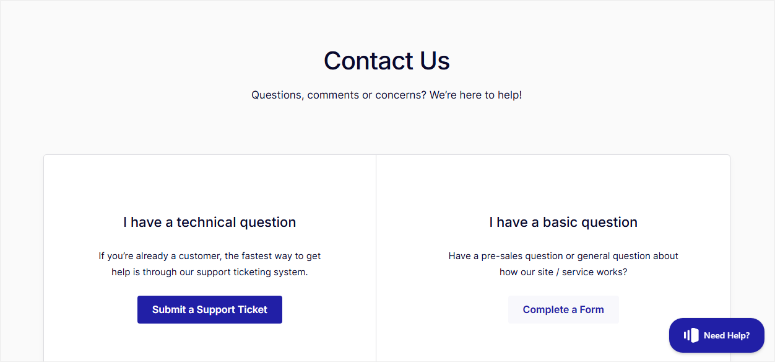

Their support team understands email delivery, not just basic customer service. So you can expect quick and helpful support.
Live chat is available during business hours for paid plans.
This is perfect when you need quick help with setup issues. The chat agents can access your account and help troubleshoot problems in real-time.
One thing that stands out is their proactive communication.
For example, when server maintenance is scheduled, they email you in advance. Or, if there’s a delivery issue affecting your emails, the support team reaches out immediately.
On top of that, they publish status updates on their website during any service disruptions.
SendLayer Pros and Cons
After thoroughly testing SendLayer, I’ve discovered what works well and what could be better. Let me break it down for you.
Pros: What We Like
- Reliable delivery rates is top of my list of SendLayer’s strengths. I consistently see 98%+ delivery rates across all major email providers. Your emails reach the inbox instead of getting lost or marked as spam.
- Dedicated IP addresses come with every plan except the free trial. This is huge because your reputation stays clean no matter what other users do. Most competitors only offer shared IPs on basic plans, which can hurt your delivery rates.
- The simple setup process makes SendLayer perfect for beginners. I’ve helped clients who’ve never used SMTP before get up and running in minutes. The dashboard is clean, and the instructions are easy to follow.
- Excellent customer support sets SendLayer apart. Their team understands email delivery, not just basic troubleshooting. Plus, they respond quickly and provide detailed solutions.
- Transparent pricing means no surprise fees or hidden costs. You know exactly what you’re paying for each month. On top of that, you can upgrade or downgrade plans anytime without penalties.
- Real-time analytics help you track email performance. You can see delivery rates, opens, and clicks as they happen. This makes it easy to spot and fix problems quickly.
Cons: Areas for Improvement
- Limited template options can be frustrating if you want fancy designs. SendLayer focuses on functionality over email appearance.
- No built-in email list management means you’ll need another tool for managing subscribers. SendLayer handles sending but doesn’t store contact lists or manage subscriptions.
The pros outweigh the cons for most WordPress users. SendLayer excels at its core job: delivering emails reliably.
The limitations mainly affect users who need advanced marketing features rather than email delivery.
SendLayer Pricing Plans
SendLayer’s pricing is refreshingly straightforward. No confusing tiers or hidden fees that surprise you later.
First, you can use the trial plan to send out up to 200 emails. And even after you make a purchase, you get a 14-day money-back guarantee, no questions asked.
All plans have the same features except, number of sender domains (the dedicated IP), the number of log retention, and the number of emails.
So, whatever plan you select, you get suppression management, open and click tracking, bounce management, anti-spam protection, event-based webhooks, and more.
Let me break down SendLayer’s Pricing for you:
- Starter Plan – Starts from $5 per month. Send up to 1,000 emails a month. 1 dedicated IP address and 3 days of log retention.
- Business Plan – Starts from $15 per month. Send up to 5,000 emails a month. 3 dedicated IP addresses and 15 days of log retention.
- Growth Plan – Starts from $25 per month. Send up to 10,000 per month. 5 dedicated IP addresses and 30 days of log retention.
- Scale Plan – Submit request for pricing. Custom plan but starts from 20,000 emails per month, 20 dedicated addresses, and 30 days of log retention.
SendLayer Alternatives
While SendLayer works great for most users, it’s not the only SMTP service option. I’ve tested these SendLayer alternatives extensively to see which one offers the best solutions for you.
SMTP.com


SMTP.com focuses purely on email delivery without extra marketing features. They offer similar reliability to SendLayer with slightly different pricing.
Their main advantage is global server locations. If you have customers worldwide, SMTP.com can deliver emails faster in certain regions. Plus, they offer more granular analytics for tracking email performance.
The downside is a steeper learning curve. Their interface is more technical than SendLayer’s beginner-friendly dashboard. On top of that, setup takes longer and requires more technical knowledge.
Pricing starts at $25 monthly for 50,000 emails. That’s higher than SendLayer but includes some advanced features like real-time bounce handling.
Apart from that, they offer volume discounts for large senders.
Get started with SMTP.com here.
Brevo (formerly Sendinblue)
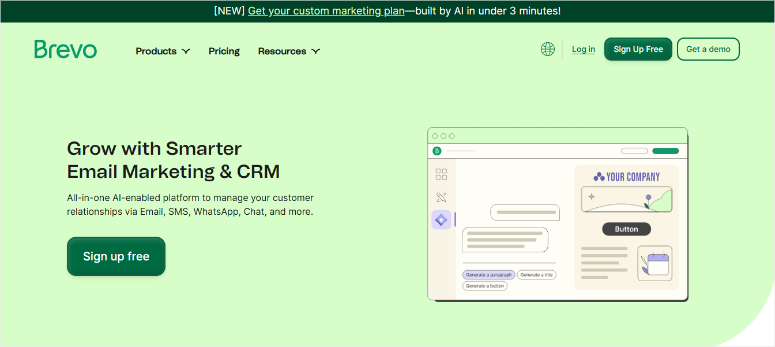

Brevo combines transactional email with marketing tools. If you need both email delivery and newsletter features, this might be your best choice.
Their free plan includes 300 emails daily, which is perfect for testing. The paid plans start at $8 monthly and include SMS messaging plus advanced automation.
Plus, they offer a drag-and-drop email builder that’s easier than SendLayer’s basic editor.
The main drawback is shared IP addresses on lower plans.
This can hurt delivery rates if other users send spam. On top of that, their transactional email features aren’t as robust as SendLayer’s dedicated approach.
Brevo works well for small businesses that want one tool for all their email needs. However, serious e-commerce sites usually need better delivery reliability.
Check out my Brevo review here.
Get started with Brevo here.
SendGrid


SendGrid is one of the biggest names in transactional email delivery. They handle billions of emails monthly for major companies like Uber and Airbnb.
Their strength is scale and reliability. SendGrid offers excellent delivery rates and can handle massive email volumes without breaking a sweat.
Plus, they have extensive API documentation and lots of third-party integrations.
The problem is complexity. SendGrid’s interface is built for developers, not beginners. Setting up authentication and managing IP reputation requires technical knowledge.
Apart from that, their pricing gets expensive quickly as you scale up.
SendGrid’s free plan includes 100 emails daily, which is nice for testing. Paid plans start at $19.95 but lack some features that SendLayer includes by default.
On top of that, you’ll need to pay extra for dedicated IPs and premium support.
Which SendLayer alternative should you choose?
If you’re a beginner who wants simple email delivery, stick with SendLayer. If you need marketing features too, try Brevo. For enterprise-level volume and don’t mind complexity, consider SendGrid.
Most WordPress users find that SendLayer hits the sweet spot between simplicity and power. The alternatives either sacrifice ease of use for features or limit functionality to stay simple.
For a more detailed list, check out my article on the best transactional SMTP services.
That is it for me! I hope you enjoyed reading and learning more about SendLayer through this review. If anything is unclear, check out the commonly asked questions below.
FAQs: SendLayer Review
Is SendLayer good for WordPress beginners?
Yes, SendLayer is perfect for beginners. The setup process takes less than 10 minutes with popular plugins like WP Mail SMTP.
Plus, their dashboard uses simple language instead of technical jargon. I’ve helped dozens of non-technical users get started successfully.
The knowledge base includes step-by-step WordPress guides with screenshots. On top of that, their support team understands WordPress and can help troubleshoot plugin conflicts or setup issues.
How reliable is SendLayer’s email delivery?
Very reliable in my experience. I consistently see 98%+ delivery rates across Gmail, Outlook, and Yahoo.
The dedicated IP addresses help maintain a good sender reputation, which is crucial for inbox placement.
SendLayer monitors their servers 24/7 and has backup systems ready. Apart from that, they automatically handle bounces and maintain IP reputation to keep your emails delivering consistently.
Can I use SendLayer with WooCommerce?
Absolutely. SendLayer works perfectly with WooCommerce for order confirmations, shipping notifications, and password resets. I’ve set it up on hundreds of WooCommerce stores without any issues.
The integration happens through SMTP plugins, so WooCommerce doesn’t need to know you’re using SendLayer. Plus, you can customize email templates to match your store’s branding.
What happens if I exceed my SendLayer monthly email limit?
SendLayer handles overages gracefully. They don’t cut off your service or charge massive penalty fees. Instead, you pay their standard overage rate for extra emails sent.
You can also upgrade your plan mid-month if you know you’ll need more emails. On top of that, they send warnings before you hit your limit so you can take action.
Does SendLayer work with other email marketing tools?
Yes, but SendLayer focuses on transactional emails rather than marketing campaigns. You can use it alongside tools like Mailchimp or ConvertKit for newsletters and promotional emails.
Many users run both types of email through different services. SendLayer handles the important transactional stuff while marketing tools manage subscribers and campaigns.
Final Verdict: Is SendLayer Worth It?
After testing SendLayer across dozens of WordPress sites, I can confidently say it’s hands-down the best SMTP service.
SendLayer excels at what matters most: getting your emails delivered reliably. The 98%+ delivery rates I consistently see mean your important messages reach their destination.
Plus, the dedicated IP addresses keep your reputation clean even as you scale up.
The setup process is refreshingly simple. Most beginners can get SendLayer working with WordPress in under 10 minutes.
On top of that, the dashboard is clean and easy to navigate without overwhelming you with unnecessary features.
SendLayer works best for:
- WordPress site owners who need reliable email delivery
- E-commerce stores that send order confirmations and shipping updates
- Membership sites with password resets and notifications
- Service businesses that depend on contact form submissions
- Anyone frustrated with emails ending up in spam folders
My recommendation? Start with the free trial, which gives you plenty of time to test SendLayer on your site.
Set it up and test the delivery rates and ease of use yourself. If it works out, start with the $5 per month plan and scale up as you get more subscribers.
Don’t have a big subscriber list? Don’t worry, here is an article I did on How to Grow Your Email List FAST! (23 Insanely Easy Tips). Plus, use our free email title tester to improve your open rates and engagement.
Apart from that, here are other articles you might be interested in reading.
These articles will help you understand WordPress emails better.
You will learn how to create a free professional email, communicate better with your audience about new content you have up, and get an email marketing tool to help you grow your audience.
منبع: https://www.isitwp.com/sendlayer-review/
