I’ve been building WordPress sites for over a decade.
During that time, I’ve helped dozens of coaches, content creators, educators, and small business owners connect with their audiences online via video.
Apart from that, I’ve had lots of video meetings for interviews, training, and other purposes over Zoom.
Initially, I was manually sending Zoom links via email, and it was a nightmare. Clients would lose links, forget meeting times, or miss registration deadlines entirely.
Plus, I spent countless hours each week managing who got access to which meeting. Between life and running IsItWP.com, this was a huge waste of time.
There had to be a better way.
I mean, there’s always a solution out there if you look hard enough. Right? Searching for how to integrate Zoom meetings and webinars in WordPress wasn’t so helpful.
But just then, I discovered WordPress automation plugins, and a light bulb went off in my head. I had my eureka moment when I realized I could connect Zoom to my website using Uncanny Automator.
Now, when someone fills out a contact form, they automatically get added to the right meeting. When a customer buys a course, they’re instantly registered for the welcome webinar.
It’s like having a personal assistant that never sleeps.
After testing dozens of plugins and methods, I found the perfect solution in Uncanny Automator. And today, I’ll show you exactly how to connect Zoom to your WordPress site for easy scheduling.
You’ll save hours every week and give your visitors a smooth, professional experience they’ll love.
What You’ll Learn in This Guide
Here’s exactly what we’ll cover step by step:
- How to install and set up Uncanny Automator for WordPress
- The right way to configure your Zoom account for integration
- How to connect Zoom meetings and webinars with your WordPress site
- Adding users to Zoom meetings automatically after form submissions
- Registering people for webinars when they complete forms
- Adding customers to webinars after they make purchases
- Bonus: Using Google Meet as an alternative solution
With that said, let’s get into this tutorial.
Why Integrate Zoom Meetings and Webinars With WordPress?
First, it saves massive amounts of time. Before automation, I spent 2-3 hours every week just managing meeting registrations.
Now, everything happens automatically.
When someone signs up for my newsletter, they get invited to my monthly Q&A session. When a client books a consultation, they’re added to the right meeting instantly.
Plus, your visitors enjoy a smoother experience. They don’t have to wait for manual email confirmations or worry about losing meeting links.
And everything happens right on your website. They fill out one form and boom – they’re registered and ready to go!
On top of that, you can boost your sales with this setup. I automatically add people to special webinars based on their purchases.
Did someone buy my beginner course? They get invited to the “Getting Started” webinar. Advanced course buyers go straight to the expert sessions.
The best part? You can capture leads while providing value. Every form submission, purchase, or membership signup can trigger a meeting invitation.
It’s like turning every interaction into a chance to connect personally with your audience.
At IsItWP, we use this exact system for our team meetings, client calls, and training sessions. It’s been a game-changer for staying organized and proficient.
Now, let’s get your system set up so you can experience these benefits too.
What You’ll Need Before Starting
Before we dive into the setup process, let’s ensure you have everything ready. Trust me, getting these pieces in place first will save you headaches later.
Zoom Pro Account + Webinars Add-on
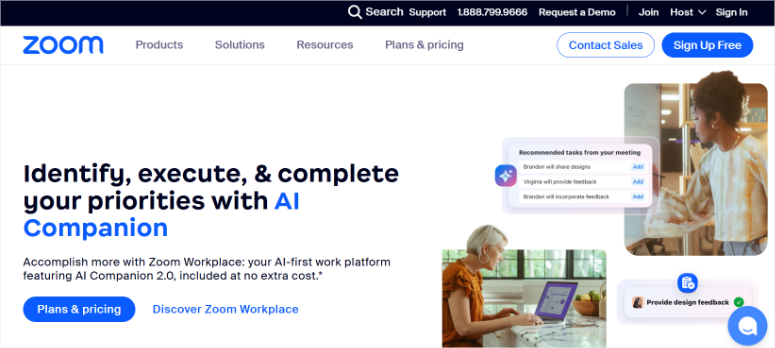

Here’s the thing about Zoom – the free version won’t work for this integration. You need a Zoom Pro account, which starts at $13.33 per month.
Plus, to host webinars (not just meetings), you′ll need the Webinars add-on for an extra $79 per month.
I know it seems like a lot upfront. But think about it this way – you’re getting professional meeting tools plus automation that saves hours every week.
For most businesses I know, this upfront cost pays for itself quickly.
WordPress Admin Access
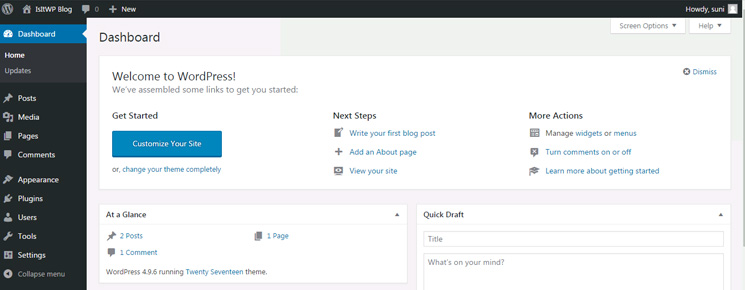

You’ll need full admin access to your WordPress site. This means you can install plugins and change settings.
If you’re not the site owner, ask for administrator privileges before we start. All the same, you won’t be changing lots of settings per se.
Most of it is point-and-click.
Uncanny Automator Pro Plugin

This is the magical WordPress automation plugin that connects everything. A free version is available, but it’s limited to five recipes and ideal for testing the waters.
That is why, for this tutorial, we are using the Uncanny Automator Pro version, which starts at just $149 per year. It ships unlimited automation recipes with the full feature set and great support.
Trust me, you’ll want more recipes once you see what this powerhouse of an automation plugin can do.
To see what I mean, check out my updated Uncanny Automator review for more details.
WPForms Plugin

We’ll use WPForms to create the contact forms that trigger your Zoom invitations. The free version works fine for basic forms.
But if you want advanced features like conditional logic, you’ll need WPForms Pro.
Check out this detailed WPForms review to see all it can do.
Additional Considerations:
Now that we’ve covered the requirements, let’s move on to the actual integration process.
How to Integrate Zoom Meetings and Webinars in WordPress
Here comes the fun part – actually setting everything up. I’ll walk you through each step exactly as I do it for my clients.
Plus, I’ll share a few tricks I’ve learned that make this process smooth and error-free.
The whole setup takes about 25 – 30 minutes if you follow along step by step. Apart from that, once it’s done, you’ll have a system that works automatically for months without any maintenance.
Let’s start by installing and configuring the right plugin.
Step 1: Install and Activate the Uncanny Automator Plugin for WordPress
First things first – we need to get Uncanny Automator installed on your WordPress site.
Uncanny Automator is one of the best WordPress automation plugins that helps you connect hundreds of apps (including Zoom) to WordPress.
Think of it as Zapier but for WordPress.
To start, head over to the official Uncanny Automator website and hit the Get Uncanny Automator Now button.


This takes you to the pricing page where you can choose a plan that’s perfect for your business needs.
After purchase, install and activate Uncanny Automator on your WordPress website like any other plugin.
If you need help, you may want to read our guide on how to install a WordPress plugin.
Once you’ve installed and activated the plugin, go to the Automator » Settings from the WordPress admin menu to enter your license key.
After that, don’t forget to select the Activate License button.
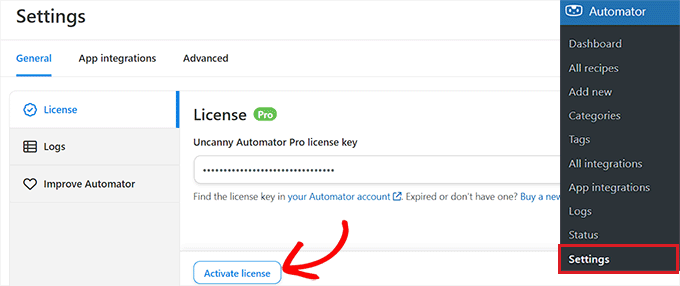

Doing this unlocks all the features for the Zoom integration. Plus, you’ll get access to hundreds of other app integrations you can use later.
The plugin setup is now complete. Next, we need to prepare your Zoom account for integration.
Step 2: Set Up Your Zoom Account the Right Way
First, make sure you’re logged into your Zoom Pro account. As mentioned, the free account doesn’t support integrations for meetings and webinars.
Then, open a new browser tab and go to marketplace.zoom.us. This is Zoom’s app marketplace where developers and WordPress site owners like you create custom integrations.
Look for the Develop menu in the top right corner of the page. Select it, then choose Build App from the dropdown menu.
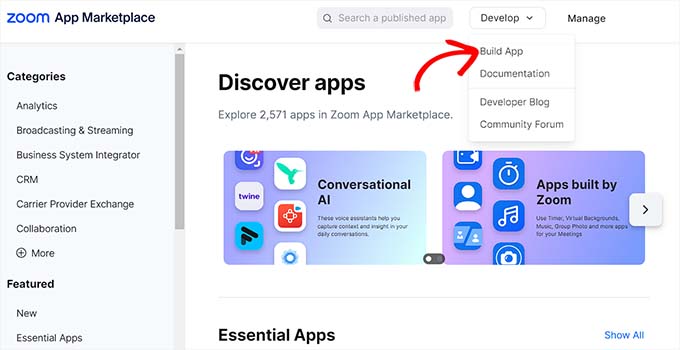

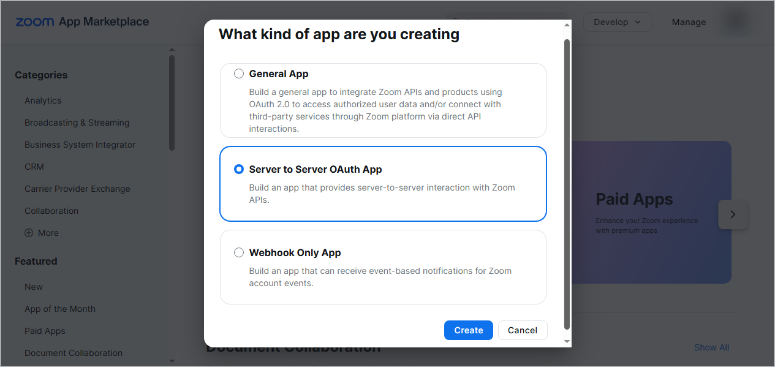
On the next page, you’ll see different app types. We want Server-to-Server OAuth because it’s the most secure option for automation. So, select Create under this option.

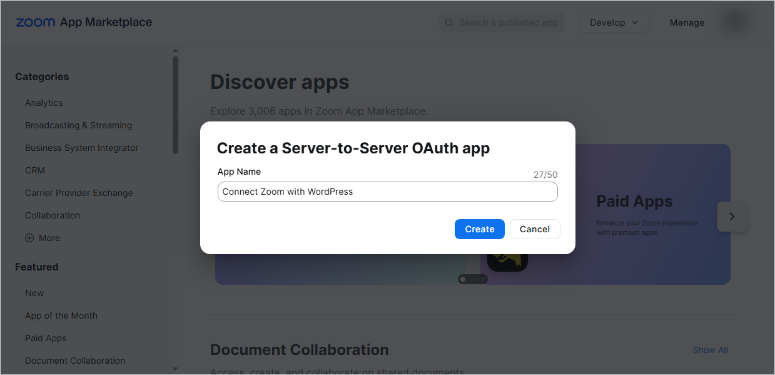
Zoom will ask you to name your app. Make it descriptive so you remember what it’s for later. In my case, I named the app “Connect Zoom with WordPress.” Once done, hit Create.

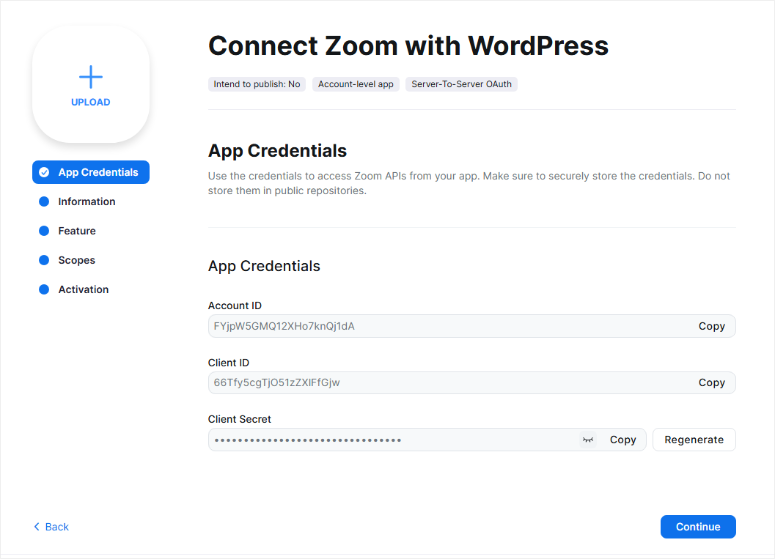
After this, Zoom will redirect you to the first screen: App Credentials. Here, the video meeting tool provides the special codes that Uncanny Automator needs to connect.
You’ll see three important pieces of information:
- Account ID (a long string of letters and numbers)
- Client ID (again, a long string of letters and numbers)
- Client Secret (another long string – keep this private!)
Copy these three codes and paste them into a text file or note-taking app. We’ll need them later when connecting everything. Also, keep the Client Secret safe – it’s like a password for your Zoom account.
Once you have this sorted, hit the ‘Continue’ button.

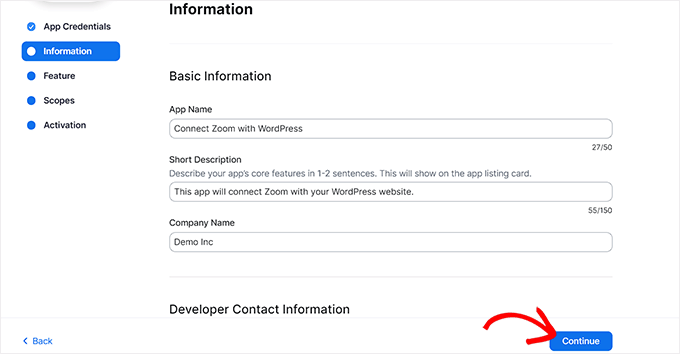
Hitting “Continue” takes you to the next important screen – App Information. Here, fill out the required fields:
- App Name: Connect Zoom with WordPress (or whatever you choose)
- Short Description: App connects Zoom to WordPress site for meetings and webinars
- Company Name: Your business name
- Developer Contact Information: Your name and email address
After filling out the details, hit ‘Continue’.

On the next page, Features, do nothing. Simply, hit the “Continue” button.
Before we leave Zoom, we need to set the correct app permissions. So, on the Scopes screen that comes next, hit the Add Scopes button.
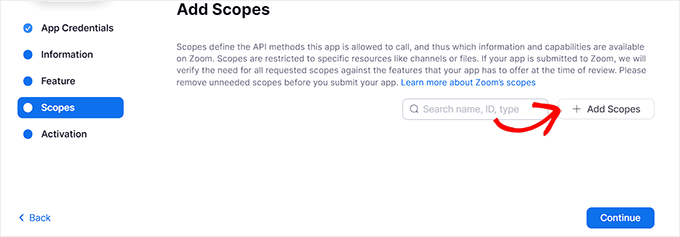

And add these permissions:
- meeting: write (to create meetings)
- meeting: read (to get meeting details)
- webinar: write (to create webinars)
- webinar: read (to get webinar details)
- user: read (to get user information)
It should look something like this:
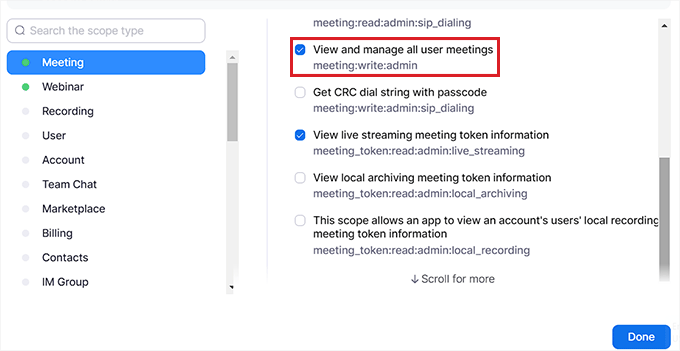

Next, select Done to save your scope settings. Finally, hit the Continue button, which leads you to a screen that shows your Zoom app is now ready to connect with WordPress.
After that, activate your new Zoom app.
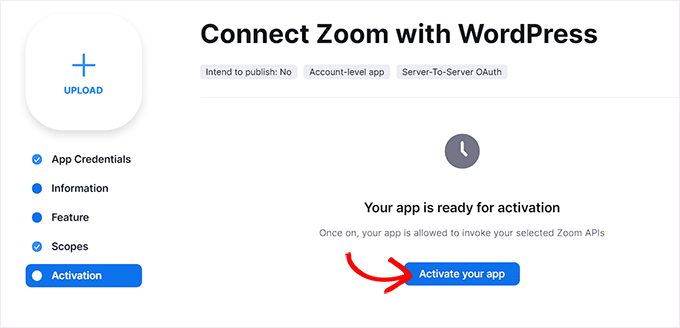

Look at that! You have just created a Zoom app that you can use to connect to WordPress. Now, let’s look at how to create a Zoom Meeting or Webinar so that we can connect it to WordPress.
Step 3: Create a New Zoom Meeting
Now, let’s create a meeting that people can join from your WordPress site.
Log in to your Zoom account and look for the “Schedule” button on your dashboard. It’s usually right at the top of the page where you can’t miss it.


After this, hit “Schedule” and you’ll see a form with all your meeting options. Fill in the basic details like your meeting topic and description. Make it clear what the meeting is about so people know what to expect.
The most important part is the “When” section. You can schedule it for a specific date and time. Or you can make it a recurring meeting that happens regularly.
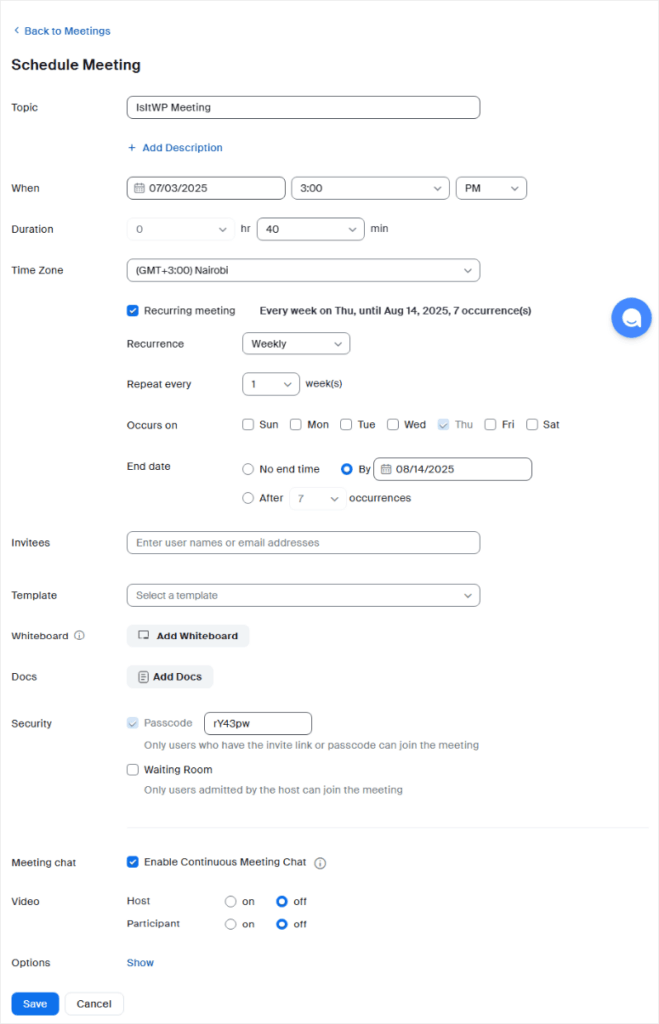

Plus, if you want the same meeting to happen every week or month, check the “Recurring meeting” box. This is perfect for things like weekly team calls or monthly webinars.
Don’t forget to hit “Save” when you’re done. Zoom will create your meeting and give you a meeting ID. Write this number down – you’ll need it later for the WordPress connection.
That’s it.
Now, how do you create a Zoom webinar?
This is ideal for larger audiences where you’re presenting to multiple people all at once.
You will follow similar steps to set up a webinar. Let me quickly list them just in case you face any difficulties.
- Go to the Webinars tab
- In your Zoom dashboard, find “Webinars” under the left menu.
- If it’s missing, you’ll need to add the Webinars add-on.
- Click “Schedule a Webinar”
- This starts the webinar setup process.
- Enter webinar details
- Add a catchy title, description, and select your date and time.
- Enable registration
- Scroll to the “Registration” section.
- Check the box labeled “Required.”
- Customize registration fields
- Choose what info to collect (e.g., name, email, company).
- Keep it short to increase signups.
- Select “Save.”
- Zoom will generate a webinar ID and registration page automatically.
- Use the registration link
- Share Zoom’s page directly or embed a custom form on your WordPress site.
Well done! You can now set up both a Zoom meeting and a webinar.
Step 4: Connect Zoom Meetings and Webinars With WordPress
Now comes the fun part – connecting your Zoom events to WordPress. This is where everything starts working together automatically.
The first thing to do in this step is to add Zoom integration to Uncanny Automator.
To do this, head back to your WordPress admin area and go to Automator » App Integrations. You’ll see a long list of services that Uncanny Automator can connect to. Here, look for “Zoom Meetings.”
It should be near the bottom since they’re listed alphabetically. Select it to open the connection settings.
You’ll see a form asking for your Zoom API credentials. Remember those three codes we saved earlier? Here’s where we use them.
So, paste your Account ID into the first field. Then add your Client ID and Client Secret in the next two boxes.
Once done, hit “Connect Zoom Meetings Account” and wait a few seconds.
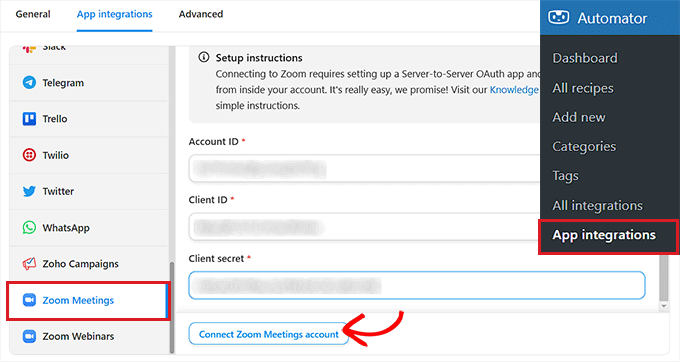

After this, Uncanny Automator will test the connection to make sure everything works properly.
Similarly, if you want to integrate Zoom Webinars, then hit the ‘Zoom Webinars’ menu option.
Then, paste the same ‘Account ID’, ‘Client ID’, and ‘Client Secret’ credentials that you used above, just like you did with the meetings connection.
After that, go ahead and click the “Connect Zoom Webinars Account” button.
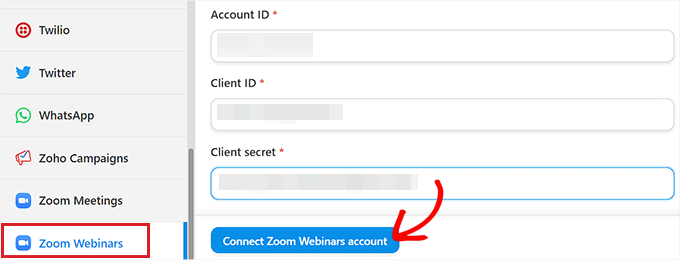

That is it! You have just connected Zoom to WordPress via Uncanny Automator.
From here, you can create “recipes” that trigger actions in Zoom when an action is performed on your WordPress site.
For example, when someone fills out a form, they can automatically get added to a meeting.
Let us learn how to do that.
Add Users To a Zoom Meeting After Form Completion in WordPress
Now let’s create your first automation through a contact form. So, when users fill out a form on your site, they automatically get added to your Zoom meeting.
Step 1: Create the WordPress Form
First, we need a form on your WordPress site. I’ll show you how to do this with WPForms since it works perfectly with Uncanny Automator.
You can get the best deals on this form builder by checking out our WPForms coupon page.
Once you have this form plugin set up, go to your WordPress dashboard and select WPForms » Add New Form. Then, enter your form name and choose “Simple Contact Form” as your starting template.
This gives you the basic fields you need.
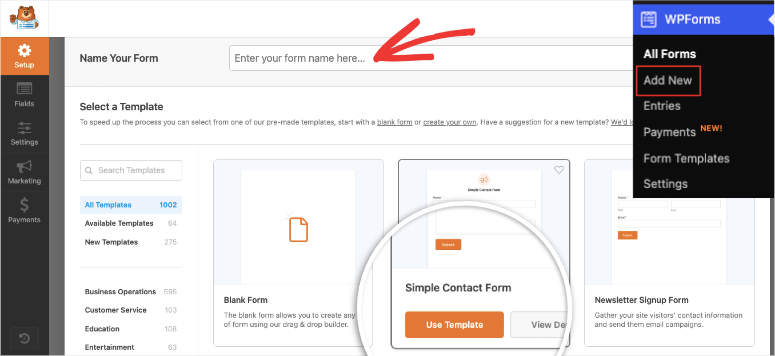

After this, you’ll be redirected to the drag and drop form builder. The default fields are perfect for our Zoom integration, and the reason I went with this form template.
The fields include name, email, and message. But you can add more fields if you want.
The important thing is to ensure you have at least these two fields:
- Name (First and Last)
- Email Address
These details are required for Zoom registrations, without which the automation won’t work properly.
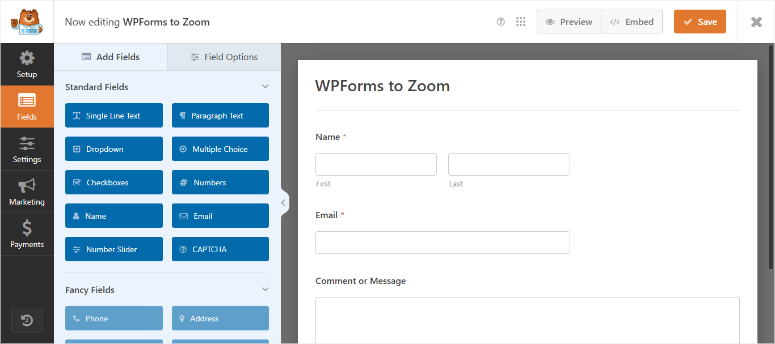

Plus, you may want to include a field that asks what they want to discuss. This helps you prepare for the meeting better. All you have to do is drag and drop fields on the left to the preview screen on the right.
You can also rearrange the order of the fields however you want.
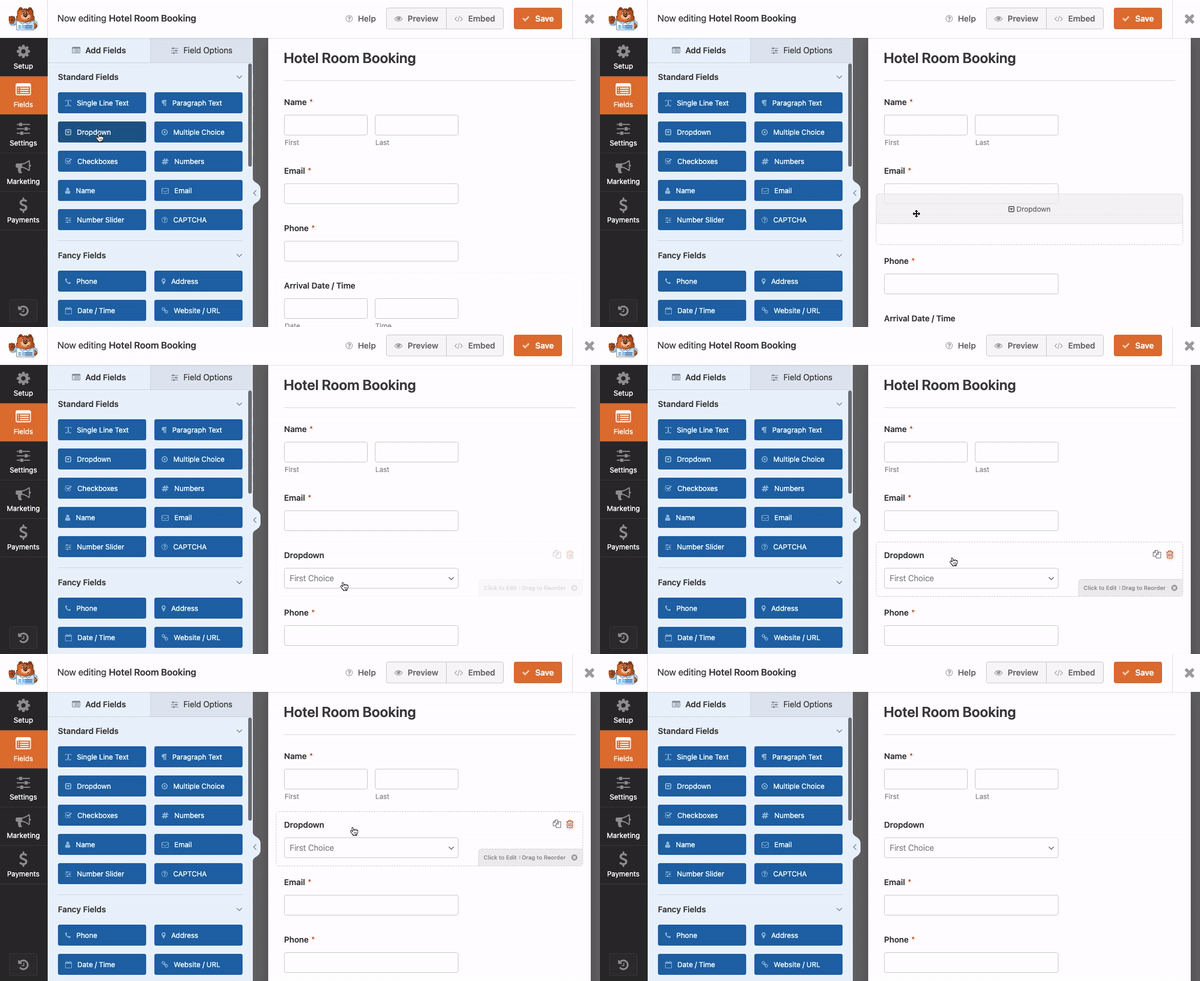

Once your form looks good, hit “Save” at the top right.
Then to publish your form, you can either embed into a new or existing page or use its shortcode.
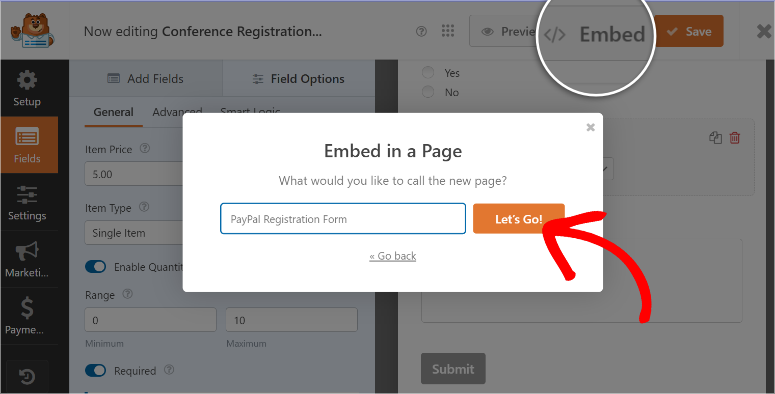

At this point, you have a ready form perfect for the Zoom integration.
Step 2: Set Up the Automation Recipe
Now let’s create the automation that connects your form to Zoom.
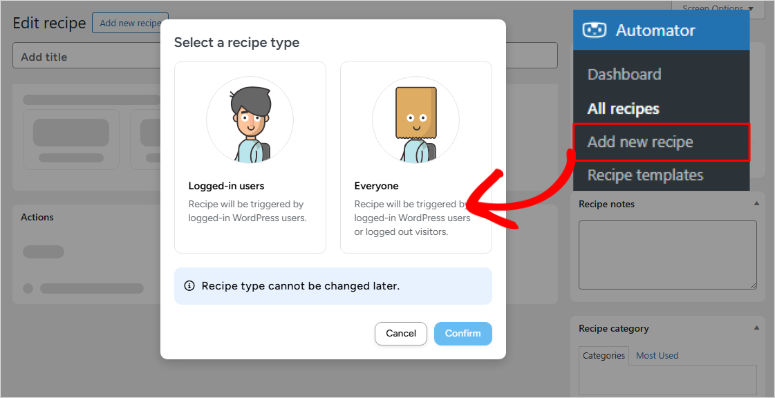
Go to Automator » Add New Recipe in your WordPress admin. This opens the recipe builder, where you create your automations.
First, choose “Logged-in users” or “Everyone” depending on who can fill out your form. For contact forms, I usually choose “Everyone” since you want anyone to be able to reach out.

Next, you need to add a trigger. This tells Uncanny Automator what action should start the automation. Hit “Add Trigger” and look for “WPForms.”
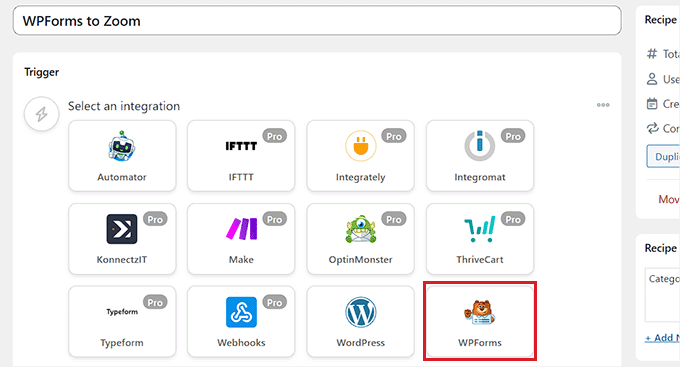

Once done, select “A user submits a form” from the WPForms options. Then choose your specific form from the dropdown menu.
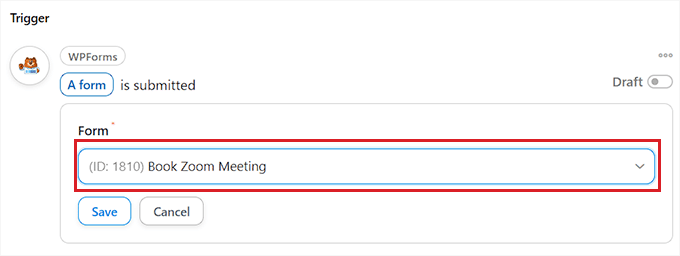

Now add an action – this is what happens after someone submits the form. Hit “Add Action” and search for “Zoom Meetings.”
You’ll see several Zoom options. Choose “Add a user to a meeting” since we want to register people for your Zoom meeting.
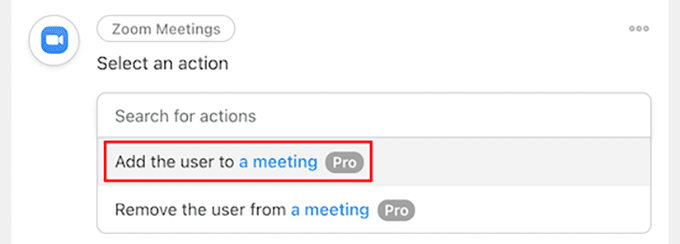

Next, you need to tell the automation which meeting to use. Select your meeting from the dropdown list. If you don’t see it, make sure your Zoom connection is working properly.
Step 3: Test the Complete Workflow
Before you make this Uncanny Automator recipe live, test everything to make sure it works.
In the recipe builder, make sure all your fields are mapped correctly.
The email field from your form should connect to the Zoom email field, and the name field mapped to the relevant field as well.
Uncanny Automator usually does this automatically, but double-check to be sure.
Now, publish your recipe by hitting the “Draft/Live” button in the top right corner. Your automation is now live and ready to work.
Test it by filling out your form with your information. Use a real email address so you can see if the Zoom registration email arrives.
Plus, check your Zoom account to see if you appear as a registrant for the meeting. If everything worked, you should see your name and email in the meeting participants list.
If something didn’t work, check these common issues:
- Form fields not mapped correctly
- The Zoom meeting ID is wrong
- Email address format problems
Once you see the test registration in Zoom, you know everything is working perfectly. Your visitors can now join your meetings automatically just by filling out your contact form.
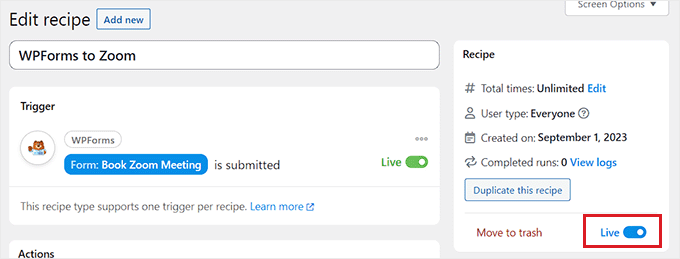

Congratulations! You can now connect Zoom to your WordPress site to host meetings and webinars. If anything is unclear, check out the commonly asked questions below.
FAQs: How to Integrate Zoom Meetings and Webinars in WordPress
Do I need Zoom Pro for WordPress integration?
Yes, you need Zoom Pro for this to work. The free Zoom account doesn’t allow third-party integrations like Uncanny Automator.
Plus, Zoom Pro gives you cloud recording, which is super useful for your business. You can record meetings and share them with people who couldn’t attend.
If you want to run webinars, you need the Webinars add-on too. This costs extra but gives you registration management and attendee controls.
Can I use the free version of Uncanny Automator?
No, the free version of Uncanny Automator won’t work for Zoom integration. You need the Pro version to connect to external services like Zoom.
Plus, the Pro version gives you unlimited automations. With the free version, you’re limited to just 5 recipes.
What happens to my Uncanny Automator flow if someone doesn’t show up to the meeting?
The automation will still work perfectly. People get registered in Zoom whether they show up or not. You don’t need to do anything special to handle no-shows.
Zoom keeps track of who joined and who didn’t. You can see these reports in your Zoom dashboard after each meeting.
Apart from that, you can record your meetings and send the recording to people who missed it. This adds extra value and keeps people engaged with your video content.
Can I automate follow-up emails after webinars?
Absolutely. This is one of my favorite automations to set up. You can send different emails to people who attended versus those who didn’t.
Create a new recipe in Uncanny Automator that triggers when someone attends a Zoom webinar. Then add an action to send a thank-you email with additional resources.
You can create a separate automation for people who registered but didn’t attend. Send them the recording and invite them to your next webinar.
You can also tag people in your email marketing system based on their webinar attendance. This helps you send more targeted emails in the future.
How do I handle time zone differences for global audiences?
This is a common challenge when you have people joining from different countries and time zones.
The good news is that Zoom handles time zones automatically. When you schedule a meeting, it shows the correct time for each person based on their location.
So, when people get the meeting invitation email, it shows the time in their local time zone. They don’t have to do any math to figure out when to join.
I also recommend mentioning the time zone in your WordPress forms and emails. Say something like “Meeting starts at 2 PM Eastern Time” so people know what to expect.
You can also create multiple meetings for different time zones. Run the same webinar twice – once for Europe and once for Asia, for example.
Many successful businesses do this to accommodate their global audience. It takes more work, but it shows you care about all your customers.
Final Verdict: Is it Worth Connecting Zoom to WordPress with Uncanny Automator?
Yes, this is the best way to bring your meetings and webinars from Zoom to your WordPress dashboard.
Setting up Zoom integration with WordPress used to be a huge pain. I remember spending entire weekends trying to get everything working properly.
But now with Uncanny Automator Pro, the whole process takes at most an hour. You can have people automatically join your meetings and webinars without any manual work from you.
Think about what this means for your business. No more copying and pasting email addresses. No more forgotten registrations. No more frustrated customers waiting for meeting links.
Plus, your visitors get a smooth, professional experience. They fill out one form, and everything happens automatically. That’s the kind of service that builds trust and loyalty.
You can also scale this system as your business grows. Add more meetings, create member-only access, or set up purchase-based webinars. The automation handles it all.
I’ve seen clients go from spending 10 hours a week on meeting management to just 30 minutes. That’s time you can spend on creating better content or growing your business.
Here’s what I recommend you do next:
Start with one simple automation. Pick either the contact form for meeting registration or the webinar setup. Get that working perfectly before you add more complexity.
Test everything thoroughly with your information first. Make sure you receive all the emails and that you appear in your Zoom participant lists.
Once you’re confident it’s working, promote it to your audience. Let people know about your new automated meeting system. You’ll be amazed at how much this improves your business operations.
If you need more WordPress automation tools, check out this article on 7+ Best Zapier Alternatives That Save You Money (Free + Paid).
Apart from that, here are more articles you may be interested in reading.
These posts will help you streamline your workflow better with automation tools for different things and projects. This can help you save time, which you can focus on actually growing your business.
منبع: https://www.isitwp.com/how-to-integrate-zoom-meetings-and-webinars-on-wordpress/
