I’ve managed WordPress sites for over a decade, and speed and performance have always been my biggest headache.
You will agree that watching potential customers leave because of slow page loading before seeing your offer is always frustrating.
From experience, the hosting provider accounts for around 60% of your website’s speed performance. The remaining 40% depends on how well the site is optimized.
So, the first step for me is always to get a reliable, fast, and top hosting service. Then, optimize the site through image compression and caching to improve performance.
One of the best ways to optimize your site is by setting up a CDN. Case in point: at IsItWP, we now use Cloudflare’s CDN on all our projects.
We made this shift because relying on hosting alone is no longer enough. Visitors expect instant loading, no matter where they are in the world.
We settled on Cloudflare because it helps us serve cached versions of our pages from data centers closest to the visitor. This means faster loads, lower server strain, and better uptime.
As a result, our speed boost is great every single time.
But here’s the thing.
Most beginners get lost in Cloudflare’s setup process. The dashboard can feel overwhelming at first, especially if you’re not tech-savvy.
Besides, don’t words like cache, purge, API tokens, and edge servers scare you senseless?
Jargon aside, one wrong setting can break your site. I learned this the hard way when I accidentally took down IsItWP during my first attempt to set up CloudFlare. I had to reach out to support for help.
I created this guide on how to set up CDNs so that you do not experience the same thing.
So, I’ll walk you through every step of setting up Cloudflare’s free CDN on WordPress so your site will load faster and perform better.
Key Points You’ll Learn:
- What a CDN is and why your WordPress site needs one
- How to sign up for Cloudflare’s free account safely
- Step-by-step nameserver changes in Bluehost
- Setting up essential page rules to protect your admin area
- Installing and configuring the official Cloudflare plugin
- Best practices to keep your site running smoothly
Now, since this is a detailed tutorial, you can also use the table of contents below to skip any section you want to read.
With that said, let us get into this CDN tutorial.
What Is a CDN?
In short, CDN stands for Content Delivery Network. As mentioned, when you use a CDN, your website content is copied to different servers worldwide.
So, when someone visits your site, they get the copy closest to them. This makes your pages load much faster.
Still don’t get what CDNs are?
Here’s how it works in simple terms.
Let’s say your website is stored on your hosting on a server in New York. A visitor from Australia has to wait for data to travel halfway around the globe.
This, without a doubt, takes time. Plus, it creates a slow experience for your website visitors.
With a CDN, your content is saved on multiple servers worldwide. Australia, Europe, Asia – you name it. Now your Australian visitor gets your content from a server closest to their location.
The result? Your website pages load in seconds.
Why WordPress Sites Need CDNs
WordPress sites are heavy by nature. They have images, CSS files, and JavaScript. All these files must load before visitors see your site in their browser.
Without a CDN, this process can be painfully slow. I tested this on one of my sites. Before using a CDN, my homepage took 8 seconds to load from overseas.
After setting up Cloudflare, the speed dropped to just 2 seconds. That’s a massive improvement!
As you probably know, speed affects everything on your site. That’s right, Google ranks faster sites higher in search results.
Also, don’t you enjoy staying longer on websites that load quickly? Your visitors are the same. The better their experience on your site, the longer they stay, leading to a better dwell time. This is a big advantage for SEO.
To add icing on the cake, cold, hard data shows faster sites convert better. That means more page speed equals more sales.
Now that you understand what CDNs are, let’s look at CloudFlare, one of the best free and premium options.


Cloudflare is much more than just a CDN provider. They offer a complete suite of website optimization tools.
Think of the company as your site’s protective shield and speed booster all rolled into one. Their main services include content delivery, DNS management, and security protection.
The CDN speeds up your site by caching content globally, and its DNS service makes your domain resolve faster. On top of that, they block malicious traffic before it reaches your server.
The best part is that even their free plan includes features other CDN companies charge for. It’s like getting premium service without the premium price tag.
Why Cloudflare’s Free CDN Stands Out
Cloudflare offers one of the best free CDN services on the market. Their free plan includes a global network of servers. Plus, you get basic security features like DDoS protection.
The best part is that CloudFlare offers unlimited bandwidth, especially given that most other free CDNs have strict limits. Plus, even on the free plan, the setup process is straightforward once you know the steps.
Step-by-Step Guide to Setting Up Cloudflare Free CDN
Now, before you set up Cloudflare, there are certain things you should have ready. Let’s discuss them.
Setting up Cloudflare isn’t complicated, but you need to be ready with a few things first.
- Domain registrar account: This is where you bought your domain name. I’m using Bluehost for this tutorial since they’re both a hosting provider and a domain registrar. That, and their dashboard is beginner-friendly.
- WordPress Admin Access: You’ll need full control over DNS settings to swap nameservers to Cloudflare. Apart from that, you can install the CloudFlare plugin and change it to simplify customization of your CDN.
- A Site Backup: While there’s no cause for alarm, I always recommend backing up your WordPress site before making any major changes. For this, I recommend Duplicator Pro. You can create a complete site backup with just one click.
Once you have everything ready, the actual setup takes less than 15 minutes. The waiting time for nameserver propagation is what takes longer, taking between 24 and 48 hours.
But that happens automatically in the background. With that out of the way, let me walk you through how to set up CloudFlare as your CDN service step by step.
Step 1: Sign Up for a Cloudflare Account
Getting started with Cloudflare is straightforward.
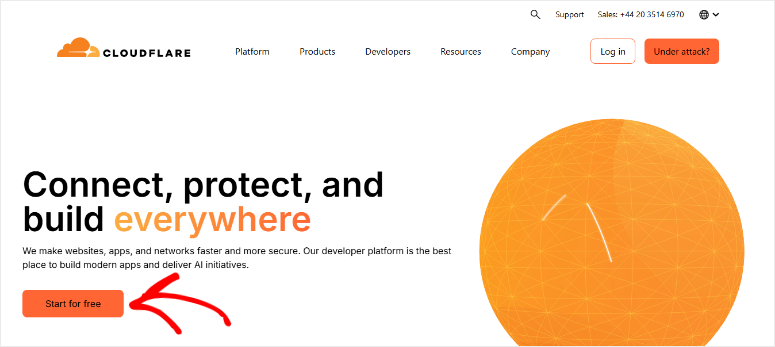
Head to the Cloudflare website and hit the “Start for free” button. It’s usually prominently displayed on their homepage.

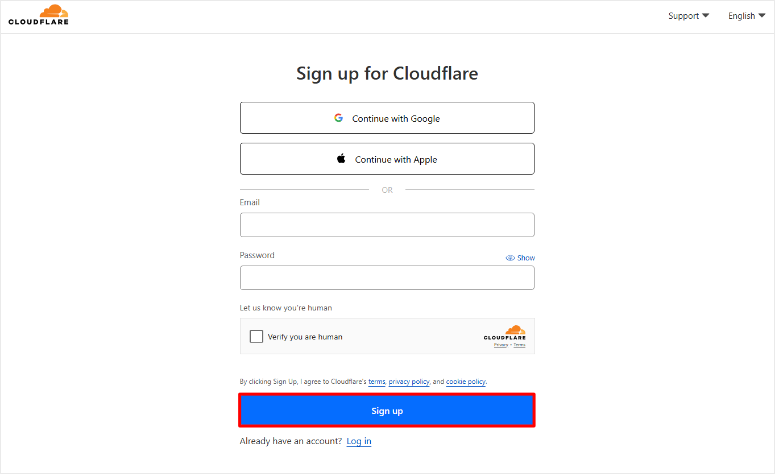
On the next page, you have three options for creating your account. You can use your email and create a password the traditional way.
Alternatively, Cloudflare offers quick signup through Google or Apple accounts. This allows you to choose whichever method you prefer.
After entering your details, hit the “Sign Up” button to get started with registration.

Once you have completed this, Cloudflare will send you a verification email if you used the email option.
Check your inbox and hit the confirmation link. If you do not see the email, check your spam folder if the email doesn’t appear right away. Once verified, you’ll land on the Cloudflare dashboard.
The first thing I noticed was that the dashboard is clean and well-organized.
The main navigation sits on the left side of the screen. Here, you’ll see options like Account Name, Discovery, Analytics & Logs, and many more.
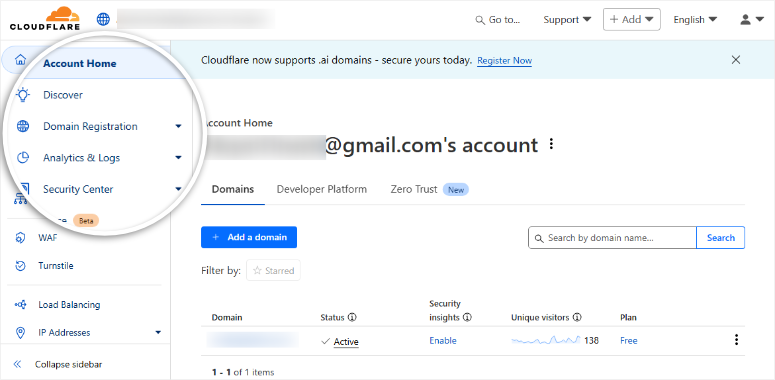

Apart from that, the dashboard shows helpful tips for getting started for new users.
Step 2: Add Your Domain and Configure CloudFlare DNS Settings
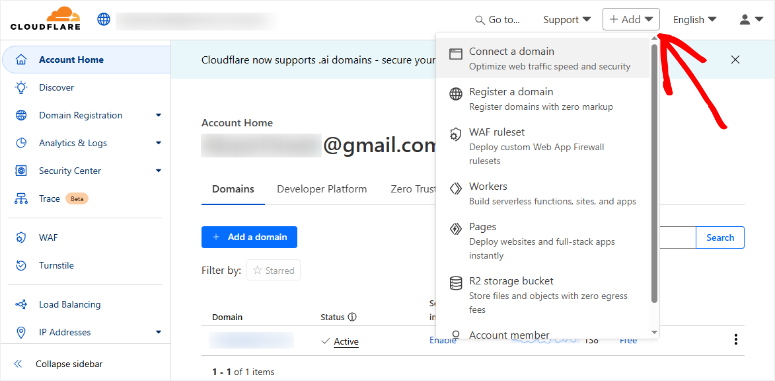
Now comes the important part – connecting your website to Cloudflare. To do this, select the “+Add” button in the top right corner of your dashboard.
Then, from the dropdown, select Connect a Domain.

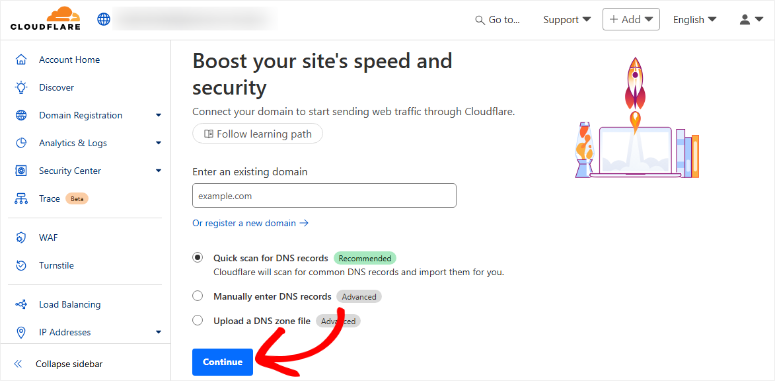
On the next page, you’ll see a simple form asking for your domain name. Type in your website’s domain exactly as visitors would type it.
But remember not to include “www” or “https” – just the root domain like “yoursite.com”.
Plus, make sure to tick the Quick scan for DNS records checkbox to allow Cloudflare to scan common DNS records and automatically import them for you.
This is especially helpful for beginners as it prevents accidentally breaking your site’s connection.
Once done, hit “Continue” and give Cloudflare a few seconds to scan your current setup.

Choosing Your Plan
Next, Cloudflare presents you with its pricing plans. You’ll see several options ranging from free to enterprise levels.
For this tutorial, we’re sticking with the free plan as it includes everything most WordPress sites need.
The free plan gives you access to their global CDN network, basic DDoS protection, and SSL certificates. As we hinted earlier, there are no bandwidth limits, which is incredibly generous for a free service.
On this page, hit Continue to proceed with the free plan. You can always upgrade later if your site grows and needs advanced features.
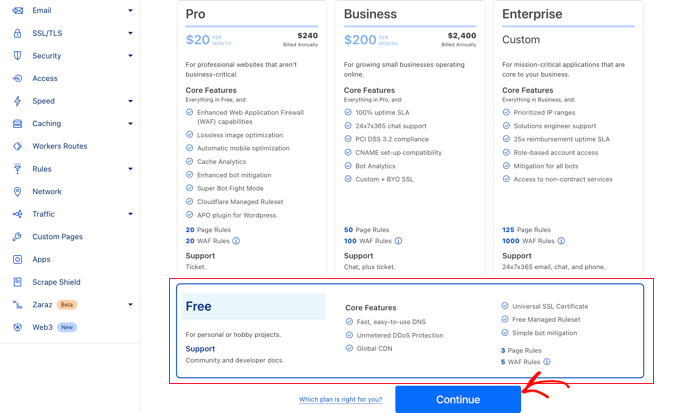

Apart from that, Cloudflare makes it easy to switch plans at any time from your dashboard.
Updating Nameservers in CloudFlare
After selecting your plan, Cloudflare shows you a list of DNS records they found. These are like a map that tells the internet where to find your website, email, and other services linked to your domain.
I should point out that records with orange icons will use Cloudflare’s network while gray icons bypass Cloudflare entirely.
So, to confirm the connection with CloaFlare CDN servers, make sure your main domain shows an orange icon.
Then, check that important subdomains like “www” also have orange icons. On top of that, leave any email-related records as gray to avoid mail delivery issues.
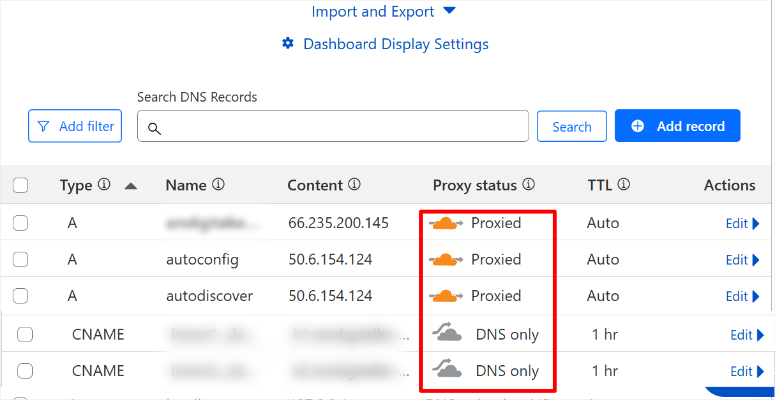

When everything looks correct, hit “Continue to Activation.” Cloudflare will then show you two nameserver addresses.
These are the crucial pieces you need to update with your domain registrar. Copy these exactly as shown.


Step 3: Update DNS in your Hosting Account
Now let’s move to the hosting provider dashboard. As mentioned, we will be using Bluehost for this tutorial.
Check out this updated Bluehost review to learn everything about this hosting provider. Thinking of another host solution? Check out this list of hosting providers reviewed and ranked.
I list some of the best hosting solutions for small businesses.
Now, I recommend you keep both tabs for CloudFlare and your Bluehost account open so this setup is easier. You’ll need these addresses in the next step.
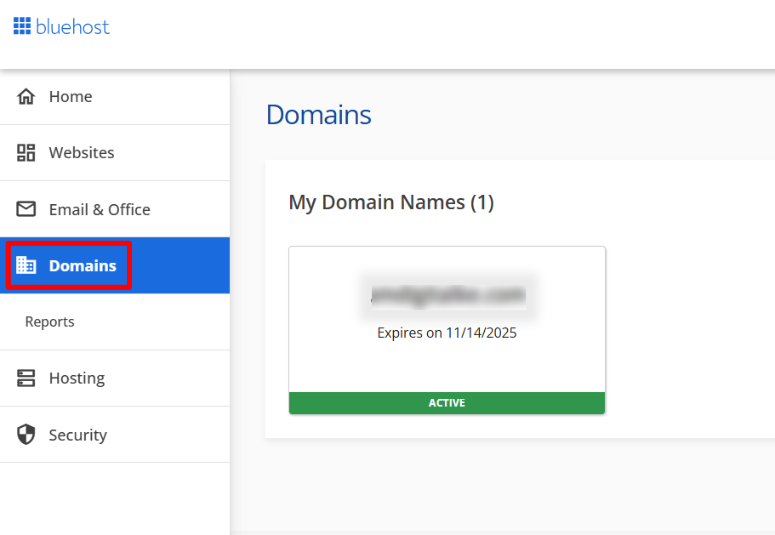
Now, log in to your Bluehost dashboard and navigate to the Domains section. This is usually found in the main menu or dashboard tiles. Here, find your domain in the list and select it.

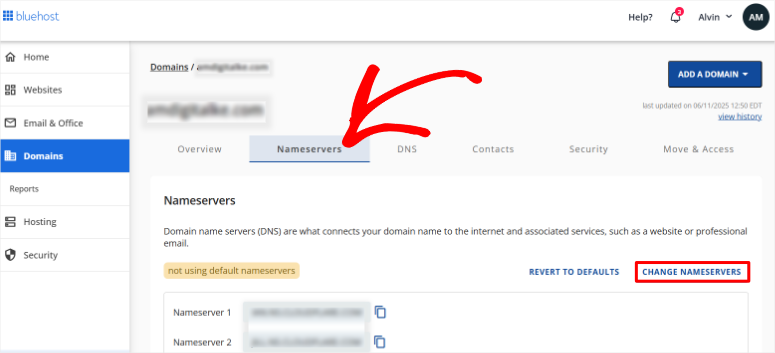
Then, on the next screen, go to the Nameservers tab. Here you will find your current Nameservers added as: Nameserver 1 and Nameserver 2. Select Change Nameservers to proceed.

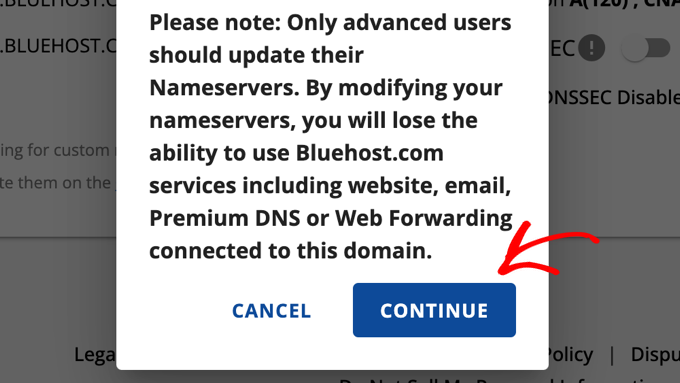
Bluehost will show a pop-up asking if you’re sure about making changes. This is normal – they want to ensure you understand what you’re doing. Select “Continue” to proceed.

Next, you’ll see a form with two fields for nameserver addresses. Delete the existing nameservers and enter the ones Cloudflare provided.
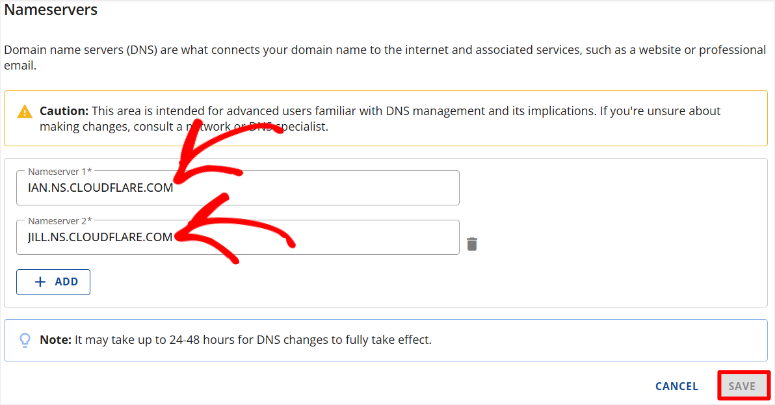

Plus, they’ll show a message about propagation time taking up to 24 hours.
After this, return to your Cloudflare setup page and hit “Check nameservers now”. Cloudflare will verify that you’ve made the changes correctly.
On top of that, they’ll start monitoring your domain automatically. Once done, select the Continue button to finish the setup.
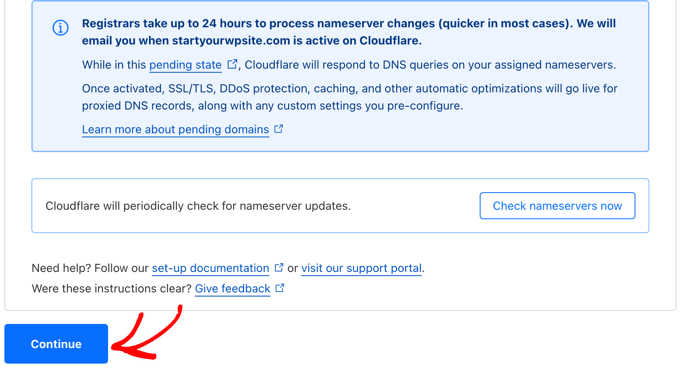

Well done! You can now change your DNS from your host to a CDN like CloudFlare. At this point, your site should be faster and better optimized.
But we won’t stop there. Next, let us look at how to configure page rules.
Configure Essential Page Rules
Setting up page rules is a crucial step that many beginners skip. These rules tell Cloudflare how to handle different parts of your website.
Plus, they prevent caching issues that could break your WordPress admin area.
The good news is that Cloudflare’s free plan includes three page rules. That’s exactly what you need for a basic WordPress setup.
On top of that, creating these rules takes just a few minutes once you know what to do.
Let me show you how:
In your Cloudflare dashboard, go to Rules » Create Rule.


Cloudflare will show you a form with several options. Apart from that, they provide helpful tooltips explaining what each setting does.
Then in the popup, you will see options like Response Header Transform Rules, Origin Rules, Compression Rules, and more.
For this demonstration, I will show you how to create Cache Rules.


On the next page, you have premade templates to Cache Everything, Bypass Cache for Everything, and Cache Default File Extensions. These options help you simplify the cache rules, so all you have to do is deploy them.


But to manually create Cloudflare cache rules, simply scroll below the templates. Here, you will first see checkboxes for Custom Filter Expression and All incoming requests.
So let us create a rule for Cloudflare to bypass our “WordPress admin area.” This will allow you to work in the backend without triggering Cloudflare verification.
First, check the Custom Filter Expression box. Then, in the “Page URL” field, enter your admin URL followed by an asterisk (*).
For example, if your site is “yoursite.com”, you’d enter “yoursite.com/wp-admin*”. The asterisk tells Cloudflare to apply this rule to all admin pages.
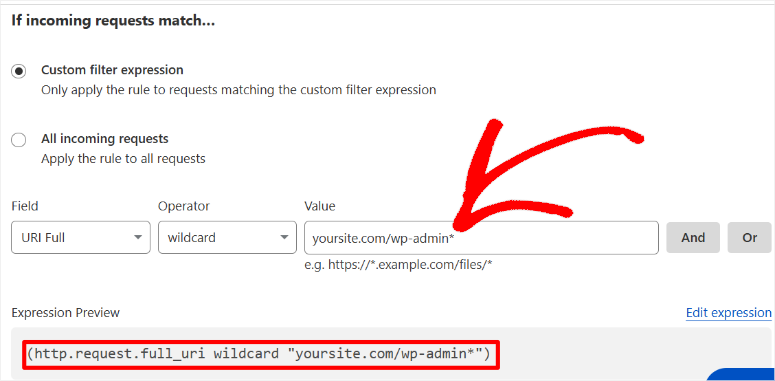

Then check the box Bypass Cache below this. After this, you can “Add Settings” under Browser TTL, an optional step. Finally hit Deploy, and you are done.
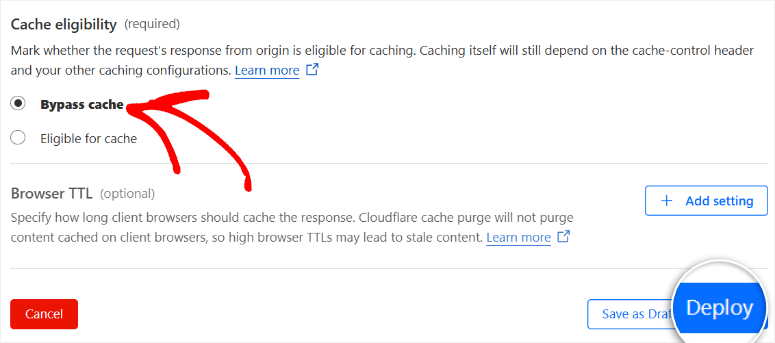

Creating other rules for Cloudflare follows a similar process, ensuring a small learning curve.
Cloudflare will activate the rule immediately. On top of that, you’ll see it listed in your page rules dashboard with an “Active” status.
This page rule solves the most common Cloudflare issues with WordPress. I’ve seen too many beginners struggle because they skipped this step.
Plus, it only takes a minute to set up, but it saves hours of troubleshooting later.
That is it for CloudFlare rules. Now, let us look at how to set up the CloudFlare WordPress plugin.
Install and Configure the Cloudflare WordPress Plugin
Cloudflare offers an official WordPress plugin to help you manage your CDN settings easily. The plugin connects directly to your Cloudflare account, making it an easier method to handle the CDN features.
On top of that, it includes security features that enhance your site’s protection.
To get started, go to the CloudFlare plugin page and download it. You can also find it on WordPress.org or in your WordPress plugin repository.
After this, install and activate the Cloudflare plugin on your website. If you face any issues, see our step-by-step guide on how to install a WordPress plugin.
Connecting Your API Key
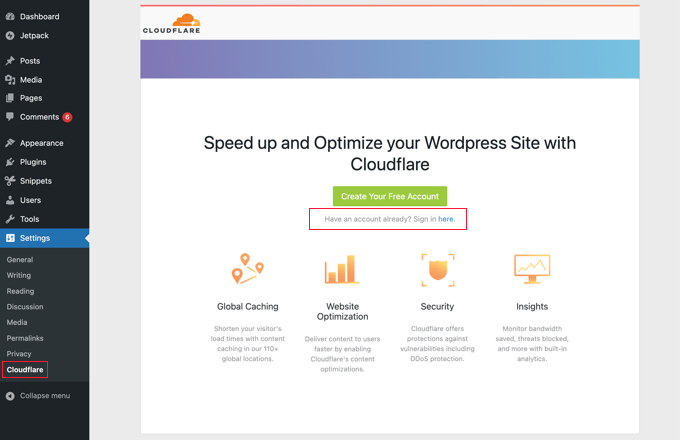
After activating the plugin, go to Settings » Cloudflare in your WordPress dashboard. Here, hit “Sign in here.”

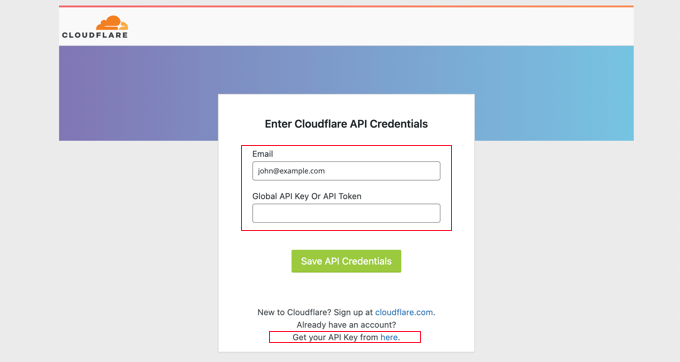
The plugin will ask for your Cloudflare email address and API key. If you don’t know where to find this key, select “Get your API key from here,” and CloudFlare will redirect you to your API key on another tab.

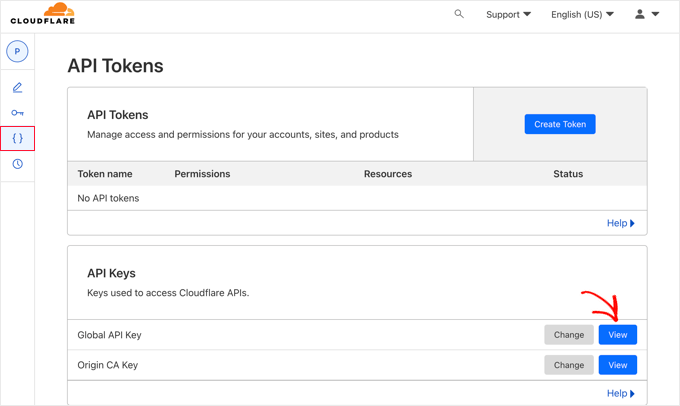
Then, on this new tab, select the API Tokens tab in the left sidebar and click on it.
After this, scroll down to find the “Global API Key” section. This is different from API tokens and provides full account access. Hit the “View” button next to the Global API Key option.

Cloudflare will then ask you to enter your account password for security.
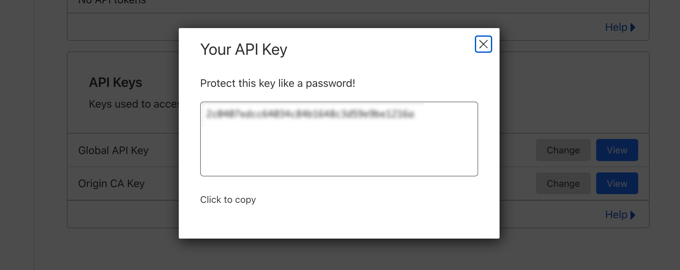
After confirming your password, your API key will appear in a pop-up window. I like that you get a convenient copy button to grab the key quickly.

Back in WordPress, enter your Cloudflare email address in the first field. Then paste your API key into the second field. Then, hit Save API Credentials to establish the connection.
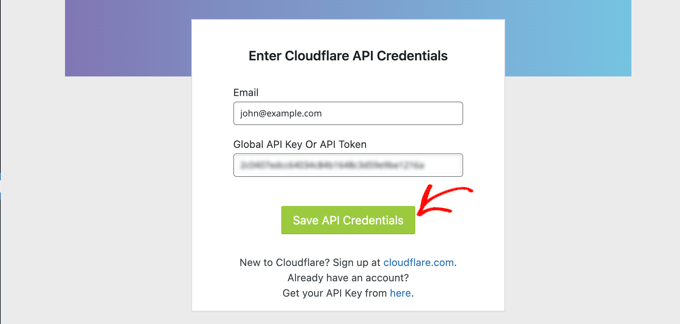

The plugin will verify your credentials with Cloudflare’s servers. Finally, you should see a success message confirming the connection worked.
Applying Recommended Settings
Once connected, the Cloudflare plugin displays your website’s current settings. You’ll see options for caching, optimization, and security features.
On top of that, the plugin provides recommended settings specifically optimized for WordPress.
Then, select “Apply” in the Apply Default Settings tab. This automatically configures Cloudflare with WordPress-optimized defaults.
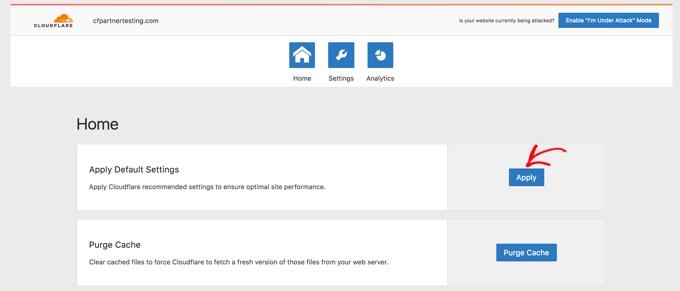

The recommended settings include appropriate caching levels for different content types. Plus, they enable useful features like automatic cache purging when you update posts.
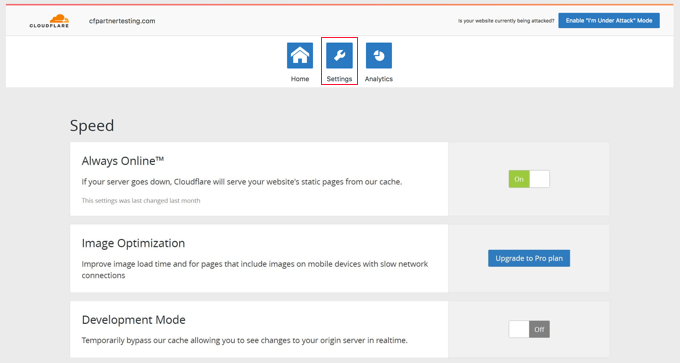
After applying the recommended settings, go to the “Settings” tab for additional optimization features you can enable. Use the toggle button to enable Always Online.
This way, if your server is down, CloudFlare will show your visitors static cache pages instead.

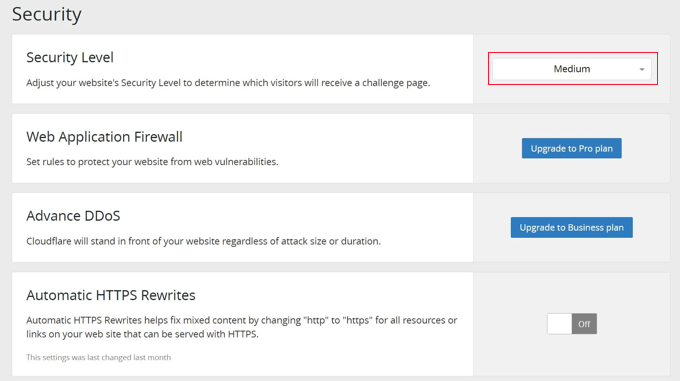
Next, scroll down the page to find CloudFlare security options to protect your site further.
The security level is set to “Medium” by default, and I recommend you leave it like that if you have a simple blog or a small website.
Setting it to High can lead to too many security prompts, which can reduce user experience. But it’s a small price to pay for significantly better protection against attacks for larger sites.

On top of that, the plugin automatically handles cache purging when you make content changes. This means your visitors always see the latest version of your pages.
You can also manually purge the cache anytime using the plugin’s dashboard.
Congratulations! You can now set up CloudFlare CDN both on its dashboard and in WordPress with its plugin.
Use the IsItWP free website speed test tool and our site downtime check to confirm if CloudFlare actually helped improve performance.
Cloudflare Premium Plans and Advantages
Now, as you have seen above, CloudFlare Free is quite useful. But what if you want to use a Pro version?
In this case, Cloudflare offers paid plans starting at $20 per month. These unlock advanced features such as better image optimization and mobile acceleration, plus, you get priority support when issues arise.
The premium plans include advanced security rules, meaning you can block specific countries or IP addresses.
This can be particularly important if you target people from a specific region or want better spam protection.
On top of that, you get detailed performance analytics. These show exactly how much faster Cloudflare makes your site.
Who Should Consider Cloudflare Premium?
eCommerce sites benefit most from premium Cloudflare plans. The advanced security features protect customer data better. The extra speed optimizations boost conversion rates and user engagement.
Besides eCommerce stores with complex designs, all high-traffic websites can benefit from CloudFlare’s premium features.
For example, businesses in competitive industries should consider upgrading. The performance edge can make the difference between winning and losing customers.
But for most WordPress beginners, the free plan is perfect. You can always upgrade later as your site grows.
Other Ways to Speed Up Your Site
CDNs aren’t the only way to boost WordPress speed. Here are other ways to optimize your WordPress site:
- Caching Plugins: You can also use caching plugins like WP Rocket. If you want to learn more about this cache plugin, check out my WP Rocket review.
- Image Compression: You can use image optimization tools, such as EWWW Image Optimizer, to shrink file sizes.
- Good Hosting: I always recommend quality hosts for better performance. But it depends on the kind of website you have set up.
- Fast Themes: Choose a lightweight theme to help keep your site’s load speed fast. Heavy themes slow everything down, even with the best optimization.
At the end of the day, here’s the simple truth:
CDNs give you the biggest speed boost with the least effort. Plus, they work alongside all these other optimization methods. So, for the best results, you can combine different site optimization techniques.
I hope you have enjoyed learning about how to set up CDNs and CloudFlare in particular. If anything is unclear, check out my commonly asked questions below.
Frequently Asked Questions
Can Websites Work Without a CDN?
Yes, websites can work without a CDN. But as mentioned, it can frustrate your visitors. Especially when you consider you’re losing potential customers to faster competitors.
How long does it take for Cloudflare to start working?
This depends on your nameserver propagation time. In my experience, most domains start working within 2-4 hours after changing nameservers. But it can take up to 48 hours for full global propagation.
Will Cloudflare slow down my WordPress admin area?
No. Not if you set it up correctly. But to be sure, you can create that page rule for your admin dashboard. This ensures Cloudflare does not cache your admin pages since it can cause unusual issues, such as old content appearing or login problems.
Can I use Cloudflare with any hosting provider?
Yes, absolutely. Cloudflare works with any hosting provider because it sits between visitors and servers. I’ve set up Cloudflare with Bluehost, SiteGround, WP Engine, and dozens of other hosts. The process is always the same – you just change your nameservers.
What happens if I want to remove Cloudflare later?
Removing Cloudflare is simple. Just change your nameservers back to your original hosting provider’s nameservers. I keep a record of the original nameservers before switching to Cloudflare. But not to worry, most hosting providers also email you this info when you first sign up.
Is the free plan enough for most websites?
Yes, that’s a solid yes for most small businesses and personal websites. The free plan gives you the CDN, basic security, and SSL certificates. That covers the main speed and security needs for most WordPress sites.
Final Verdict: Is Setting Up CloudFlare Important?
After setting up CDNs on more WordPress sites than I can count, I can honestly say it’s one of the best decisions for website owners.
The speed improvements are real and noticeable. Most of my clients see page load times drop by 30-50% after setup.
That’s a huge win for user experience and SEO rankings. I recommend Cloudflare’s free CDN if you:
- Have a WordPress site that feels slow to load
- Want better security without paying monthly fees
- Need SSL certificates, but your host provides them as a premium add-on
- Serve visitors from different countries or regions
- Want to reduce server load and bandwidth usage
In the end, your visitors will notice the difference immediately. Pages that used to crawl will now snap into view. Plus, that smooth, professional experience builds trust and keeps people on your site longer.
Now, check out my complete guide on how to boost speed and performance.
Apart from that, here are other articles you may be interested in reading.
These articles will walk you through the best CloudFlare alternatives and show you other tools and techniques to optimize your WordPress site.
منبع: https://www.isitwp.com/how-to-set-up-a-free-cdn/
